Photopea is a free, web-based photo editing software that supports RAW image formats such as .DNG, .NEF, CR2, and .ARW. RAW images are popular among photographers as they contain raw, uncompressed data from a camera sensor, which can be processed in various ways to generate different regular images. When a user opens a RAW file in Photopea, they can adjust parameters such as white balance, exposure, and contrast. However, Photopea's RAW editor has limited controls compared to Adobe Camera RAW, lacking independent adjustment capabilities for blacks, whites, highlights, shadows, clarity, and texture.
| Characteristics | Values |
|---|---|
| File formats supported | DNG, .NEF, CR2, .ARW |
| Adjustable properties | White balance, Tint and Temperature, Exposure, Contrast |
| Other tools | Healing, Crop, Auto-adjust, Curves, Exposure, Contrast, Brightness, Highlights, Shadows, B & W tool, Temp, Tint, Vibrance, Saturation, Clarity, Vignette, Lens correction, Perspective |
What You'll Learn
- Photopea supports .DNG, .NEF, CR2, .ARW and other raw formats
- You can adjust properties like White Balance, Tint, Temperature, Exposure and Contrast
- Photopea will generate a regular image from your raw file, and open it as a new PSD document
- Photopea has a RAW photo editor, but it's missing some features
- You can open a raw file in Photopea by clicking File > Open
![]()
Photopea supports .DNG, .NEF, CR2, .ARW and other raw formats
Photopea supports a wide range of raw formats, including .DNG, .NEF, CR2, and .ARW files. This means that if you have a modern camera that saves images in RAW formats, you can easily open and edit these files using Photopea.
RAW files are unprocessed and uncompressed image files that offer greater flexibility in editing compared to JPEGs. They contain more data, including the original, unprocessed pixels from your camera's image sensor, allowing you to make adjustments to white balance, tonal range, contrast, colour saturation, and sharpening.
When you open a RAW file in Photopea, you will see your photo along with a histogram of colours. You can then adjust various properties such as white balance (with tint and temperature sliders), exposure, and contrast. Once you're happy with the adjustments, you can choose to open the photo in Photopea for further editing or quickly convert it to a JPG file.
In addition to supporting .DNG, .NEF, CR2, and .ARW formats, Photopea also works with other raw formats used by different camera manufacturers. This versatility makes Photopea a powerful tool for photographers who want to get the most out of their RAW images without being limited by their camera brand or model.
Photopea's support for RAW formats gives photographers more control over their images and allows them to enhance their photos before printing or using them on the web. With Photopea, you can unlock the full potential of your RAW images and take your photography to the next level.
Unlocking Camera Raw: Preview Power
You may want to see also
![]()
You can adjust properties like White Balance, Tint, Temperature, Exposure and Contrast
Adjusting the white balance, tint, temperature, exposure, and contrast of your photos is crucial to achieving the desired look and feel. These settings allow you to modify your images and enhance their overall quality. Here's a detailed guide on how to adjust these properties in Photopea:
White Balance:
White balance is the process of setting your images to neutral, ensuring that whites appear white without any unwanted tints. This adjustment is essential for achieving realistic colours in your photographs. In Photopea, you can adjust the white balance by going to "Image" > "Adjustments" in the top menu. Here, you will find options such as "Color Balance" or Hue/Saturation to fine-tune the colours in your image. Additionally, you can use the Auto option on the "Basic" tab to let Photopea analyse your image and apply automatic tonal adjustments.
Tint:
Tint adjustment is particularly important when dealing with artificial lighting conditions. A tinted light can disturb the white balance of your image. In Photopea, you can adjust the tint by going to "Image" > "Adjustments" and then selecting the Hue/Saturation option. This will allow you to fine-tune the colours and reduce any unwanted colour casts.
Temperature:
Colour temperature is measured in degrees Kelvin and varies for each light source. Higher temperatures result in a bluer light source, while lower temperatures produce a warmer, orange hue. In Photopea, you can adjust the temperature by going to "Image" > "Adjustments" and then playing around with the Color Balance settings. Increasing the temperature will add a cooler, bluer tone to your image, while decreasing it will make it warmer and more orange.
Exposure:
Exposure adjustments can be made in Photopea by navigating to "Image" > "Adjustments" and experimenting with options such as Levels or Curves. These adjustments will allow you to modify the brightness and tonal range of your image, creating the desired exposure.
Contrast:
Contrast adjustments can also be found under "Image" > "Adjustments". Play around with the "Brightness/Contrast" settings or explore more advanced options like Shadows/Highlights to enhance the contrast in your image.
By understanding and manipulating these properties in Photopea, you can take control of your image editing process and create stunning visuals that match your creative vision.
Charging Your Fujifilm Camera Battery: Alternative Methods
You may want to see also
![]()
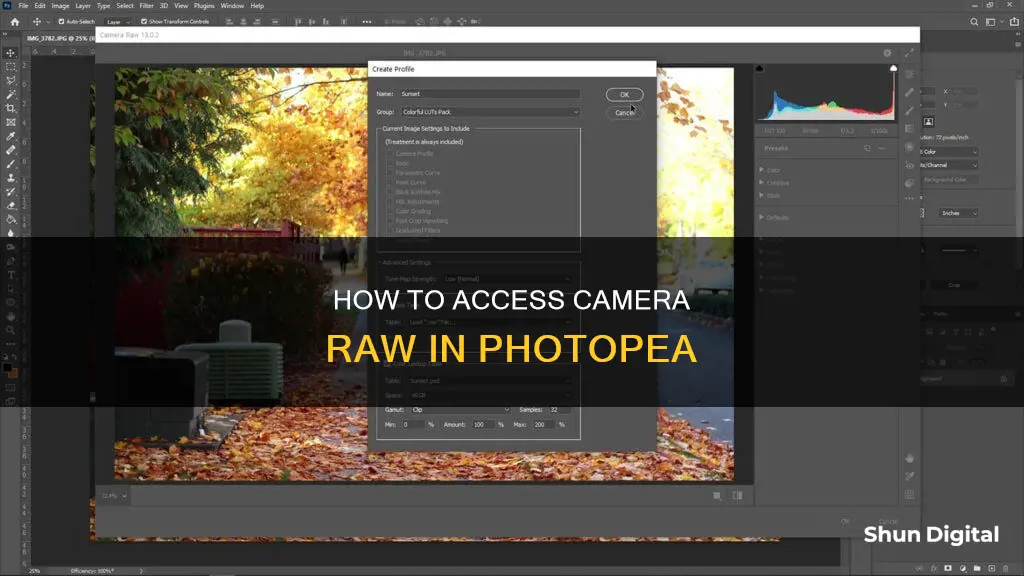
Photopea will generate a regular image from your raw file, and open it as a new PSD document
Photopea is a free web-based photo editing software that can be used to open and edit RAW image files. RAW image files are popular among photographers as they contain raw information from the camera sensor, which can be processed in many ways to generate different regular images. Photopea supports the DNG format of raw images, and when a user opens such a file, they will see the Raw Photopea window where they can change some additional parameters.
Once a user is satisfied with the adjustments made to their RAW image, they can click "OK", and Photopea will generate a regular image from the raw file and open it as a new PSD document. This PSD document can then be further edited using the various tools available in Photopea, which has a user interface similar to that of Photoshop.
In addition to the DNG format, Photopea also supports other RAW formats such as .NEF, CR2, and .ARW. When opening a RAW file in Photopea, users will see their photo along with a histogram of colors, and they can adjust properties such as white balance, exposure, and contrast.
While Photopea offers a range of features similar to Photoshop, it is important to note that it is slower than working on a hard drive application due to its web-based nature. This can make it challenging to be precise with brush tools as the mouse movement may become jittery and slow.
Is Your Camera Battery Charged? Check This Way
You may want to see also
![]()
Photopea has a RAW photo editor, but it's missing some features
Photopea is a free, web-based photo editor that supports various RAW formats, including .DNG, .NEF, CR2, and .ARW. It offers a range of features, such as white balance adjustment, exposure, and contrast control, as well as healing and cropping tools. However, compared to more advanced RAW editors like Adobe Camera RAW, Photopea's RAW editing capabilities are limited.
While Photopea provides basic RAW editing tools, it lacks certain features found in other software. Notably, Photopea does not allow independent adjustment of whites and blacks, nor does it offer sliders for clarity, texture, or dehaze effects. Additionally, it misses some of the most recent AI-based tools for more precise and advanced editing. The lack of these features may be a drawback for photographers seeking more control over their RAW image adjustments.
Photopea's RAW editor has similarities to Adobe Camera RAW in terms of interface and tool placement, making it relatively easy to navigate for those familiar with Photoshop. However, the web-based nature of Photopea can lead to slow performance and lag, especially when using brush tools. This can result in a loss of precision and a frustrating user experience, particularly for intricate editing work.
Despite its limitations, Photopea's RAW editor can be useful for quick edits and basic adjustments. It is a good option for photographers who need a simple and accessible tool for minor corrections without the need for advanced features. However, for more serious photo editing, other software with more comprehensive RAW editing capabilities may be required.
Photopea's RAW editor, while convenient and free, may not satisfy photographers seeking extensive control over their RAW image adjustments. Its limitations in features and performance highlight the trade-offs inherent in free web-based photo editing software.
Formatting Micro SD Cards: A Step-by-Step Guide
You may want to see also
![]()
You can open a raw file in Photopea by clicking File > Open
Opening a raw file in Photopea is a simple process. To get started, go to www.photopea.com. Once you're on the website, click "File" and then "Open" to locate the raw file on your device. Photopea supports a variety of raw formats, including .DNG, .NEF, CR2, and .ARW.
After opening your raw file, you will see your photo along with a histogram of colors. This is where you can make adjustments to the image. You can modify several properties, such as the white balance, tint, temperature, exposure, and contrast.
Once you're happy with the adjustments, you have two options. You can either press "Open" to continue editing the photo in Photopea, or you can press the "JPG" button to quickly get a JPG version of your photo.
It's worth noting that Photopea is a web-based application, so you don't need to download anything to use it. However, this also means that the performance of the application can be impacted by your internet speed.
Finding the Chevy Camaro's Battery: Location and Access
You may want to see also
Frequently asked questions
RAW files contain raw information from a camera sensor and need additional processing before they can be printed or used on the web.
Photopea supports the DNG format of raw images as well as .DNG, .NEF, CR2, .ARW and other raw formats.
You can adjust several properties, such as White Balance (with a Tint and Temperature slider), Exposure or Contrast.