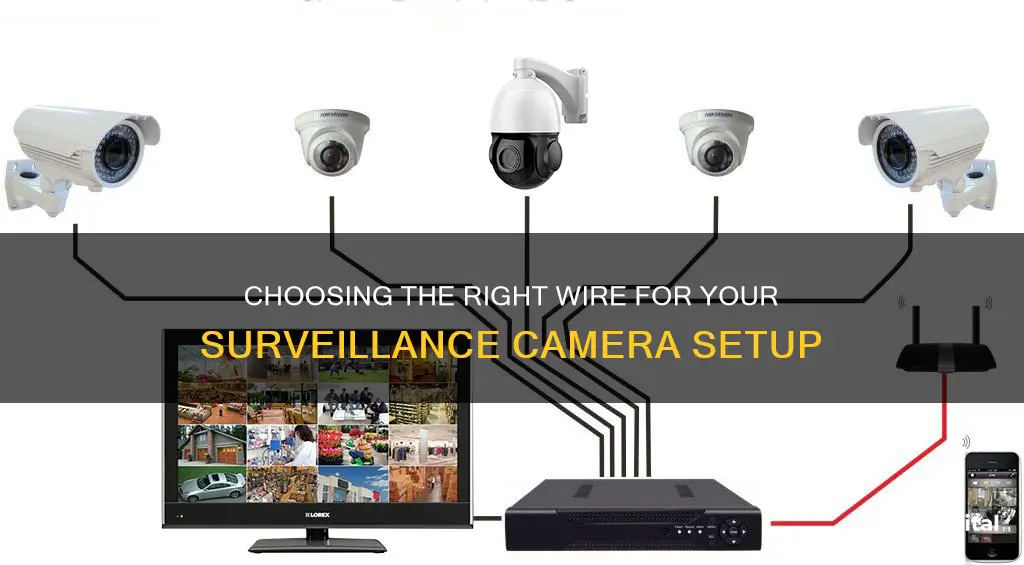
Running wires for surveillance cameras can be a challenging task, but with careful planning and the right tools, it can be done efficiently and safely. The first step is to determine the type of camera system being used, such as HD over coax or IP camera systems, as this will dictate the type of wires needed. For instance, IP camera systems typically use CAT5/6 cables, while HD over coax systems use RG-59 siamese coax cables. The placement of the cameras is also crucial, ensuring clear lines of sight and considering potential blind spots. When running wires outdoors, it's important to use weatherproof cables and protect them with conduit or clips to prevent damage and tampering. Proper measurement and cutting of wires are essential, and sealing connections ensure reliable performance. Running wires through walls or along the exterior of a building requires careful drilling and the use of cable clips to secure the wires. Finally, testing the camera setup is crucial to ensure all connections are correct and the cameras are functioning properly.
| Characteristics | Values |
|---|---|
| Cable Type | Cat 5/6 Ethernet Cable, Coaxial Cable, Plug and Play Cable, Siamese Cable, RG-59 Cable |
| Cable Function | Transmit video data, power certain camera types, transmit unprocessed video signals |
| Cable Flexibility | Flexible and thin cables are easier to install |
| Cable Length | Maximum distance of 330 feet without voltage drop concerns |
| Cable Cost | Plug and play cables are more expensive |
| Cable Connections | F type plug, Bayonet Neill-Concelman (BNC) connector, Threaded Neill-Concelman (TNC) connector, N-type connector, Radio Corporation of America (RCA) connector, Direct Current (DC) connector, Registered Jack (RJ45) connector |
| Cable Protection | PVC or metal conduit, wire guards, security camera wire cage |
What You'll Learn
- Planning: Determine the camera location, distance from the recording device, wire length, and potential obstacles
- Wiring options: Choose between Wi-Fi and Ethernet connections, considering speed, reliability, and cost
- Prepping wires: Measure, cut, strip insulation, clean wire ends, and label wires
- Running wires: Drill holes, thread wires, and secure with clips or conduit for protection
- Sealing and protection: Seal holes with silicone, and use surge protectors to safeguard against lightning strikes
![]()
Planning: Determine the camera location, distance from the recording device, wire length, and potential obstacles
Planning is a crucial step in ensuring your surveillance system is effective and efficient. Here are some detailed instructions and considerations for planning your camera setup:
Camera Location
Start by identifying the areas you want to monitor and determining the desired field of view for each camera. Consider any blind spots, and try to position cameras to maximise coverage while minimising blind spots. For indoor cameras, mounting them in a corner of the room, opposite the entry point, is a common practice. The ideal height for cameras is around 10 feet or higher to prevent tampering and ensure a clear view.
Distance from the Recording Device
The distance between the camera and the recording device, or Network Video Recorder (NVR), is an important factor. The length of the cable connecting the two will impact the signal quality and power transmission. Ethernet cables, commonly used for IP cameras, have a maximum effective distance of 330 feet. Siamese cables, typically used for analog cameras, can also provide excellent distance options.
Wire Length
Calculate the required length of cable for each camera, taking into account the distance from the camera to the NVR and any additional slack needed for manoeuvring during installation. Ensure you have enough cable to reach the desired camera locations, with some excess for future adjustments if needed.
Potential Obstacles
Identify any potential obstacles between the camera and NVR locations, such as walls, doors, or other structures. Plan how you will navigate these obstacles, whether by drilling holes or using alternative methods like wireless transmission. If you need to drill holes, mark the exact spots and use a metal coat hanger to check for any unforeseen obstructions within the wall.
Additionally, consider the path your cables will take to reach the NVR. Try to keep cables away from existing electrical wiring to minimise signal interference. For outdoor installations, you may need to bury cables or use protective conduits to safeguard them from tampering and environmental factors.
By carefully considering these factors, you can ensure you have a well-planned surveillance system that meets your specific needs and requirements.
Mastering Camera Focus for Creative Forced Perspective Shots
You may want to see also
![]()
Wiring options: Choose between Wi-Fi and Ethernet connections, considering speed, reliability, and cost
When choosing between a Wi-Fi and Ethernet connection for your surveillance camera, there are several factors to consider, including speed, reliability, and cost.
Wi-Fi Connection
Wi-Fi security cameras offer significant benefits in terms of deployment and flexibility. They are easy to install and can be set up almost anywhere, as they don't require a wired network connection. This makes them highly portable, and you can easily move them to a new location if needed. They are ideal for temporary deployments, remote locations, and situations where wiring is impractical.
However, one of the main drawbacks of Wi-Fi security cameras is their reliance on a stable network signal. If the signal is weak or unreliable, it can lead to connectivity challenges. Additionally, Wi-Fi cameras have an extra point of vulnerability through their Internet connectivity, which requires additional safeguards against internet-enabled threats.
Ethernet Connection
Ethernet connections, on the other hand, provide a stable and reliable connection. Wired security cameras are directly plugged into the network, ensuring consistent data transmission and communications. They are also less susceptible to signal interference from nearby devices. Power over Ethernet (PoE) technology allows wired cameras to receive data and power over the same Ethernet cable, providing a constant and reliable power source.
The main disadvantage of Ethernet connections is the complexity of installation. Running cables from the camera to the recording device can be labour-intensive and may limit the flexibility in terms of camera placement. Additionally, Ethernet cables tend to be more expensive than Wi-Fi connections.
Cost Comparison
While Wi-Fi security cameras are generally less expensive upfront, there may be additional costs associated with ensuring a strong and secure network connection. Ethernet connections, on the other hand, may require a higher initial investment, but can provide a more reliable and consistent performance.
Unleashing Camera Raw's Power: From Basics to Advanced Techniques
You may want to see also
![]()
Prepping wires: Measure, cut, strip insulation, clean wire ends, and label wires
Prepping the wires is a crucial step in the installation of surveillance cameras. Here's a detailed guide on how to measure, cut, strip insulation, clean wire ends, and label wires:
Measure and Cut:
- Determine the exact location where the wires will be run. This will help establish the required length and gauge of the wires.
- Use a tape measure or a ruler to measure the distance between the camera and the power outlet or recording device.
- Mark the length on the wire and cut it accurately using wire cutters. Ensure straight and clean cuts to prevent any issues.
Strip Insulation:
Use wire strippers to carefully remove the insulation from the ends of the wires. This will expose the copper wire underneath.
Clean Wire Ends:
Utilize a wire brush to thoroughly clean the exposed wire ends. This step ensures a better connection when attaching the wires to terminals or connectors.
Label Wires:
Label the wires to easily identify them later. This helps in keeping track of which wire corresponds to each camera or connection point.
By following these steps, you will have properly prepped wires, ensuring a safe and efficient installation process for your surveillance camera system.
The Olympus OM-1 35mm Camera: A Vintage Photography Icon
You may want to see also
![]()
Running wires: Drill holes, thread wires, and secure with clips or conduit for protection
Running wires for surveillance cameras requires careful planning and execution to ensure optimal performance and longevity of the surveillance system. Here are some detailed instructions on how to run wires by drilling holes, threading wires, and securing them with clips or conduit for protection:
Planning the Wire Route:
- Identify the locations for the surveillance cameras, considering areas such as the front/back door, reception room, front/back yard, shop floor, etc.
- Determine the central surveillance hub, such as the NVR/DVR location, which should be easily accessible and well-connected to the internet.
- Plan the route for the wires, considering the shortest and easiest path to minimise interference and potential damage.
Drilling Holes and Running Wires:
- Turn off the power to ensure safety and prevent damage to devices.
- Drill holes at the desired locations for the cameras, ensuring they are large enough to accommodate the wires. Use the appropriate drill bits for stucco walls or other surfaces.
- Drill additional holes to run wires from the camera locations to the central surveillance hub.
- Use a straightened metal coat hanger to check for any obstructions inside the walls before running the wires.
- If running wires through walls, drill holes in the top or bottom wall plate within the same wall cavity.
- If running wires outdoors, follow local electrical codes for burying conduits or using wire guards to protect the wires from tampering and adverse weather conditions.
Threading and Securing Wires:
- Attach the wires to a fish tape or pull wire to guide them through the drilled holes.
- Pull the wires gently, ensuring they remain untangled.
- Secure the wires with clips or conduit to fix them in place and provide protection.
- Leave extra wire inside for future reorganisation and allow for termination.
- Label the ends of the cables to identify which camera they correspond to.
By following these steps and taking the necessary precautions, you can effectively run wires for your surveillance cameras, ensuring a reliable and well-protected installation.
Fight Speeding Tickets: Alberta Drivers Can Beat Camera Tickets
You may want to see also
![]()
Sealing and protection: Seal holes with silicone, and use surge protectors to safeguard against lightning strikes
Sealing and protection are essential steps in installing a surveillance camera system. Proper sealing ensures that the camera setup remains protected from the elements, while surge protectors provide a crucial layer of defence against voltage spikes and lightning strikes. Here are some detailed instructions on sealing and protection for your surveillance camera installation:
Sealing Holes with Silicone
After drilling holes for wiring, it is important to seal these openings to prevent moisture intrusion. Waterproof materials such as silicone and duct seal are ideal for filling these holes. This step is crucial, as moisture can run along electrical cables and cause significant issues at electrical connection points, leading to costly repairs. By properly sealing the holes, you can avoid potential damage to your surveillance system.
Use of Surge Protectors
Surge protectors are essential devices that safeguard electronic equipment from voltage spikes, including those caused by lightning strikes. While they cannot offer complete protection against direct lightning strikes, they are highly effective at mitigating damage from voltage spikes within a home's electrical system. Here are some key considerations when using surge protectors:
- Voltage Diversion: Surge protectors detect excessive voltage and divert it to the grounding wire, preventing it from reaching connected devices. This process is extremely fast, ensuring that only standard electrical current passes through.
- Metal Oxide Varistor (MOV): This component is crucial to the surge protector's function. It connects the power line and ground line, remaining inactive under normal voltage conditions. During a voltage spike, the MOV becomes highly conductive, allowing excess voltage to be diverted to the ground and protecting the connected equipment.
- Gas Discharge Arrestor (GDA): In the event of higher voltage spikes, the GDA steps in. It works in tandem with the MOV, providing an additional pathway to conduct excess voltage to the ground. This feature also helps prevent the surge protector itself from catching fire during massive voltage spikes.
- Whole-House Surge Protection: Consider installing a whole-house surge protector at your electrical panel. This provides a first line of defence against surges that could impact all electrical devices in your home. While it requires professional installation, it offers more comprehensive protection than a power strip.
- Response Time: Look for surge protectors with a fast response time, ideally one nanosecond or less. This ensures that any excess voltage is diverted away from sensitive electronics quickly.
- Certification: Ensure that your surge protector is certified by Underwriters Laboratories (UL) and specifically mentions surge protection. This certification indicates that the product has been rigorously tested for performance and effectiveness.
By following these sealing and protection guidelines, you can enhance the longevity and functionality of your surveillance camera system while also safeguarding your property and electronics from the damaging effects of voltage spikes and lightning strikes.
Disrupting Surveillance Cameras: Effective Ways to Stay Invisible
You may want to see also
Frequently asked questions
The type of cable depends on your camera. For IP cameras, use CAT5/6 cables. For HD over coax systems, use RG-59 siamese coax cables.
The maximum length for CAT5/6 cables is 300 feet. For RG-59 siamese coax, the maximum distance is 500 feet.
Yes, use clips or zip ties to secure your cables and protect them from the elements. If running cables outside, use weatherproof cables with a PVC jacket.
Drill a hole in the wall and attach the cables to fish tape to "fish" the wires through. Use security camera wire protectors such as a tube to keep things neat and professional.