Camera Raw is a self-contained Adobe plug-in built for professional photo editing and retouching. It is included as a plug-in with Adobe After Effects and Adobe Photoshop, and also adds functionality to Adobe Bridge. Camera Raw is the standard in photo editing software for most photographers. It is a powerful tool that can help produce extraordinary-looking photos.
A camera raw file contains unprocessed, uncompressed grayscale picture data from a digital camera's image sensor, along with information about how the image was captured (metadata). Photoshop Camera Raw software interprets the camera raw file, using information about the camera and the image's metadata to construct and process a colour image.
This additional step in the process gives photographers far more control over the final image output.
| Characteristics | Values |
|---|---|
| File type | Raw |
| File format | .NEF, .CRW, .CR2, .CR3, .ARW |
| File size | Larger than JPEG |
| Image quality | Higher than JPEG |
| Image editing | More control than JPEG |
| Image processing | Requires additional software |
| Image storage | Requires external hard drive |
What You'll Learn
![]()
How to open images in Camera Raw
Opening images in Camera Raw is a simple process. Camera Raw is a file format that contains information about how a photo was taken, including exposure, white balance, and other settings. It is a powerful and rapid tool for image editing that can be used to edit photographs non-destructively.
To open images in Camera Raw, you can follow these steps:
Using Adobe Bridge:
- Open Adobe Bridge and navigate to the folder containing your images.
- Select the image you want to open by clicking on its thumbnail.
- Go to the File menu and choose "Open in Camera Raw" or use the keyboard shortcut Ctrl+R (Windows) or Cmd+R (Mac).
- The image will now open in Camera Raw, and you can start editing.
Using Photoshop:
- Open Photoshop and go to the File menu.
- Select "Open" and locate the photo you wish to open.
- Click on the photo and then click the "Open" button.
- If the file is a RAW file, it will automatically open in Camera Raw. If it is a JPEG or TIFF file, go to the next step.
- With the image open in Photoshop, click the Filter menu and select "Camera Raw Filter..." near the top.
- Make your adjustments in Camera Raw and click "OK" to apply the changes.
Alternatively, you can use the keyboard shortcut Shift + Cmd + A (Mac) or Shift + Ctrl + A (PC) to open the selected image layer in Photoshop in Camera Raw.
Using File Explorer or Finder:
If you are using Windows or Mac, you can also open a raw file directly from your File Explorer or Finder:
- Double-click the file's icon, and it will launch Photoshop and open the Camera Raw window.
- If Photoshop is not already open, you can Ctrl + Click (Mac) or Right-Click (Windows) on the file, then choose "Open With" > "Adobe Photoshop".
By following these steps, you can easily open and edit your images using Camera Raw, either through Adobe Bridge or Photoshop.
Shipping Camera Batteries: USPS Guidelines and Tips
You may want to see also
![]()
How to crop a photo in Camera Raw
To crop a photo in Camera Raw, follow these steps:
Firstly, open your image file in Camera Raw. You can do this by selecting the 'Camera Raw filter' in Photoshop or opening the file directly in Camera Raw. Note that if you are using the Camera Raw filter in Photoshop, there won't be a crop tool available.
Once you have your image open in Camera Raw, select the Crop Tool. You can do this by pressing 'C' as a shortcut or by selecting the Crop Tool icon.
Now, you can drag in the preview image to draw the crop area box. If you want to constrain the initial crop area to a specific aspect ratio, hold down the mouse button while selecting the Crop Tool and choose an option from the menu.
You can move, scale, or rotate the crop area by dragging the crop area or its handles.
If you want to cancel the crop, press Esc with the Crop Tool active or click and hold the Crop Tool button and choose 'Clear Crop' from the menu. To cancel the crop and close the Camera Raw dialog box without processing the image, click 'Cancel' or deselect the Crop Tool and press Esc.
When you are happy with the crop, press Enter (Windows) or Return (Mac OS). The cropped image will resize to fill the preview area, and the updated image size and dimensions will be displayed.
You can also find several tutorials on YouTube that can guide you through the process of cropping and rotating images in Camera Raw.
Polaroid Camera Battery: Where is it Located?
You may want to see also
![]()
How to use spot removal in Camera Raw
The Spot Removal tool in Adobe Camera Raw has been renamed to Remove. It can be used to remove unwanted objects like tourists, bags, or poles from a selected area of an image. The tool can either use Generative AI or sample from a different area of the same image to make edits.
To remove blemishes or spots, follow these steps:
- Choose the Spot Removal tool (B).
- Zoom in on the area to be repaired.
- Press "[" or "]" to size the brush cursor.
- Do one of the following:
- Ctrl-Alt-drag/Cmd-Option-drag outward from the centre of a blemish to create and scale a target circle.
- Click on a blemish.
- Cmd-drag/Ctrl-drag from the target area to the desired source area if you want to control which area Camera Raw uses as the source.
- When you release the mouse, a red dashed circle will surround the target region, and a green dashed circle will surround a source area.
- Drag across a blemish to create a target region. When you release the mouse, a red pin and dashed border will surround the target region, and a green pin and dashed border will surround a source region.
- From the Type menu, choose "Heal" to blend source pixels into the texture and luminosity values of the target pixels, or "Clone" to copy the source pixels exactly without any healing.
- Optional: Press "/" to cycle through alternative source locations that Camera Raw detects.
- Select a target or source region by clicking its pin or select a circle by clicking inside it, then do any of the following optional steps:
- Drag inside a region or circle to reposition it.
- Use the Opacity slider to control the opacity of the repair.
- Drag the dashed border to resize a pair of target and source circles (not irregular-shaped regions).
- Shift-click or Shift-drag just outside an existing region to add to it or convert a circle to a region.
- Optional: Create more regions or circles to correct other blemishes. To remove a pin or circle, hold down Alt/Option and click it, or to delete multiple pins and circles, Alt/Option drag a marquee across them. Click "Clear All" to remove all pins and circles.
- To hide all regions and circles, uncheck "Show Overlay (V)".
- To redisplay the main tabs, press "H" (Hand tool).
- To redisplay the Spot Removal overlays at any time, choose the tool again (press "B").
Battery Cells for Camera Drones: How Many Do You Need?
You may want to see also
![]()
How to use presets in Camera Raw
Adobe Camera Raw (ACR) is a powerful photo editor that allows you to create and use presets to automate your photo adjustments with a single click. This is especially useful if you need to process a lot of images.
How to Install Presets in ACR
To install ACR presets in Photoshop, you need to download and unzip the presets. The process then differs slightly depending on whether you are using a Windows PC or a Mac.
Windows
- Navigate to the following location on your computer: "C:\Users\UserName\AppData\Roaming\Adobe\CameraRaw\Settings".
- Go to the location where you unzipped your presets and open the ACR presets folder, usually named 'Photoshop - Adobe Camera Raw (ACR) Presets'.
- Select the desired preset folder(s) containing the XMP file(s) and press CTRL+C to copy them.
- Go back to the 'Settings' folder and hit CTRL+V to paste the folder(s) inside.
Mac
- Open a new Finder window and go to "UserName > Library > Application Support > Adobe > Camera Raw > Settings".
- Go to the location where you unzipped your presets and open the ACR presets folder, usually named 'Photoshop - Adobe Camera Raw (ACR) Presets'.
- Select the desired preset folder(s) containing the XMP file(s) and press Command+C to copy them.
- Go back to the 'Settings' folder and hit Command+V to paste the folder(s) inside.
How to Apply Presets in ACR
Once you have installed your presets, you can apply them to your photos in ACR.
- Open your desired image in ACR.
- Click on the "Presets" tab.
- Choose your desired preset from the list.
- Adjust any other settings as needed.
Using Lightroom Presets in ACR
It is also possible to use Lightroom presets in ACR, although the process is a little more involved.
- Open an image in the Develop module in Lightroom and apply the preset you want to use.
- Export the image as a DNG file so that the changes will be written to the file.
- Launch Windows Explorer and locate the image on disk.
- Right-click on the image and choose "Open With > Photoshop CS5". The file will open automatically in ACR.
- Click the "Presets" tab and then click "Create New Preset" at the bottom of the panel.
- Type a name for your preset and select the options you want to include.
Now, your Lightroom preset will be available to use in ACR, and you can adjust any image with it.
Charging Your Roku Doorbell Camera: A Step-by-Step Guide
You may want to see also
![]()
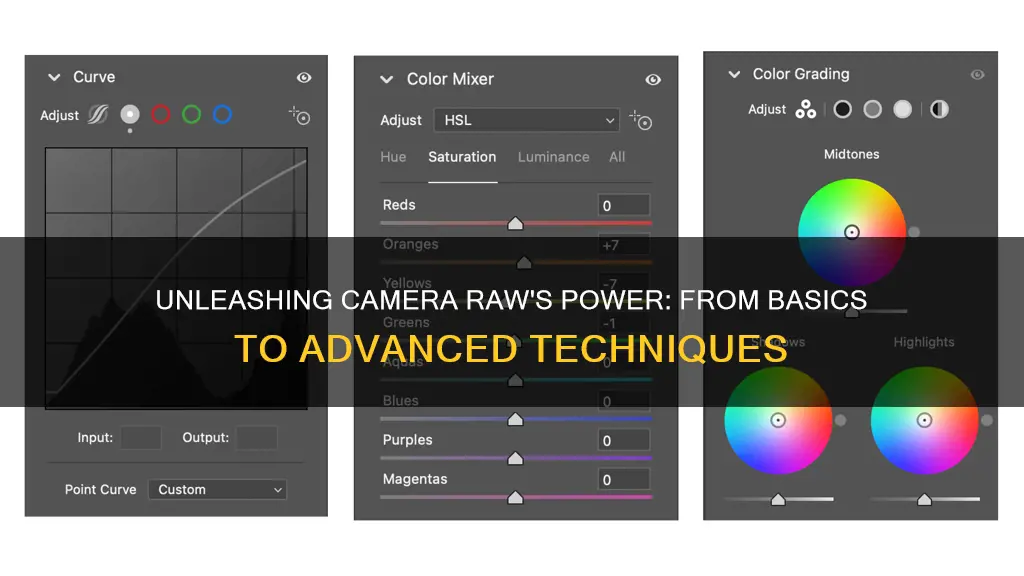
How to mask a photo in Camera Raw
Masking in Camera Raw is a powerful tool that allows you to make precise adjustments to specific areas of your photo, giving you maximum creative control. Here's a step-by-step guide on how to mask a photo in Camera Raw:
Step 1: Access the Masking Tools
Open your photo in Camera Raw and select "Masking" from the right-hand toolbar to access the Masking panel. This is where you'll find all the tools you need to create and edit masks.
Step 2: Create a New Mask
Click on "Create New Mask" in the Masking panel. This will create a default Mask 1, which you can rename by clicking the three-dot icon next to it and selecting "Rename."
Step 3: Choose Your Masking Tool
The Masking panel offers a variety of tools for creating masks, including the Brush tool, the Graduated Filter tool, and the Radial Filter tool. Select the tool that best suits your needs. For example, if you want to edit a specific object in your photo, the Brush tool might be the best choice, while the Graduated Filter tool is ideal for applying adjustments across a large portion of the image with a soft transition.
Step 4: Make Your Selections
Use the selected masking tool to make your desired selections in the photo. For example, if you've chosen the Brush tool, simply select and drag the brush over the areas you want to edit. You can specify the size, feather, flow, and density of the brush to get the desired effect.
Step 5: Refine Your Mask (Optional)
If needed, you can refine your mask by adding or subtracting from it. To do this, click on the mask in the Masking panel and then select "Add" or "Subtract." You can also use the Intersect option to create a new component that intersects with other components in the mask.
Step 6: Make Local Adjustments
With your mask in place, you can now use the editing sliders in the right panel to make local adjustments to the selected areas. Play around with the sliders to adjust exposure, contrast, highlights, shadows, and more until you achieve the desired effect.
Step 7: Save Your Work
Once you're happy with the adjustments, don't forget to save your work. You can also save the local adjustments as a preset using the "New Adjustment Preset" option in the Adjustment Preset drop-down menu.
Tips and Tricks:
- Camera Raw offers AI-powered features like "Select Subject" and "Select Sky" that automatically detect and select the main subject or sky in your photo, making it easier to apply adjustments to those areas.
- You can change the color of the mask overlay to something other than the default red by clicking the radio button next to "Show Overlay" and selecting your desired color.
- To temporarily hide a mask, long-press the eye icon next to it.
- To remove a mask, simply click on it and press Delete.
Lightroom CC and Camera Raw: Preset Compatibility
You may want to see also
Frequently asked questions
Camera Raw is a self-contained Adobe plug-in built for professional photo editing and retouching. It is included with Adobe Photoshop and Adobe After Effects, and adds functionality to Adobe Bridge.
Camera Raw gives you greater control over your images during the editing process. It allows you to make adjustments to the white balance, exposure, colour saturation, and sharpening of your photos, among other features. It is especially useful for processing large batches of raw photos.
To open an image in Camera Raw, load your image into Photoshop. If it is a RAW file, Camera Raw should open automatically. If not, press Shift + Ctrl + A (Windows) or Shift + Cmd + A (macOS), then click Filter and select Camera Raw Filter.
Camera Raw is designed for editing RAW image files. However, you can also edit JPEG and TIFF images, though they won't have the same treatment as raw photos.