The Adjustment Brush is an editing tool in Adobe Camera Raw (ACR) that allows users to make local adjustments to their photos. It is possibly the equivalent of the Dodge and Burn tools in Photoshop, where 'dodging' lightens and 'burning' darkens a specific area. The Adjustment Brush isolates a specific area by masking it, similar to using layer masks in Photoshop. The Adjustment Brush is located at the top left of the dialog box.
While the Adjustment Brush tool has been a part of Adobe Camera Raw for some time, there have been updates to its functionality and ease of access. In this paragraph, we will explore the different versions of Camera Raw that include the Adjustment Brush, as well as some tips and tricks for using this tool effectively.
| Characteristics | Values |
|---|---|
| Tool Type | Editing Tool |
| Tool Function | Equivalent to the Dodge and Burn tools in Photoshop |
| Tool Location | Top left of the dialog box |
| Tool Application | Click on the Adjustment Brush icon |
| Tool Options | Brush size, feather, flow, density |
| Tool Icon | Pin icon |
What You'll Learn
- The Adjustment Brush tool is located in the top left of the dialog box
- The Adjustment Brush icon changes the right panel to the Adjustment Brush tab
- The Adjustment Brush tool can be used to lighten or darken specific areas of a photo
- The Adjustment Brush tool can be used in conjunction with the Graduated Filter tool
- The Adjustment Brush tool can be used to create local adjustments
![]()
The Adjustment Brush tool is located in the top left of the dialog box
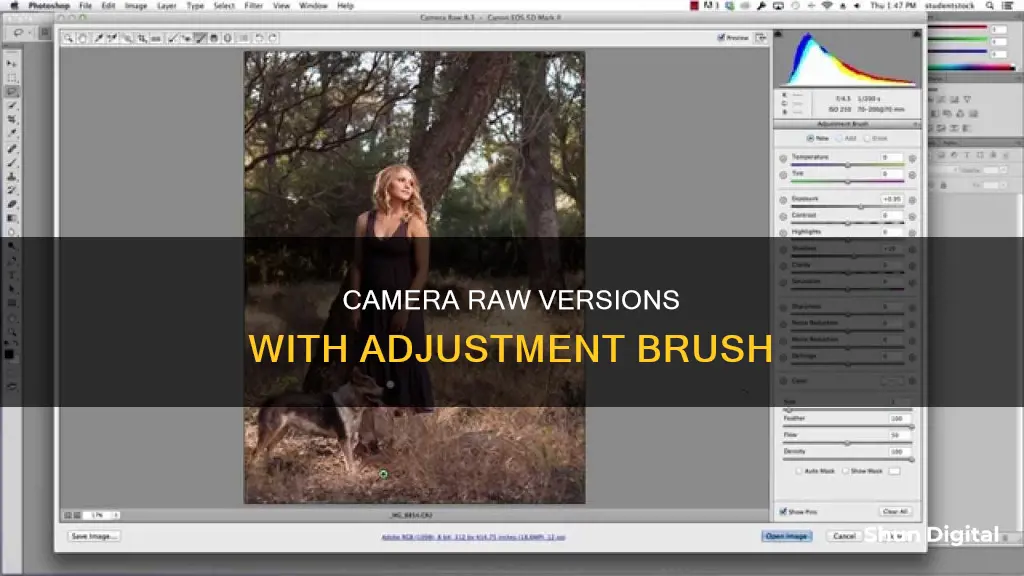
The Adjustment Brush tool is a powerful feature in Adobe Camera Raw (ACR) that allows you to make local adjustments to specific areas of your photo. This tool can be accessed by clicking on the Adjustment Brush icon located in the top left corner of the dialog box.
When you select the Adjustment Brush tool, the right panel changes to the Adjustment Brush tab, revealing various options for customising your brush. The bottom sliders allow you to modify the size of the brush, while the other sliders let you adjust the feather, flow, and density settings. The feather value determines how hard or soft the brush stroke is, flow controls the amount of adjustment applied with each stroke, and density adjusts the transparency of the stroke.
By clicking on the dropdown menu next to the brush size, you can explore additional brush options. The Auto Mask option confines brush strokes to areas of similar colour, making it easier to paint over objects with definite lines or borders. You can also choose whether to display a mask as you paint by ticking the "Mask Options" box. This allows you to pick a colour and decide whether the mask colour indicates the area you want to change or exclude.
Once you've selected and modified your brush, you can start brushing over the areas of the image you want to adjust. A pin icon will appear to mark the location of your adjustment. You can then fine-tune your adjustments by moving the sliders in the Selective Edits menu. Any changes made to these sliders will only affect the area you've brushed over.
The Adjustment Brush tool is an excellent way to make precise edits to your photos in ACR. It provides you with greater control and flexibility during the editing process, allowing you to accentuate specific details or fix problem areas without affecting the entire image.
Y Dome Camera: Battery-Powered Security Solution?
You may want to see also
![]()
The Adjustment Brush icon changes the right panel to the Adjustment Brush tab
The Adjustment Brush is an editing tool in Adobe Camera Raw (ACR) that allows you to make local adjustments to specific areas of your photo. When you click on the Adjustment Brush icon, the right panel changes to the Adjustment Brush tab, providing you with various options to modify your brush and make precise adjustments.
The Adjustment Brush icon is typically located at the top left of the dialog box in ACR. Clicking on it will bring up the Adjustment Brush tab on the right panel, where you can define the type of adjustment you want to make. This tab includes options such as Exposure, Texture, Clarity, and more, which can be applied by "painting" them onto the desired area of your photo. The Adjustment Brush allows for selective adjustments, similar to using layer masks in Photoshop.
Under the Histogram, you will find the Adjustment Brush tool options. Here, you can choose the type of adjustment by dragging the effects slider. The available effects depend on the Process Version you are using (2012, 2010, or 2003). You can update your photo to the latest Process Version by clicking the exclamation mark icon in the lower-right corner of the image preview.
The bottom sliders in the Adjustment Brush tab allow you to modify the size of the brush and adjust the feather and density (flow) of the brush strokes. The feather value determines how hard or soft the brush is, while the flow and density values control the rate of application and the transparency of the stroke, respectively.
When you use the Adjustment Brush on a specific part of your image, a pin icon appears to indicate where the adjustment has been made. This pin serves as a visual reference for your adjustments and can be toggled on or off as needed.
By utilizing the Adjustment Brush in conjunction with other tools like the Graduated Filter, you can speed up your editing workflow and make more precise adjustments to your photos. The Graduated Filter allows for similar adjustments but in a gradual manner across a selected region of your photo.
Overall, the Adjustment Brush in ACR provides a powerful tool for making local adjustments, giving you greater control over the editing process and helping you achieve the desired outcome for your photographs.
Kodak Camera Battery Exhausted: What's the Fix?
You may want to see also
![]()
The Adjustment Brush tool can be used to lighten or darken specific areas of a photo
The Adjustment Brush tool is a feature in Adobe Camera Raw (ACR) that allows you to make local adjustments to specific areas of your photo. This tool is similar to the Dodge and Burn tools in Photoshop, where "dodging" lightens and "burning" darkens specific areas of an image.
When you open a RAW file in ACR, you will likely need to make local adjustments after your initial global adjustments. The Adjustment Brush tool is useful for this purpose, allowing you to modify specific areas of your photo. You can use the tool to isolate a specific area by masking it, similar to using layer masks in Photoshop.
To use the Adjustment Brush tool, select it from the toolbar or press "K" on your keyboard. This will open the Adjustment Brush tool options under the Histogram, and you can set the mask mode to "New". Choose the type of adjustment you want to make by dragging an effects slider. The available effects depend on whether you are working in Process Version 2012, 2010, or 2003.
With the Adjustment Brush tool, you can selectively apply adjustments such as Exposure, Texture, Clarity, and more by "painting" them onto your photo. You can also determine the size of the brush, as well as the amount of feather and density (flow) you want to apply.
When you use the Adjustment Brush on a particular part of your image, a pin icon will appear to indicate where your adjustment has been made. This allows you to keep track of your adjustments and modify them if needed.
The Adjustment Brush tool can be used in conjunction with the Graduated Filter tool, which applies adjustments gradually across a region of your photo. You can also create local adjustment presets to quickly reapply effects that you use frequently.
Overall, the Adjustment Brush tool in ACR is a powerful feature that gives you precise control over the lighting and adjustments in specific areas of your photo, enhancing your editing capabilities.
Labeling Camera Batteries: A Quick Guide to Best Practices
You may want to see also
![]()
The Adjustment Brush tool can be used in conjunction with the Graduated Filter tool
The Adjustment Brush tool and the Graduated Filter tool are both used to make local adjustments to a photo in Adobe Camera Raw (ACR). The Adjustment Brush tool allows you to selectively apply adjustments to specific areas of your photo by "painting" them on. On the other hand, the Graduated Filter tool applies adjustments gradually across a region of a photo, which can be made as wide or narrow as you like.
Both tools can be used together to create more precise and controlled local adjustments. The Graduated Filter tool can be used to apply broad adjustments to a large area of the photo, such as the sky, and then the Adjustment Brush tool can be used to refine the adjustment by "painting" over areas that you don't want the Graduated Filter to affect. This combination can speed up your editing workflow and reduce the need for further adjustments in other software like Photoshop or Lightroom.
To use the Adjustment Brush tool in conjunction with the Graduated Filter tool, follow these steps:
- Make your initial global adjustments to your RAW file in ACR.
- Select the Graduated Filter tool from the toolbar and choose the type of adjustment you want to make by dragging the sliders in the Graduated Filter tool options.
- Drag in the photo to apply the graduated filter across the desired region.
- Refine the filter by adjusting the effect sliders, toggling the visibility of guide overlays, or dragging the dots and lines to modify the shape and position of the filter.
- Select the Adjustment Brush tool from the toolbar and choose the type of adjustment you want to make by dragging the sliders in the Adjustment Brush tool options.
- Paint with the Adjustment Brush tool in the areas of the image where you want to apply more precise adjustments.
- Refine the adjustment by dragging the effect sliders or using the options to hide or show the pin icon and mask overlay.
- Repeat the above steps as needed to apply additional adjustments with either tool.
By using both the Adjustment Brush tool and the Graduated Filter tool together, you can create more complex and nuanced local adjustments to your photos in ACR.
Charging the Blackmagic Pocket Cinema Camera 4K: A Guide
You may want to see also
![]()
The Adjustment Brush tool can be used to create local adjustments
The Adjustment Brush tool is an editing tool in Adobe Camera Raw (ACR) that allows you to make local adjustments to your photos. It is similar to the Dodge and Burn tools in Photoshop, where dodging lightens and burning darkens a specific area. With the Adjustment Brush, you can selectively apply adjustments such as Exposure, Texture, Clarity, and others by "painting" them onto your photo.
To use the Adjustment Brush tool, follow these steps:
- Select the Adjustment Brush tool from the toolbar or press "K" on your keyboard.
- Choose the type of adjustment you want to make from the options available, such as Exposure, Texture, or Clarity.
- Specify the brush options, including the size, hardness, flow, and density of the brush.
- Move the Adjustment Brush tool over the image and click to apply the adjustment to the selected area.
- A pin icon will appear at the application point, indicating where your adjustment has been made.
- You can refine the adjustment by dragging the effect sliders or using the Show Mask option to toggle the visibility of the mask overlay.
- To undo part of the adjustment, select the Erase option and paint over the area.
- To remove the adjustment completely, select the pin and press Delete.
The Adjustment Brush tool is a great way to make local adjustments to your photos and enhance specific areas. It is available in Adobe Camera Raw and Lightroom, and can be a useful addition to your photo editing workflow.
Quick Guide: Reinstalling Camera Batteries
You may want to see also
Frequently asked questions
The Adjustment Brush is an editing tool in Adobe Camera Raw (ACR) that allows you to make local adjustments to specific areas of your photo. It is similar to the Dodge and Burn tools in Photoshop, where dodging lightens and burning darkens a specific area.
After making adjustments in the Basic and Tone Curve tabs, select the Adjustment Brush tool (usually by pressing "K" on your keyboard). You can then modify the size of the brush using the bottom sliders and determine the amount of feather and density (flow) you want to apply. Paint over the areas of the photo you want to adjust, and a pin icon will appear to mark your adjustment.
The Adjustment Brush is usually located at the top left of the dialog box. If you cannot find it, try selecting the masking icon or pressing "K" on your keyboard.
With the Adjustment Brush, you can selectively apply Exposure, Texture, Clarity, and other adjustments by "painting" them onto the desired area of your photo. You can also use it to lighten or darken specific areas, similar to dodging and burning in Photoshop.
The Adjustment Brush allows you to make precise, local adjustments to your photo, enhancing specific areas while leaving others untouched. It can speed up your editing workflow, especially when used in conjunction with the Graduated Filter tool, which allows for broad lightening or darkening adjustments.