Adobe After Effects is a powerful tool for video editing and motion graphics design, offering a range of features to enhance your visuals. One notable feature is its camera functionality, which allows users to create dynamic and immersive scenes. To harness the full potential of After Effects' camera tools, it is essential to understand the various modes available and their unique capabilities.
The camera in After Effects mimics a real-life camera, offering similar settings such as sensor size, focal length, and iris shape. Users can create a new camera by navigating to Layer > Create New Camera or using the keyboard shortcut Command+Option+Shift+C on a Mac. This will place the camera in the timeline, ready for customization.
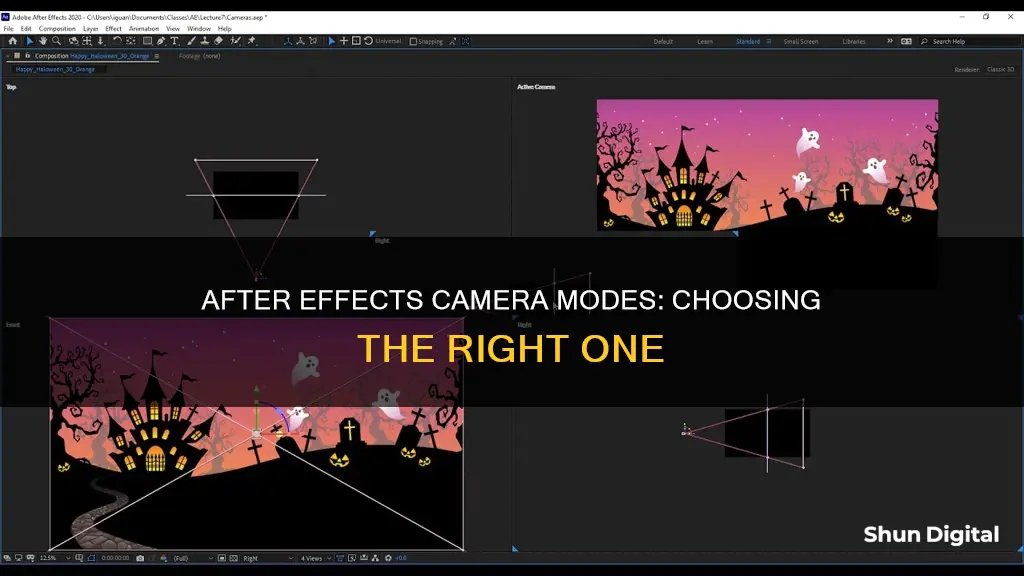
After Effects provides two types of cameras: One-Node and Two-Node. A One-Node camera operates similarly to a real-life camera, allowing adjustments to pan, tilt, and zoom, along with the focus distance. On the other hand, a Two-Node camera has a point of interest and revolves around a single point in 3D space, enabling complex movements like orbits and arcs.
Additionally, After Effects offers four camera tools: Unified, Track XY, Orbit, and Track Z. These tools allow users to move the camera in different ways. The Unified tool combines the functions of the other three tools, providing an easy way to switch between them. The Track XY tool enables vertical and horizontal movement, while the Orbit tool moves the camera around the point of interest. The Track Z tool pushes the camera forward and backward in the Z-axis.
To enhance your visuals further, After Effects also provides a 3D camera tracker effect, which extracts camera motion and 3D scene data from video sequences. This effect is particularly useful for compositing 3D elements over 2D footage.
By understanding the different camera modes and tools available in After Effects, users can create captivating visuals and bring their creative visions to life.
| Characteristics | Values |
|---|---|
| Camera creation | Layer > New > Camera or press Ctrl+Alt+Shift+C (Windows) or Command+Option+Shift+C (macOS) |
| Camera settings | One-Node Camera or Two-Node Camera, Camera name, Type of camera settings (focal length, film size, angle of view, zoom, depth of field, focus distance, aperture, f-stop, blur level, etc.), Units of measurement |
| Camera movement | Orbit Camera Tool, Track XY Tool, Track Z Tool, Unified Camera Tool |
| Camera positioning | View – Look at Selected Layers or use keyboard shortcut (Ctrl+Alt+Shift+\ on PC or Cmd+Opt+Shift+\ on Mac) |
| Camera tracking | 3D Camera Tracker effect |
What You'll Learn
![]()
Using the 3D camera tracker effect
The 3D camera tracker effect is a powerful tool in After Effects that allows you to extract and replicate camera motion from video footage. This is particularly useful for motion graphic designers and VFX artists who want to add 3D elements, text, or special effects to their 2D footage.
- Import your video footage and make any necessary edits.
- Select the layer with the footage, go to the Animation menu, and click "Track Camera". Alternatively, you can add the effect from the Effects & Presets panel by searching for "3D Camera Tracker" and dragging it to your footage.
- The process will involve two steps: analyzing the footage and solving the camera. This may take some time, especially for longer videos, so be patient.
- Once the analysis is complete, you will see colourful tracking points all over your clip. These points guide you on where to add graphic motion elements to your composition.
- Specify the "Shot Type" to match your footage: fixed-angle view, variable zoom, or specified angle of view.
- If your video has a lot of moving elements or an unstable camera, you may encounter an "Analysis Solve Failed" error. In this case, go to the Advanced submenu in the effects control panel and select "Detailed Analysis". This option will reanalyse your video, paying more attention to the extra movement in the scene, resulting in improved camera tracking quality.
- Once the camera is solved, you will see a red target display when hovering over the tracking points. This red target is your ground plane. Ensure that it is flat against the surface where you are placing it.
- To place the ground plane, click and select a few tracking points. The ground plane will stay in place.
- Right-click on the ground plane to open a menu and choose the element type to attach (text, solid, or null layer).
- To add text, right-click on the red target and select "Create Text". Double-click the text layer to edit the text, and use the Transform options to adjust the size, position, and rotation to fit your text into the scene.
- To add a solid layer, right-click on the ground plane and select "Create Solid". You can use this layer to add pictures, 3D objects, or other graphics.
- To create a null layer, right-click on the ground plane and select "Create Null". Null layers can be used as parent layers to store properties and attach other elements.
- If needed, you can move the red target to a different place in the scene by clicking and dragging it to the new location.
- You can delete unwanted tracking points by selecting them and either right-clicking and choosing "Delete Selected Points" or pressing the Delete key on your keyboard.
- To enhance your composition further, you can add special effects like particle effects or use tools like Mocha Pro from Boris FX, which offers advanced planar tracking features.
By following these steps, you can effectively use the 3D camera tracker effect in After Effects to extract and replicate camera motion, enabling you to seamlessly integrate 3D elements into your 2D footage.
Cropping Images in Camera Raw: Sizing Mastery
You may want to see also
![]()
Creating a camera layer
To create a camera layer, follow these steps:
- Create a new composition.
- Go to the "Layer" menu and select "New Camera" or press "Ctrl+Alt+Shift+C" (Windows) or "Command+Option+Shift+C" (macOS).
- A "Camera Settings" dialog box will appear, where you can adjust various settings such as the type of camera (One-Node or Two-Node), focal length, film size, angle of view, zoom, focus distance, aperture, and blur level.
- Ensure that the layers in your timeline are set to 3D by selecting the 3D layer switch in the timeline or navigating to "Layer > 3D Layer".
- You can also activate the camera tool by pressing the 'C' key on your keyboard and cycling through until the camera layer is selected.
With the camera layer, you can now view and manipulate your 3D composition from different angles and distances. You can also animate the camera settings to create camera movements such as rack focus and snap zoom. Additionally, you can add keyframes to specific camera options to further enhance your video.
Charging Exilim Cameras: A Quick Guide
You may want to see also
![]()
Modifying camera settings
The first setting you will encounter is the option to choose between a One Node or Two Node camera. A node refers to the point of movement for your camera. A One Node camera operates similarly to a real-life camera, allowing you to adjust the pan, tilt, and zoom, along with the focus distance. However, it lacks a point of interest and can be challenging to control with complex 3D movements. On the other hand, a Two Node camera revolves around a single point in 3D space, enabling complex movements like orbits and arcs. It is the more popular choice in After Effects but can be tricky for beginners.
Moving on to the camera settings, you will find options such as Focal Length, Film Size, Angle of View, Zoom, and Depth of Field. The Focal Length determines how zoomed in you are to your subject, similar to a real camera lens. The default value is 50mm, and adjusting this value will change the Angle of View and Zoom accordingly. The Film Size is less crucial as it pertains more to physical camera limitations, so the default value of 36mm is generally recommended. The Angle of View refers to the width of your camera's field of view, which can be adjusted by modifying the Focal Length or Zoom. The Zoom setting is directly related to the Focal Length, and changing one will impact the other.
Depth of Field is an essential setting if you want your projects to appear life-like. It creates an optical effect that blurs out the foreground and background, adding realism to your compositions. You can enable Depth of Field and adjust settings like Aperture, F-Stop, and Blur Level to dial in the desired amount of blur. The Aperture controls the shallowness of the in-focus area, similar to a real-life camera. The Blur Level is a slider that lets you adjust the intensity of the blur applied to out-of-focus areas.
Additionally, After Effects provides tools to assist with focusing. The "Set Focus Distance to Layer" feature allows you to quickly snap the focus to the selected layer. The "Link Focus Distance to Layer" option takes it a step further by creating an expression that ties the focus distance to the selected layer for the entire composition, ensuring that the focus follows the layer as it moves.
In conclusion, modifying camera settings in After Effects offers a range of customisation options to enhance your compositions. By understanding the various settings and tools available, you can create professional-looking videos and become a skilled AE artist.
Calibrating Your Lith Battery: A Step-by-Step Guide
You may want to see also
![]()
Using the Orbit Camera tool
The Orbit Camera tool is one of the four camera tools in After Effects, the others being Unified, Track XY, and Track Z. The Orbit tool allows you to move your camera around a point of interest. If you orbit a one-node camera, you can change the camera orientation as a one-node camera with no point of interest.
To activate a camera tool, hit the 'C' key on your keyboard and cycle through the tools until you reach the Orbit Camera tool. You can also select it from the Tools panel. The easiest way to switch between the various camera tools is to select the Unified Camera tool and use the buttons on a three-button mouse.
The Unified Camera tool allows you to switch between the other three camera tools. Using a mouse, you can quickly jump between the Orbit, Track XY, and Track Z camera tools.
The Track XY tool moves the camera horizontally and vertically in 3D space, while the Track Z tool moves the camera forward and backward.
To adjust a 3D view or move a camera, you can use the Camera tools in the Composition panel. You can also use the Camera tools to adjust a working 3D view, which is a view that isn't associated with a camera layer. The working 3D views are useful for placing and previewing elements in a 3D scene.
When using the Orbit Camera tool, you can rotate the 3D view or camera by moving around the point of interest. To temporarily activate the Orbit Camera tool when the Unified Camera tool is selected, hold the left mouse button.
To create a camera in After Effects, go to Layer > New > Camera, or press Ctrl+Alt+Shift+C (Windows) or Command+Option+Shift+C (macOS). When you create a new camera layer, a Camera Settings dialog box will appear, where you can modify your camera attributes.
Restarting Li-ion Camera Battery: Quick Guide
You may want to see also
![]()
Using the Unified Camera tool
The Unified Camera Tool combines the Track XY, Orbit, and Track Z tools into a single tool. Using your mouse, you can quickly move between these three tools. Right-clicking activates the Track Z tool, middle-clicking activates the Track XY tool, and left-clicking activates the Orbit tool. This allows for the fastest way to adjust your camera.
To activate the Unified Camera Tool, first, make sure you have a camera layer in your composition. Then, hit 'C' on your keyboard to cycle through the camera tools until you reach the Unified Camera Tool. Alternatively, you can select it in the Tools panel.
The Unified Camera Tool can be used to adjust a camera layer's Position and Point of Interest properties. It can also be used to adjust a working 3D view, which is a 3D view that is not associated with a camera layer. Working 3D views are useful for placing and previewing elements in a 3D scene.
It's important to note that you can't use the Unified Camera Tool to adjust the camera if you are looking through the camera itself. You need to use one of the custom 3D views to adjust the camera.
Extending Camera Battery Life: Tips for Longer Shoots
You may want to see also
Frequently asked questions
A one-node camera orients around itself, whereas a two-node camera has a point of interest and orients around that point.
To create a new camera in After Effects, go to Layer > Create New Camera or use the keyboard shortcut Command+Option+Shift+C on a Mac or Control+Alt+Shift+C on a PC.
There are four camera movement tools in After Effects: Orbit, Track XY, Track Z, and Unified.
To change camera settings, double-click the camera layer in the Timeline panel or select the layer and go to Layer > Camera Settings.
To position a camera, select the camera layer and use the Properties panel to adjust the camera settings and transforms.