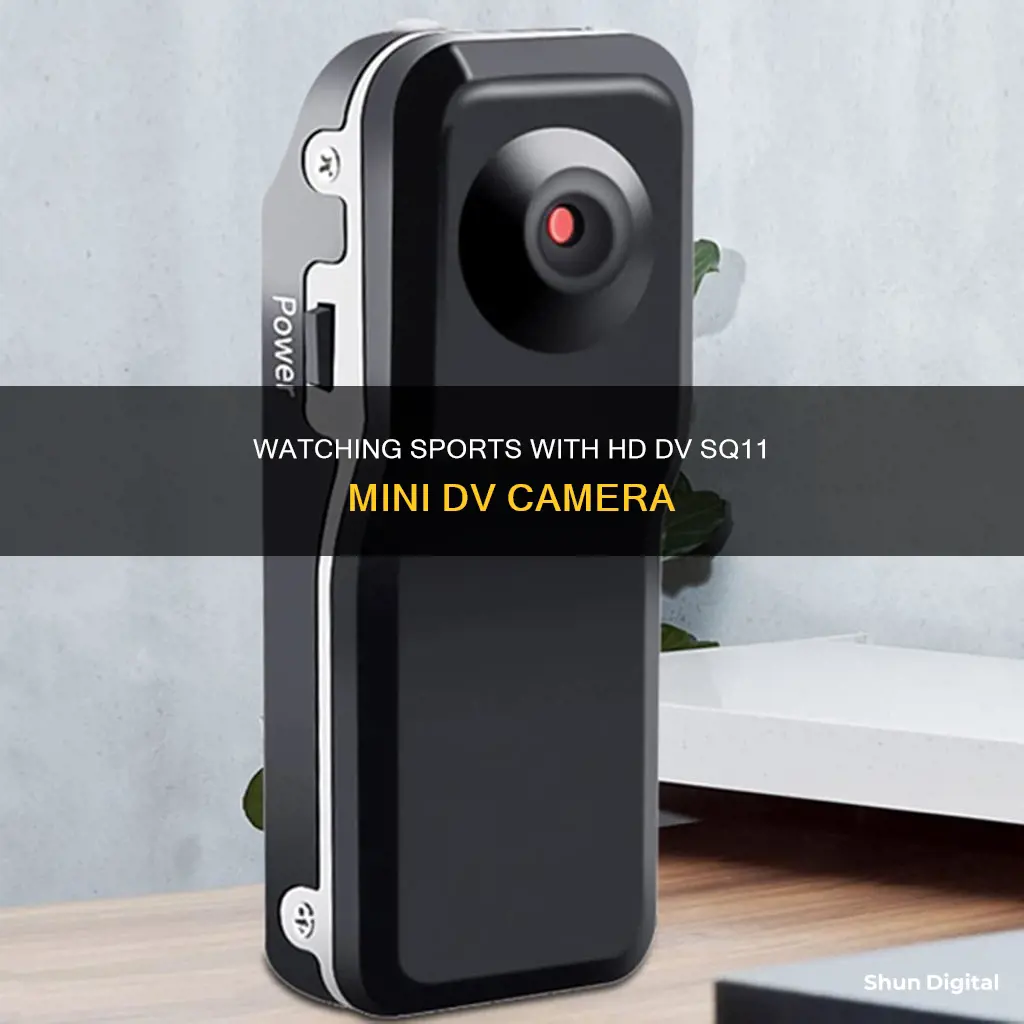
The SQ11 Mini DV Camera is a small but powerful device with a variety of applications. It is often marketed as an alternative sports camera, but its compact design makes it ideal for security purposes as it can be mounted and hidden almost anywhere. The SQ11 Mini DV Camera has a number of features, including motion detection, night vision, and the ability to record video in 720p or 1080p resolution. It also has a photo mode and can be used as a webcam when connected to a computer. The camera is easy to set up and use, but its small size means that users need to be familiar with its operations before using it.
What You'll Learn

Setting up the SQ11 Mini DV Camera
The SQ11 Mini DV Camera is a small but powerful device with a wide range of applications. Its compact design makes it highly portable and easy to mount and hide just about anywhere. However, its many functions are accessed via only two buttons, so it's important to have a good understanding of its operations before use. Here's a step-by-step guide to setting up your SQ11 Mini DV Camera:
- Insert a microSD card: The SQ11 Mini DV Camera requires a spare microSD card to store photos and videos locally. It's recommended to use a 32 GB card for maximum storage capacity. Insert the microSD card into the flash card slot.
- Charge the device: Before using the camera for the first time, ensure that its built-in lithium-ion battery is fully charged. Use the supplied USB cable to connect the camera to your computer. The LED indicator on the camera's side will flash red during charging and turn solid red when fully charged.
- Set the time: While the camera is plugged into your computer, take the opportunity to adjust the time settings. Navigate to the camera's USB drive, where you'll find a file named "TIMEREST." Open this file with a text editor, and you'll see a single line of text. Here, you can set the date and time to match your local time zone or turn off-time stamps by changing "Y" to "N." Save your changes before proceeding.
- Power on the camera: Once the battery is charged and the time is set, you can power on the camera. The LED indicator will display a solid blue light, indicating that the camera is on standby to record video in 720p.
- Select the desired mode: The SQ11 camera has three main modes: 720p video, 1080p video, and photo. You can toggle through these modes by pressing the MODE button. The LED indicator will change accordingly, showing solid blue for 720p, solid blue and red for 1080p, and solid red for photo mode.
- Record video or take photos: To start recording a video, press the POWER button once. The LED will flash a few times before turning off, and video recording will begin. The camera automatically saves videos every five minutes. Press the POWER button again to stop recording and save the video. When in photo mode, the POWER button is used to capture photos. The LED will flash once to confirm a picture has been taken.
With its compact design, versatile modes, and motion detection capabilities, the SQ11 Mini DV Camera is a versatile device suitable for various applications, including sports, security, and nanny cams.
Cameras: Are They Really Watching You?
You may want to see also

Using the Mini Camera
The SQ11 Mini DV Camera is a small but powerful device with a range of applications. It can be used as a sports camera, a nanny cam, a dashcam, or a body camera. The SQ11 has a compact design, making it highly portable and easy to mount and hide almost anywhere.
The SQ11 has three main modes: 720p video, 1080p video, and photo. The camera's LED indicator will show a solid blue light when it is on standby to record video in 720p. Pressing the MODE button once will take you to 1080p standby, indicated by solid red and blue lights. Pressing the MODE button a second time will put you in photo standby mode, indicated by a solid red light.
To record video, simply press the POWER button once. The LED will flash a few times before going out, and recording will begin. The camera will automatically save videos every 5 minutes if left alone. Press the POWER button again to stop recording and save the video.
To take a photo, enter photo standby mode and press the POWER button. The LED will flash once to indicate that a picture has been taken.
The SQ11 also has a motion detection feature. To turn this on, go to either the 720p or 1080p video standby mode and hold the MODE button for 3 seconds. The camera will enter motion-activated recording mode and will record for a 1-minute interval once motion is sensed.
The night vision assisting lights can be turned on and off by holding the POWER button for 2 seconds. The LED indicator will flash red twice when the IR night lights are on and three times when they are off.
The SQ11 can also be used as a webcam by connecting it to a computer via the provided USB cable. Once plugged in, press the POWER button once to switch to webcam mode, where it will capture video and photos in 720p.
Watching Live Remote Cameras: A Step-by-Step Guide
You may want to see also

Recording Video and Taking Photos
The SQ11 Mini DV Camera is a small but powerful device with a range of applications. It can be used as a sports camera, a nanny cam, a dashcam, or a body camera. The camera has three main modes: 720p video, 1080p video, and photo.
To record video, first, make sure the camera is on standby by pressing the power button once. The LED indicator will give a solid blue light to show that it is on standby to record video in 720p. To toggle between 720p and 1080p, press the MODE button. The LED indicator will show solid red and blue lights when in 1080p standby. Press the POWER button once to start recording. The LED will flash a few times before going out, and the camera will start recording. It will automatically save videos every 5 minutes. Press the POWER button again to stop recording and save the video.
To take photos, press the MODE button twice from the video mode to enter photo standby mode. The LED indicator will show a solid red light. Press the POWER button once to take a photo. The LED will flash once to indicate that the picture has been taken.
Apple Watch Series 3: Camera-Equipped or Not?
You may want to see also

Using the night vision mode
The SQ11 Mini DV camera has a night vision mode that can be activated by holding down the power button for 2 seconds. The IR night lights will turn on, indicated by the red LED flashing twice, and they can be turned off by holding the power button for 2 seconds again, with the red LED flashing three times to indicate this.
The night vision LEDs have a poor range, so they will only be useful if your subject is within a couple of feet of the camera lens. The night vision mode can be used at the same time as the motion detection mode.
To set up the SQ11 Mini DV camera, insert a microSD card into the flash card slot. It is recommended to use a 32GB card to maximise storage. Then, charge the camera using the supplied USB cable by plugging it into your computer. The LED indicator on the side of the camera will flash red while charging and will show a solid red light when fully charged.
The SQ11 Mini DV camera has three main modes: 720p video, 1080p video, and photo. The mode button can be used to toggle between these modes, with the LED indicator showing blue for 720p video, blue and red for 1080p video, and red for photo.
Stop Neighbors Spying: Block Their Camera Views
You may want to see also

Using the motion detection recording mode
The SQ11 Mini DV Camera has a motion detection recording mode that can be activated by following these steps:
- Ensure that the camera is in either the 720p or 1080p video recording standby mode. This can be done by pressing the "On/Off" button to turn on the camera, which will illuminate the blue LED light.
- From the video recording standby mode, press and hold the "Mode" button for 3 seconds.
- The camera will now enter the motion sensor recording mode, indicated by the simultaneous blinking of the red and blue LEDs.
- Once motion is detected, the camera will automatically start recording video, with the red and blue LEDs blinking simultaneously.
- In this mode, the video recording will be automatically saved every 5 minutes.
To exit the motion detection recording mode or stop recording, simply press the "On/Off" button.
It is important to note that the camera's motion detection feature has a range of 5 meters, and the overall duration of work in motion sensor mode is approximately 5 hours.
Pairing Apple Watch with Camera: A Simple Guide
You may want to see also
Frequently asked questions
The SQ11 Mini DV Camera is a small but powerful device with many applications. It is often marketed as an alternative sports camera but can be used for security applications as it can be mounted and hidden almost anywhere.
First, insert a spare microSD card to store photos and videos locally. Then, charge the camera using the supplied USB cable and allow the LED indicator to turn solid red. Once charged, you can set the date and time by creating a text file named "TIMERSET.txt" in the root directory of the device's memory card.
The SQ11 has three main modes: 720p video, 1080p video, and photo. These can be accessed using the mode button. To record video, press the POWER button once and the LED will flash a few times before going out. The camera will automatically save videos every 5 minutes. To take a photo, enter photo standby mode and press the POWER button.
The SQ11 Mini DV Camera has a video resolution of 1920x1080 or 1280x720, a frame rate of 15 or 30 frames per second, and a photo resolution of 4032x3024. It supports Micro SD cards up to 64GB and has a viewing angle of 140 degrees.
Reviews for the SQ11 Mini DV Camera are mixed. Some users have given positive reviews, stating that the camera has good video quality and responsive motion sensing. However, other users have criticized the night vision and short battery life, which limit its applications.


