Adobe Camera Raw has recently added a new feature that allows users to preview their work and compare it with the original version as they edit and retouch their images. This feature is available in Photoshop CC and can be accessed by going to the bottom right corner below the image, where there are four new preview options to choose from. One of these options is the Before and After Views, which allows users to see a side-by-side comparison of the original and adjusted versions of their image. To toggle between these views, users can click on the first icon in the row, which looks like either a letter Y or a wine glass, or simply press Q on their keyboard. This makes it easy for users to see the changes they have made and decide if they want to keep them or try something different.
| Characteristics | Values |
|---|---|
| Toggle before and after | Press the "P" key |
| Toggle individual panel previews | Click the fourth icon in the row |
| Toggle between before/after views | Click the first icon in the row |
| Toggle between left/right side-by-side view | Click the before/after icon once |
| Toggle between left/right split view | Click the before/after icon twice |
| Toggle between top/bottom view | Click the before/after icon three times |
| Toggle between top/bottom split view | Click the before/after icon four times |
| Toggle back to the original single view | Click the before/after icon five times |
| Jump to a specific view | Click and hold the before/after icon and select from the menu |
| Turn off views | Click and hold the before/after icon, choose Preview Preferences, and uncheck the views you want to skip |
What You'll Learn
- Toggle the preview on and off using the Preview checkbox or the ''P'' key
- Cycle through the before/after views using the first icon in the row
- Toggle individual panel previews on and off by clicking the fourth icon in the row
- Swap the before and after previews
- Copy the current settings to the before version
![]()
Toggle the preview on and off using the Preview checkbox or the ''P'' key
When editing images in Camera Raw, you can compare your work with the original version by toggling the preview on and off. This can be done in two ways: using the Preview checkbox or by pressing the 'P' key.
The Preview checkbox is located at the top right of the image preview. Clicking this checkbox will allow you to see your changes, while unchecking it will show the original version of your photo. However, an easier way to toggle the preview is by simply pressing the 'P' key on your keyboard. This keyboard shortcut will quickly switch between showing your adjustments and the original image.
In addition to the Preview checkbox, Camera Raw also offers a Panel Preview icon, which is the fourth icon in the row below the image. Clicking this icon will reset all the settings in the currently open panel to their defaults, allowing you to see the image before any adjustments were made.
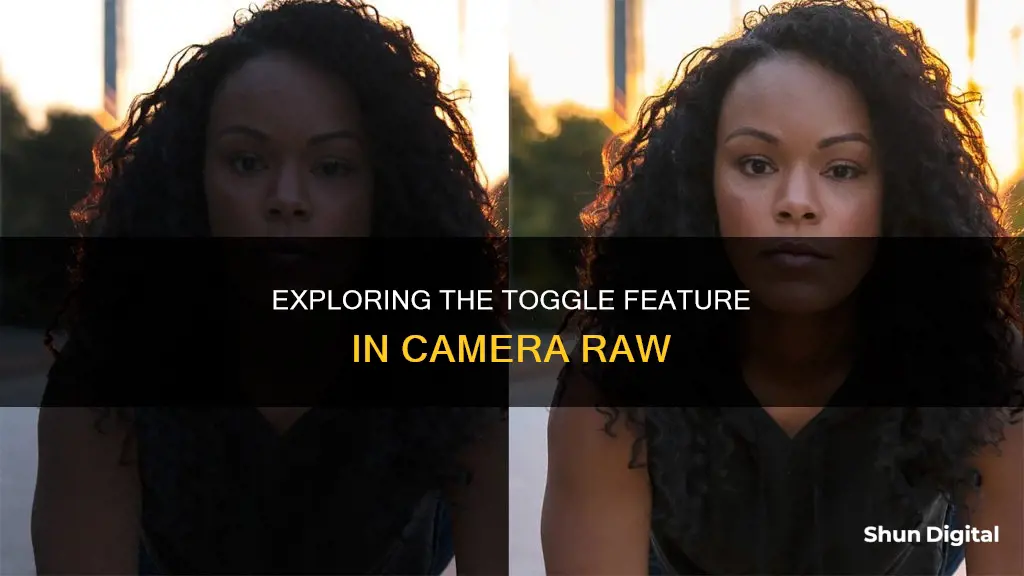
Furthermore, Camera Raw provides Before and After views, which allow you to see a side-by-side comparison of your image. You can access these views by clicking the first icon in the row, which looks like either a letter 'Y' or a wine glass. Clicking this icon will display the original version on the left and the adjusted version on the right, making it easy to compare the two versions.
By utilising these preview options, you can easily toggle between your work-in-progress and the original image, making it simpler to track your progress and adjustments in Camera Raw.
Charging the FinePix XP120: A Step-by-Step Guide
You may want to see also
![]()
Cycle through the before/after views using the first icon in the row
To cycle through the before/after views in Camera Raw, click on the first icon in the row (the icon that looks like either a letter Y or a wine glass). This will display both versions of the image side by side, with the original version (before) on the left and the adjusted version (after) on the right.
Clicking the icon a second time will give you a split view, with the left half showing the original and the right half showing the corrected version. A third click will switch to a top and bottom view, with before on the top and after on the bottom. Finally, clicking the icon one more time will give a top and bottom split view, with the top half displaying the before version and the bottom half showing the after version.
You can also cycle through these views by pressing the letter Q on your keyboard. Clicking the icon or pressing Q repeatedly will return you to the original single view.
If you want to jump straight to a specific view, click and hold the icon to bring up a menu showing all five preview modes and select the one you want.
Replacing Sanyo Camera Battery: Step-by-Step Guide
You may want to see also
![]()
Toggle individual panel previews on and off by clicking the fourth icon in the row
To toggle individual panel previews on and off, click the fourth icon in the row. This is the one on the far right. Clicking this icon will reset all the settings in the currently open panel to their defaults.
This is how it works: when you click the fourth icon, your Basic panel will be back to its default settings. This allows you to see what the image looked like before you made any adjustments. When you click the icon again, your settings in the panel will be restored.
This feature is useful if you want to compare your work with the original version of the image.
Charging Camera Batteries: Alone Contestants' Strategies
You may want to see also
![]()
Swap the before and after previews
Swapping the before and after previews in Camera Raw is a simple process.
Firstly, you need to be running Photoshop CC, which is available with an Adobe Creative Cloud subscription. Once you have the image open in Camera Raw, you can find the preview options in the bottom right corner below the image.
To swap the before and after previews, click the second icon from the left. This will display your adjusted image as the 'Before' version and your original, unedited image as the 'After' version. Click the same icon again to swap them back.
You can also use the keyboard shortcut 'P' to swap the before and after previews.
Cleaning Camera Battery Corrosion: DIY Guide
You may want to see also
![]()
Copy the current settings to the before version
To copy the current settings to the before version in Camera Raw, you can follow these steps:
- Open the raw images you want to edit in Photoshop.
- Edit one image as desired.
- Right-click on the edited image and select "Copy Edit Settings" or use the keyboard shortcut "Ctrl + Alt + C" on Windows or "Cmd + Option + C" on Mac.
- Select your next image by right-clicking or using the "Ctrl" or "Command" key to select multiple images at once.
- Choose "Paste Edit Settings" by right-clicking or using the keyboard shortcut "Ctrl + Alt + V" on Windows or "Cmd + Option + V" on Mac.
By following these steps, you can copy and paste the current settings to multiple images at once, allowing for efficient batch editing.
Additionally, you can create snapshots of your image at different stages of editing in Camera Raw. Snapshots allow you to easily compare the effects of adjustments and revert to earlier settings if needed. To create a snapshot, click the New Snapshot button in the Snapshots tab of the Camera Raw dialog box and provide a name for the snapshot. You can then apply those settings to other images by selecting the snapshot from the Snapshots tab.
Exploring Camera Raw Files: A Quick Preview Guide
You may want to see also
Frequently asked questions
Press the "P" key to toggle the preview on and off.
Click the first icon in the row (the icon that looks like either a letter Y or a wine glass) or press the "Q" key to cycle through the views.
Click the second icon from the left or press "P" to swap the views.