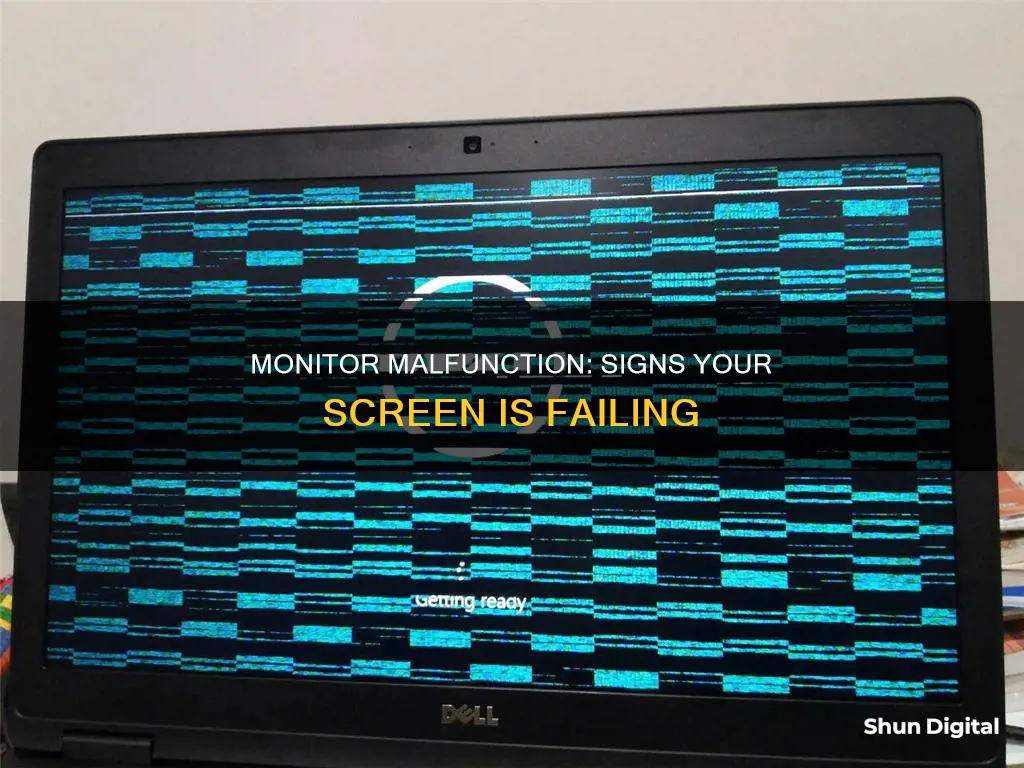
If your monitor suddenly stops working, it's important to figure out whether the problem lies with the computer or the monitor itself. There are several signs that indicate your monitor may be going out. For example, if your monitor takes longer than usual to turn on, this could indicate an internal problem. Other signs include a dim image, flickering or blinking, strange lines and patterns, and stuck or burnt-out pixels. If you're experiencing any of these issues, it's important to take action, as your monitor may be reaching the end of its lifespan.
| Characteristics | Values |
|---|---|
| Dim images on screen | Monitor failure |
| Flickering and blinking images | Monitor failure, loose cable, change of resolution, refresh rate, bad drivers, or a corrupted graphics card |
| Monitor takes too much time to turn on | Internal problem, swollen capacitors, poor factory soldering, micro-cracks |
| Corrupted pixels | Faulty graphic card, RAM, or computer's bad power supply |
| Strange lines and patterns on screen | Glitch in hardware, failure of the graphic card or monitor's screen panel |
| Monitor does not turn on | Problem with the power supply board, POST error, or incomplete connection to the monitor |
| Monitor noise and image jitter | Poor-quality cable or PC video card without an EMI suppressor |
| Screen burn-in | Identically positioned graphics displayed for a long time |
| Hibernating at odd times | Problem with the power supply |
| Turn on and off without prompting | Problem with the power supply |
| Slow to reach full brightness | Monitor is wearing out |
| Stuck or burnt-out pixels | Monitor is going out |
What You'll Learn

Check power and cable connections
If your monitor suddenly stops working, it's important to figure out if it's the computer or the monitor that's causing the issue. Before you begin troubleshooting, ensure that your monitor is switched on. Some monitors have more than one power button or switch, so confirm that all of them are turned on.
Now, let's focus on checking the power and cable connections:
Firstly, check for any disconnected or loose power cable connections. A loose or unplugged power cable could be the reason why your monitor is not functioning properly. Make sure that all the cable connections are secure and firmly plugged in at both ends—the wall outlet or power strip, and the back of the monitor.
Next, check for any disconnected or loose data cable connections. The power light on your monitor might be on, but if it's amber or yellow instead of green, it could indicate an issue with the data cable. The data cable connects your monitor to your computer, so ensure that it's securely connected at both ends.
Additionally, check for any cable adapters that might not be fully secured. This could include small connectors that join an HDMI or DVI cable to a VGA plug, or other similar connections. Ensure that all adapters and connectors are firmly attached and compatible with each other.
If you're using a dual-monitor setup, make sure that all monitors are set up properly. This includes ensuring that your operating system is using the extended displays correctly. Issues with dual-monitor setups could be due to missing or corrupt video card drivers, or an incorrect setup procedure. For example, if a projector is connected to a laptop but not set up as an additional screen, it might remain black.
If you've checked and secured all the power and cable connections, and you're still experiencing issues, move on to the next step of troubleshooting. This could include testing your monitor with a different data cable, adjusting brightness and contrast settings, or testing your monitor with another computer.
VA Monitors: LCD Revolution for Your Setup
You may want to see also

Test monitor brightness and contrast settings
If you're experiencing issues with your monitor, it's important to determine whether the problem lies with the monitor itself or with the computer's ability to send information to the monitor. One way to do this is by testing the monitor's brightness and contrast settings. Here are some detailed steps to help you through the process:
Firstly, ensure that your monitor is turned on. This may seem obvious, but it's worth checking, especially if your monitor has multiple power buttons or switches. Make sure they're all switched on. If your monitor appears to be on, but you're not seeing any display, try turning the brightness and contrast settings up to maximum. Modern monitors usually have a single on-screen interface for these settings, but older monitors may have manual knobs for adjustment.
If you still can't see any display, try replacing the data cable that connects your monitor to your computer. A loose or disconnected cable could be the culprit. If possible, use a data cable that is known to work. Additionally, check your cable adapters and connections, including small connectors that join an HDMI or DVI cable to a VGA plug, or vice versa. Make sure they're all securely connected.
If your monitor's power light is completely off, a disconnected power cable is likely the issue. If the power light is on but is amber or yellow instead of green, it could indicate a problem with the data cable or that your monitor isn't receiving information from your computer.
If adjusting the brightness and contrast settings and checking the cables don't solve the issue, the problem may lie with your computer's video card. Try connecting your monitor to another computer to test its functionality. If your monitor displays correctly on another computer, then your original computer's video card or other internal components may be at fault.
If your monitor fails to display on multiple computers, the issue is likely with the monitor itself, and you may need to consider a replacement.
Is Your Monitor Glossy? Here's How to Tell
You may want to see also

Test with another device
If your monitor suddenly stops working, the problem could be with either the monitor itself or the computer it's connected to. Testing the monitor on another device can help you determine which is the case.
The fastest way to rule out your monitor as the source of the problem is to test it on another computer. First, disconnect the monitor from your computer. Then, connect it to another properly functioning computer, making sure to use the same cables that you were previously using. If the monitor turns on correctly and displays what's supposed to be on the screen, you can conclude that the issue lies with your original computer, not the monitor.
If the screen doesn't turn on within a few seconds, try using the working monitor's connection and power cables. Connect only the test monitor to the computer and reboot the test computer to eliminate every variable other than the monitor. If the monitor still doesn't turn on, it is most likely blown.
You can also test your monitor on a laptop computer, which usually features a video-out VGA, DVI, or HDMI port that can be used to test the laptop with an external monitor.
If you suspect that the problem might be with your cables or video card, try changing the cables on the monitor. If you still experience problems with the graphics not displaying correctly, the issue may lie with the card itself. Take the monitor to another computer and test it to see if the problem persists.
Bigger Monitors: Better Experience or Just a Myth?
You may want to see also

Look for dead pixels
A monitor with dead pixels is a common sign of a failing monitor. Dead pixels are pixels that don't work, appearing as blank pixels on your monitor. They can also manifest as stuck or brighter pixels. Dead pixels usually cannot be fixed without replacement as the hardware is damaged. If you notice a few dead pixels on your monitor, it's recommended to get an early replacement to avoid further issues.
You can identify dead pixels by performing a simple test. Check your monitor for any small black dots or blank spots. These dots or spots are dead pixels. If you find a few dead pixels, it's likely that your monitor is starting to fail.
To confirm the presence of dead pixels, you can use online tools such as checkpixels.com. This website allows you to check for dead pixels on your monitor by displaying a series of coloured screens. If you notice any anomalies or blank spots on these coloured screens, it indicates the presence of dead pixels.
Additionally, you can try using software solutions like JScreenFix, Online Monitor Test, or Killdeadpixel. These tools work by cycling the pixels on your monitor on and off or using pattern displays, which can help fix minor issues with dead pixels. However, if the problem persists, it's likely that the hardware is damaged and needs to be replaced.
It's important to address dead pixel issues promptly as they can lead to more severe problems over time. A monitor with a significant number of dead pixels can become difficult to use, impacting your productivity and overall user experience. Therefore, if you notice any signs of dead pixels, it's recommended to take proactive measures to ensure the longevity of your monitor.
Unlocking G-Sync: Is My ASUS Monitor Compatible?
You may want to see also

Check for monitor noise
If your monitor is making noise, it could be due to a variety of reasons. Firstly, it is important to determine whether the noise is coming from the monitor itself or another connected device. In some cases, the noise may be originating from a speaker, a power brick, or even a faulty USB device connected to the monitor. Therefore, it is recommended to disconnect all cables and devices from the monitor and power it off to isolate the source of the noise.
If the noise persists even when the monitor is disconnected from all external devices and power sources, it could be due to a component in the monitor, such as a capacitor in the power supply. In such cases, pressing the power button a few times to discharge the power may help. Additionally, certain monitors have a LED light on the power button, which can be used to discharge the power.
For monitors that emit a high-pitched noise, the issue could be related to coil whine. This can sometimes be addressed by adjusting the monitor settings, such as the response time, switching to a different input cable or source, or disabling audio or HDR in the monitor settings. In some cases, the noise may be reduced by adjusting the brightness to maximum, as the whining noise often occurs when the monitor's brightness is reduced.
If the noise occurs during normal operation, it could indicate a potential failure of the monitor or one of its components. In such cases, it is recommended to consult a qualified technician for repair or replacement.
Fixing LCD Monitors: DIY Guide to Screen Repair
You may want to see also
Frequently asked questions
If the monitor is faulty, it may not turn on at all. Check that the monitor is plugged in and the power is on. If it's still not turning on, try plugging it into a different power outlet. If the monitor is old, the problem could be internal and you may need to replace it.
Some common signs include a flickering screen, a black screen, missing half of the screen, slow to reach full brightness, and stuck or burnt-out pixels. If your screen is flickering, check your cable connections first as this may be the cause.
If you notice any of the issues mentioned above, try testing your monitor on another computer. If the monitor still doesn't work, you may need to replace it.


