Skin softening is a popular technique used in photography to enhance portraits and make them more eye-catching and attractive. While it can be a time-consuming process, especially when working with raw image formats, there are ways to streamline the process and produce images with accurate skin tones. This involves understanding the lighting, white balance, and exposure, as well as utilising tools such as the Spot Healing Brush Tool and the Texture Slider in Camera Raw.
| Characteristics | Values |
|---|---|
| Software | Adobe Camera Raw (ACR), Photoshop |
| Skin softening technique | Texture Slider in Camera Raw, Spot Healing Brush Tool |
| White balance | Use the white balance targeted adjustment tool (looks like an eye-dropper) |
| Exposure | Check the histogram in the upper right-hand corner of the screen |
| Luminance | Adjust using the orange slider in the HSL panel |
What You'll Learn
![]()
Utilise the Texture Slider in Camera Raw
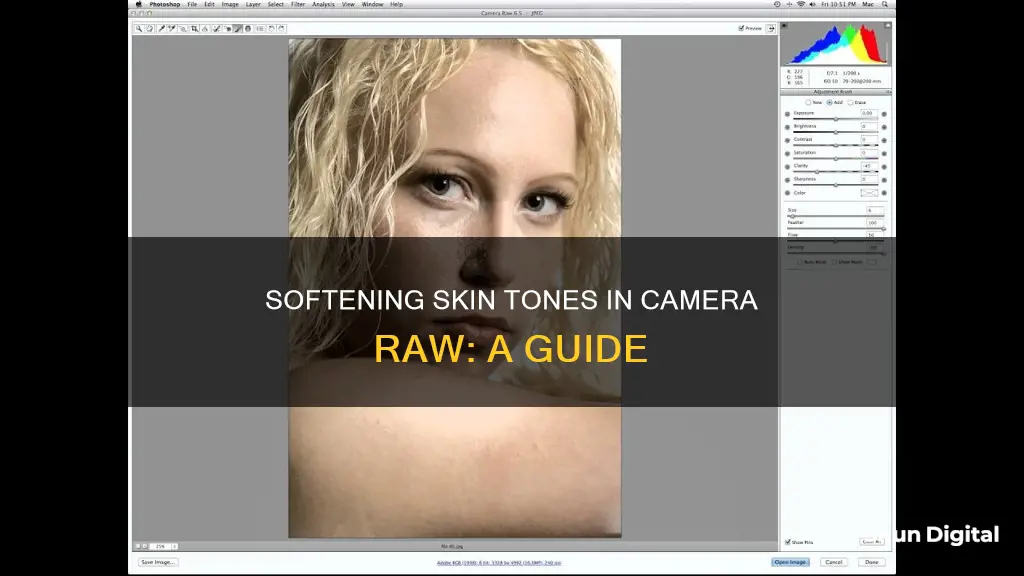
To soften skin in Camera Raw, you can utilise the Texture Slider. This slider can be used to decrease or increase the appearance of "texture" in a photograph while retaining fine details. Moving the slider to the left will reduce unwanted, medium-sized details, which is useful for minimising skin texture.
- Open your image in Adobe Camera Raw (ACR).
- Locate the Texture Slider. In Camera Raw, it is found on the Basic tab.
- View your image at 100% and adjust the Sharpening sliders to observe the effect on the finest details.
- Set the Sharpening Amount slider to 0, and then adjust the Texture slider from 0 to +100 to understand its impact on medium-sized details.
- Reset the Texture slider and scrub the Clarity slider to observe its effect on edge details and midtone areas.
- Once familiar with the effects, apply the desired amount of sharpening to your image.
- Decrease the Texture slider to negative values to soften the skin. For example, in a portrait, you might apply a Texture of -80 on the face and -30 on other skin areas.
- Check the texture at different zoom levels to avoid over or under-enhancing the image.
- To apply Texture selectively, use local adjustment tools like the Graduated Filter, Radial Filter, or Adjustment Brush.
- Experiment with different adjustments and combinations to fine-tune the skin softening effect.
By following these steps, you can effectively utilise the Texture Slider in Camera Raw to soften skin while retaining important skin details and creating a natural look.
Why 18650 Batteries Are Popular in Cameras
You may want to see also
![]()
Remove blemishes with Photoshop's Spot Healing Brush Tool
To remove blemishes with Photoshop's Spot Healing Brush Tool, follow these steps:
Firstly, open your image in Photoshop. You will see the image on the Background layer in the Layers panel. To keep your original image separate from your retouching work, add a new layer above the image by holding the Alt (Win) / Option (Mac) key and clicking the Add New Layer icon. Name this new layer "Spot Healing" and click OK.
Now, select the Spot Healing Brush from the Toolbar. In the Options Bar, turn on the Sample All Layers option. This allows the Spot Healing Brush to sample texture not just from the currently-selected layer (the blank "Spot Healing" layer), but also from the image below. Still in the Options Bar, set the Type to Content-Aware. This allows Photoshop to make more intelligent decisions when choosing good replacement texture.
Next, adjust the brush size and hardness to cover the blemish you want to remove. Make sure your brush is slightly larger than the blemish so that Photoshop can copy part of the image around it to fill it in. A harder brush will remove the blemish without blurring the edges.
Finally, click or drag over the blemish to remove it. If you are removing something small, try a single click and repeat if necessary. For larger areas, drag the brush in short strokes. Photoshop will replace the blemish with good skin texture from the surrounding area.
You can also adjust the blend mode of the brush in the Options Bar. The default setting is Normal, but changing it to Lighten will ensure that Photoshop only replaces pixels that are darker than the good texture. If a blemish is lighter than the normal skin tone, try the Darken mode.
To compare your retouching work with the original image, toggle the "Spot Healing" layer on and off by clicking its visibility icon in the Layers panel.
In addition to removing blemishes, you can also use the Spot Healing Brush Tool to fix white balance and exposure issues that affect skin tones. Correct white balance is crucial for achieving pleasing skin tones. If your image appears too warm or cool, adjust the temperature slider to the right or left until you get a pleasing white balance. You may also need to adjust the Tint. Check your exposure using the histogram—it should look like a smooth bell curve with the high point in the middle. If your curve falls too far to one side, adjust the exposure slider until the majority of the curve is in the middle.
By following these steps, you can use Photoshop's Spot Healing Brush Tool to effectively remove blemishes and improve skin tones in your images.
Charging the Panasonic Lumix: How Long Does It Take?
You may want to see also
![]()
Adjust the white balance
Adjusting the white balance is crucial to achieving accurate and appealing skin tones in your photographs. Incorrect white balance can result in skin appearing grayish, bluish, yellowish, or orange, which are not desirable. Here's a comprehensive guide on how to adjust the white balance to enhance your skin tones:
Understanding White Balance:
White balance refers to the colour temperature of the lighting conditions in your photograph. It affects how warm or cool your image appears. A correct white balance ensures that neutral colours, such as white or gray, are accurately represented in your photo.
Using the White Balance Targeted Adjustment Tool:
To check if your white balance is accurate, utilise the White Balance Targeted Adjustment Tool, which resembles an eye-dropper. Click on this tool, then select an area in your photo that should be white, such as the whites of the eyes. This tool will provide feedback on the appropriate white balance setting for your image.
Adjusting the Temperature:
If your image appears too warm or cool, you can adjust the temperature using the Temperature slider. This slider is usually located on the right side of your screen. Move the slider left or right until you achieve a pleasing white balance.
Fine-tuning with Tint:
In some cases, you may also need to adjust the Tint setting. The Tint slider can be used to compensate for a green or magenta tint in your image. Decreasing the Tint will add green to the image, while increasing it will add magenta.
Preventing Colour Cast:
Incorrect white balance can lead to a colour cast, which is one of the biggest challenges in photography. A colour cast can make your image appear flat and affect the overall aesthetic. By adjusting the white balance, you can minimise or eliminate this issue, resulting in more vibrant and true-to-life colours.
Using Adobe Camera Raw (ACR):
Adobe Camera Raw is a powerful plugin that allows you to import and adjust RAW images. It provides easy access to the white balance adjustment, known as Temperature in ACR. You can also use the eyedropper tool within ACR to select a neutral gray portion of your image, and ACR will automatically adjust the white balance to neutralise that area.
Working with JPEGs:
While it is easier to adjust the white balance of RAW photos, TIFFs, PSDs, and other minimally compressed files, you can also edit JPEGs. However, be cautious when adjusting JPEGs, as excessive adjustments may lead to colour issues or compression artefacts.
By following these steps and paying attention to the white balance, you can significantly improve the skin tones in your photographs, making them more balanced, natural, and visually appealing.
Charging the Garmin Virb: Battery Power Explained
You may want to see also
![]()
Ensure correct exposure
To ensure correct exposure when softening skin in Camera Raw, there are a few tricks you can use to achieve more balanced and eye-catching skin tones.
Firstly, you should pay attention to the white balance. The correct white balance will set the stage for great skin tones. If the white balance is too cool, skin will appear grey or bluish. Conversely, if the white balance is too warm, the skin will look yellow or orange, and these options are not very pleasing to the eye, nor easy to work with later on in the editing process. To check if your white balance is accurate, use the white balance targeted adjustment tool, which looks like an eye-dropper and is located at the top of your screen. Click on the dropper, then click on a white area of your photo. The whites of the eyes are a good place to start. This will indicate where the white balance should be set. If the image still appears too warm or cool, use the temperature slider to adjust until you get a more pleasing white balance.
Next, check that your exposure is correct. Look at the histogram in the upper right corner of your screen. Ideally, you want it to look like a smooth bell curve, with the high point in the middle. If the curve goes too far to either side, this indicates that your photo is over or underexposed, which will affect your skin tones. Over-exposure will cause skin tones to appear grey and dark, while under-exposure will make them too bright and blown-out in some spots.
If your curve does fall too far to one side, you can use the exposure slider to fix it. Move the slider left or right while watching the histogram. When the majority of the curve is in the middle, you have corrected the exposure. In some photos, there may be very bright or dark areas that cause the histogram to spike. This often happens with a bright sky in the background. In this case, you should look at where the majority of the curve lies and ignore the out-of-range parts of the curve.
By following these steps, you can ensure that your exposure is correct, and your skin tones will be well on their way to looking great with minimal additional work.
Best Cameras Compatible with the AZ16-1 Battery
You may want to see also
![]()
Use luminance sliders to adjust brightness
When editing images, you can use luminance sliders to adjust the brightness of your image. Luminance sliders allow you to adjust the brightness of specific colours in your image.
In Adobe Camera Raw, you can find the luminance sliders by locating the HSL panel. Click on the fourth button to the left, the HSL/Grayscale button. After selecting that option, three tabs will appear. Click on the Luminance tab.
The luminance sliders have two markers, one on the left and the other on the right. The left slider represents the darkest tones in the selection, and the right slider represents the lightest tones. The tonal range between the two sliders is the selected range. As you move the sliders, the area covered by the mask changes to reflect the selection.
You can also adjust the Smoothness slider to help blend the Luminance Range Mask selection. Moving the Smoothness slider to the left will make the selection edge harder and less blended. Moving it to the right will smooth the selection and improve blending, but it will also make it less precise.
The Luminance Range Masking feature in Camera Raw allows you to refine your selection based on how dark or light the image tones are. This can help you make better selections and improve the quality of your editing.
Outdoor Game Motion Cameras: How Long Do Batteries Really Last?
You may want to see also
Frequently asked questions
Use the Texture Slider in Camera Raw.
Pay attention to the white balance. If it's too cool, the skin will appear grey or bluish. If it's too warm, the skin will look yellow or orange.
Use the white balance targeted adjustment tool (it looks like an eye-dropper). Click on the dropper, then click on a white area of your photo. Adjust the temperature using the slider if you're not happy with the result.
Make sure your exposure is correct by checking the histogram. It should look like a smooth bell curve, with the high point in the middle. Adjust the exposure slider if the curve falls too far to one side.
Locate the luminance sliders (look for the HSL panel). Click on the fourth button from the left, HSL/Grayscale, then click on the Luminance tab. Choose the orange slider and move it to the right.