The Samsung Galaxy S7 offers a variety of camera modes to help you capture unforgettable moments. The default mode for the rear camera is Auto mode, while the front-facing camera defaults to selfie mode. However, you can manually change these settings or create a shortcut on your home screen to launch specific camera modes directly.
The pre-installed camera modes for the rear camera include Selective Focus mode and Panorama mode, while the front-facing camera includes Selfie mode. Additionally, you can download and install extra camera modes, such as Beauty Face mode, from the Galaxy Apps store.
To access the different camera modes, open your Camera app and swipe left or right on the camera screen or tap the Mode button. From there, you can select the desired camera mode. Keep in mind that the available modes may vary depending on your device model and region.
| Characteristics | Values |
|---|---|
| Default mode for rear camera | Auto mode |
| Default mode for front-facing camera | Selfie mode |
| Pre-installed camera modes for rear camera | Selective focus mode, hyperlapse, virtual shot, live broadcast, video collage |
| Pre-installed camera modes for front-facing camera | Selfie mode, wide-selfie mode |
| Additional camera modes available for download | Beauty face mode, dual camera mode, animated gif mode |
What You'll Learn
![]()
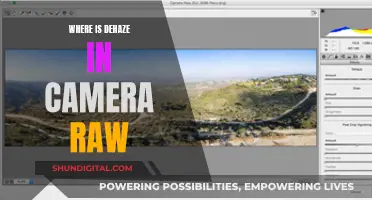
How to access and use Pro Mode
To access Pro Mode on the Samsung Galaxy S7, open the camera app and look along the top of the viewfinder area. You should see several presets, including Food, Panorama, and Selective Focus. Slide over to the "Pro" preset to access Pro Mode. If you don't see these settings, you may be using an older model of the Galaxy phone. In that case, slide over to the leftmost panel in the viewfinder and click the "Pro" preset there.
Pro Mode on the Galaxy S7 gives you access to DSLR-style manual controls, allowing you to tweak various aspects of the photography experience. The main controls are located along the right-hand side of the interface. From top to bottom, you'll find settings for filters, focusing, white balance, ISO, shutter speed, and exposure control.
Here's a breakdown of what each of these settings does:
- Filters: Preset filters that can be applied to your photos before you take them.
- Focusing: Allows you to take greater control over zeroing in on a subject, which is particularly useful for macro close-ups.
- White Balance: Adjusts the colour to look more natural. You can choose from various presets, such as Daylight, Cloudy, or Fluorescent.
- ISO: Adjusts the light sensitivity of the image sensor. A lower setting makes the sensor less sensitive to light, while a higher setting increases sensitivity.
- Shutter Speed: Determines how fast or slow the sensor captures light, affecting how motion is captured in your photos.
- Exposure: Adjusts the brightness and contrast of your photos.
In addition to these settings, there are other basic controls located on the left-hand side of the interface. These include automatic focus, focus metering, timer, flash, photo quality, and settings.
One of the benefits of Pro Mode is that you can leave most of these settings on Auto and only tweak the ones you want to adjust. This makes it a beginner-friendly way to get more out of your Galaxy S7's camera. As you get more comfortable with these settings, you can experiment with different combinations to improve your photography skills.
Conditioning Camera Batteries: Prolonging Battery Life
You may want to see also
![]()
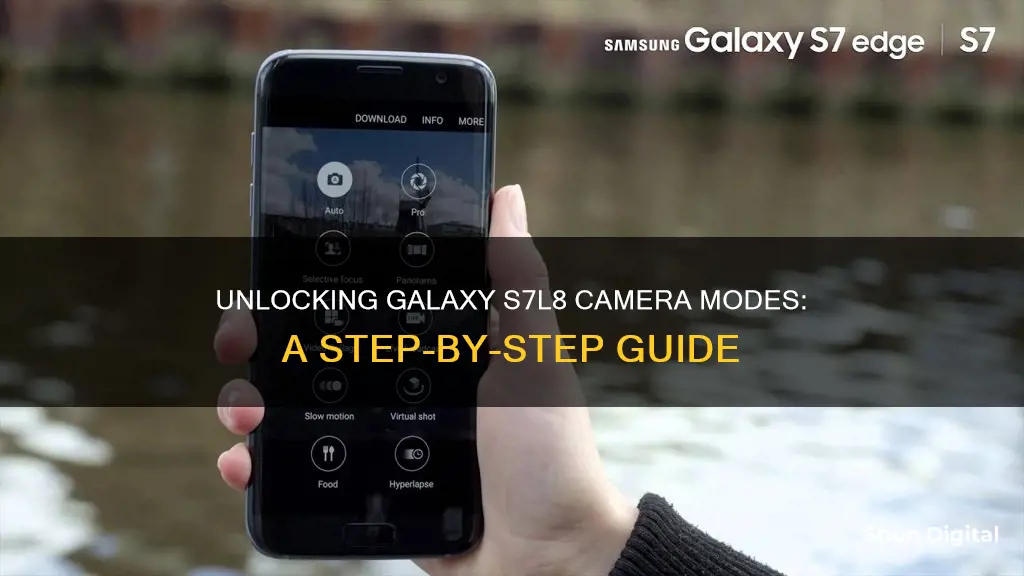
How to use Selective Focus Mode
The Selective Focus Mode on the Samsung Galaxy S7 allows you to make specific objects or areas stand out in your photo and tweak the focus to your liking. It does this by taking multiple photos of your subject at varying focus levels, and then letting you change the focus of your photo after it's been saved to your gallery. This is a great way to avoid blurry images, but it does take a bit longer for the camera to snap multiple shots.
Here's how to use it:
- From the front screen, choose "Apps".
- In the Galaxy S7 camera preview screen, choose "MODE".
- Choose "Selective focus".
- Select a location on the screen where you would like your camera to focus.
- Once the image has been taken, choose "Preview".
- Select the picture to change the focus. You will have three options: "Near focus", which focuses on things in the foreground; "Far focus", which focuses on things in the background; and "Pan focus", which makes the entire picture in focus.
- When you're happy with your photo, choose "Save" or "Save As" to keep it.
The Selective Focus Mode is a fun feature to play around with and can give you some interesting results. It's a great way to highlight specific subjects or objects in your photos and ensure they stand out.
The High Cost of Camera Batteries: Why?
You may want to see also
![]()
How to use Panorama Mode
Panorama mode on the Galaxy S7 allows you to capture more of a scene by combining multiple images to create a panoramic photo. Here is a step-by-step guide on how to use it:
- From your home screen, open your apps.
- Depending on your device, either choose the "Mode" option or swipe across the screen to select "Panorama mode".
- Press the capture button to start taking your photo. An alignment box will appear on the screen to help you keep the scene aligned.
- Slowly move your device in one direction.
- When you have reached the maximum range or touch the stop button, your device will stitch the images together to form a complete panoramic photo.
- To view your panoramic photo, choose the preview thumbnail.
You can also use Motion Panorama on your Galaxy S7, which lets you take videos in the Panorama format. Here's how you can use it:
- On the preview screen, tap "Mode".
- Tap the "Motion" option at the top of the screen.
- Tap "On" to activate the Motion Panorama feature.
- Tap the camera icon to start taking photos.
- Slowly move your device in one direction. If completed, tap the "Stop" icon to stop taking photos.
- To view your captured Motion Panorama, tap the preview thumbnail on the preview screen.
- Tap the motion panorama icon. The captured motion panorama will start playing.
- You can tilt your device or swipe on the screen to rotate the captured motion panorama.
- To save the motion panorama as a video file, tap "Save Video".
Understanding Camera Raw Conversion: The Basics
You may want to see also
![]()
How to download and install additional camera modes
To download and install additional camera modes on your Galaxy S7, follow these steps:
- Launch the Camera app on your Galaxy S7 or Galaxy S7 edge.
- Enter the Galaxy S7 camera mode page by tapping "Mode" in the camera preview screen.
- Tap "Download" in the Galaxy S7 camera mode page.
- You will be directed to a hidden page in Galaxy Apps, where you can find a list of available additional camera modes.
- Select and download the desired camera mode. For example, to install Beauty Face mode, tap on it, then tap "Install."
- Once the installation is complete, check the additional camera modes by going back to the Galaxy S7 camera modes page. The newly installed modes will be marked with a downward arrow.
You can also add a shortcut for the additional camera modes to your home screen for quick access.
Browning Trail Cameras: Maximizing Battery Life
You may want to see also
![]()
How to use Live Broadcast
Live Broadcast is a feature on the Samsung Galaxy S7 that allows you to stream live video from your device to YouTube. This means you will need to have a YouTube account (through Google) set up and ready to go. The Live Broadcast feature can be used to stream to friends and family in real time through their smartphones, laptops, or tablets.
To set up Live Broadcast, open your device's native camera application and click on the “more” option in the bottom left corner. This will bring up thumbnails of all the camera features you have installed. If you don't see the option for Live Broadcast, you can hit the download thumbnail, which will redirect you to the Galaxy App Store where it can be easily downloaded.
When entering the Live Broadcast mode for the first time, you will be prompted with a disclaimer. Once you agree, you will have to link the YouTube account you want to stream from. You will then be asked to provide the following two permissions:
- View your basic profile info
- Manage your YouTube account
You must accept both permissions to use the Live Broadcast feature. After that, you can start live-broadcasting. Here are some things to keep in mind:
- Live-broadcasting works both publicly (anyone can watch) and privately (via invitation only)
- Video size is limited to Full HD and may not exceed 60fps
- Live video must be shot in landscape orientation
- Users can only stream from one account at a time
- Depending on quality and network speed, it may take a while to upload the video once the session has concluded
When you're ready to record, tap the Live button to get started. You will then have a few seconds to get ready before the broadcast begins. The duration of the broadcast is displayed at all times. To adjust the video quality, switch between accounts, enable auto-save, or switch on power saving, tap the settings icon in the bottom left of the display. Above that will be an Invite button, where you can share the link to your stream with your contacts. A separate icon for switching between the front and rear-facing cameras is also included just above the sharing thumbnail.
Charging the Heimvision Camera: A Step-by-Step Guide
You may want to see also
Frequently asked questions
To access the camera modes on your Galaxy S7, open the Camera app and swipe right and left to change shooting modes. You can also tap the Mode button on the camera preview screen to select the mode you want to use.
To download and install additional camera modes, launch the Camera app and tap "Mode" on the camera preview screen. Then, tap "Download" on the camera mode page and select the desired mode from the list of available options.
Pro mode allows you to adjust advanced settings such as ISO, aperture, white balance, and focus. To access Pro mode, open the Camera app and slide over to the "Pro" preset. From there, you can tweak the settings to achieve your desired effect.