Saving images in the correct format is crucial to ensure they can be used as intended. Camera Raw files are 16-bit images with 4096 tones per colour channel, resulting in over 68 billion colours. This format captures the maximum amount of data, providing more usable data than JPEG, TIFF, or other formats. However, it requires development in a RAW processor before further manipulation in an image editor. On the other hand, JPEG files are ready to use straight out of the camera and are widely supported, but they offer less control and have a smaller size. This guide will explore the steps to save Camera Raw files as JPEGs, a common requirement when using Adobe Photoshop.
| Characteristics | Values |
|---|---|
| Software | Adobe Photoshop CC, Adobe Bridge, Adobe Lightroom, Adobe Camera Raw (ACR), Adobe Photoshop Elements (PSE), After Effects |
| File Format | Digital Negative (DNG), JPEG, TIFF, PSD |
| Image Format | 8-bit, 16-bit |
| Colour Space | sRGB IEC61966-2.1, Adobe RGB (aRGB), ProPhoto |
What You'll Learn
![]()
Using Adobe Photoshop CC
To save a camera raw file as a JPEG using Adobe Photoshop CC, follow these steps:
- Open the camera raw file in Adobe Photoshop CC.
- Make any desired adjustments to the image using the various tools and tabs in the Camera Raw dialog box.
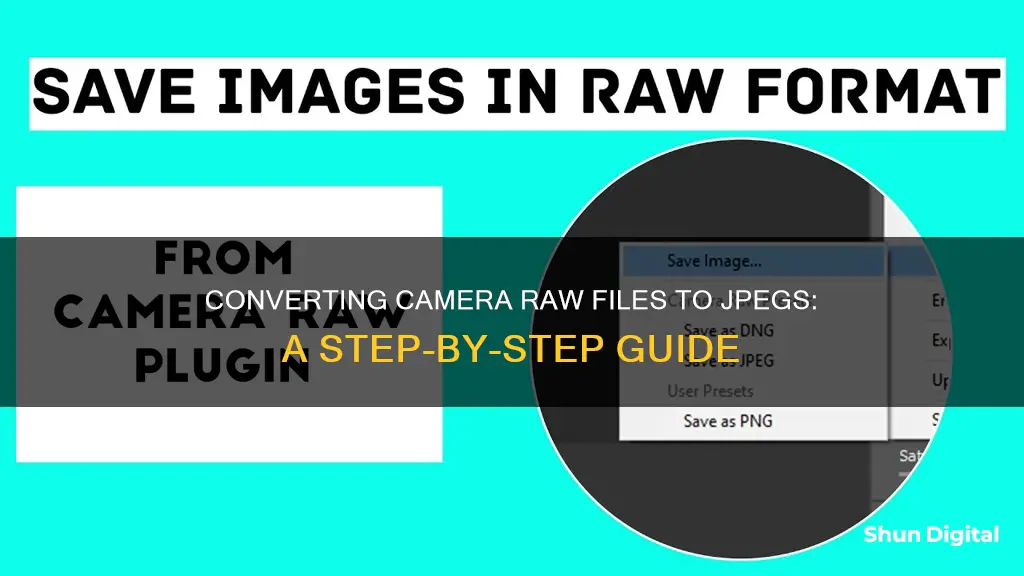
- Click the "Save Image" button in the lower-left corner of the Camera Raw dialog box.
- In the Save Options dialog box, specify the destination folder for the JPEG file.
- Choose a naming convention or enter a custom file name.
- Select "JPEG" as the output format.
- Click "Save" to save the JPEG file to the specified location.
Note: When saving as JPEG, the camera raw settings will be applied permanently to the copy. You can also save camera raw files in other formats such as Digital Negative (DNG), TIFF, or Photoshop (PSD) using the same process.
Lightroom and Camera Raw: What's the Deal?
You may want to see also
![]()
Using the Save Options dialog in Camera Raw
To save a camera raw file in another format, you can use the Save Options dialog in Camera Raw. Here's a step-by-step guide:
- Open and adjust your photo in Camera Raw.
- In the lower-left corner of the Camera Raw dialog box, click "Save Image.".
- The Save Options dialog box will open. Here you can specify the following options:
- Choose the destination folder for your saved file. You can either save it in the same location as the original file or select a new location by clicking the "Select Folder" button and navigating to the desired folder.
- Specify the filename and choose a naming convention that includes elements such as the date and camera serial number. Using informative filenames will help you keep your image files organised.
- Choose the file format from the "Format" menu. You can save your file as a Digital Negative (DNG), JPEG, TIFF, or Photoshop (PSD) file.
- Specify the versions of Camera Raw and Lightroom that can read the file. If you choose "Custom", you can set the compatibility with DNG 1.1 or DNG 1.3. The default lossless compression reduces file size without losing any information.
- Decide whether to embed a JPEG preview in the DNG file. If you choose to embed a preview, you can select the preview size. Embedding a preview allows other applications to view the contents of the DNG file without parsing the camera raw data.
- Choose whether to embed the original raw file in the DNG.
- Specify the amount of compression for JPEG files. Entering a higher value or choosing "High" or "Maximum" will reduce compression and increase file size and image quality.
- For TIFF files, decide on the type of file compression to use (no compression, LZW, or ZIP).
- For PSD files, you can choose whether to preserve cropped pixel data.
- Click "Save" and your file will be saved in the designated location. The original file will remain open in Camera Raw with its current settings.
By following these steps, you can easily convert and save your camera raw files in the desired format using the Save Options dialog in Camera Raw.
Charging the HP R847: A Step-by-Step Guide
You may want to see also
![]()
Using the Instant Fix Editor in Adobe Photoshop Elements
The Instant Fix Editor in Adobe Photoshop Elements is a great tool for making quick adjustments and adding effects to your photos. It is designed to be simple and straightforward, allowing you to enhance your images without spending too much time on the editing process. Here's a step-by-step guide on how to use the Instant Fix Editor:
- Select your photos: In the Media view, select one or more photos that you want to edit. You can use Ctrl-click (Cmd-click on Mac) to select multiple photos.
- Access the Instant Fix Editor: In the Action panel, click on the Instant Fix icon. The Instant Fix Editor will open, displaying either the Single-image Edit view or the Multi-image Edit view, depending on the number of photos you selected.
- Edit your photos: Experiment with the various edit options available in the Instant Fix Editor. You can apply effects, adjust lighting and colour, crop your images, remove red-eye, and more. The edits will be applied to all selected photos, except for Crop, Red-eye, and Flip, which are only available in the Single-image view.
- Apply and save changes: Once you're happy with your edits, click "Save" to apply the changes and remain in the Instant Fix Editor. If you want to exit to the Media view, click "Done". You can always undo changes using the "Undo" button or redo them with the "Redo" button. To discard all edits, use the "Reset" button.
The Instant Fix Editor is perfect for making simple adjustments and quick fixes to your photos. However, if you want more advanced editing capabilities, you can always switch to the full-fledged Photoshop Elements Editor by clicking the Editor button.
Drone Camera Battery Life: How Long Can You Fly?
You may want to see also
![]()
Using the Save Image button in the Camera Raw dialog box
To save a camera raw image in another format, you can use the Save Image button in the Camera Raw dialog box. This button is found in the lower-left corner of the dialog box.
Clicking the Save Image button will open the Save Options dialog box, where you can specify the following options:
- Destination: Choose whether to save the file in the same location or select a new location.
- File Naming: Choose a naming convention or enter a custom file name.
- Format: Choose from Digital Negative, JPEG, TIFF, or Photoshop format.
- Format-related options: For example, if you cropped the photo in Camera Raw and choose the Photoshop format, you can decide whether to preserve the cropped pixels.
After making your selections, click Save, and a copy of the file will appear in the designated location. The original file will remain open in Camera Raw with its current settings.
Note: When you save a photo in the JPEG, TIFF, or PSD format via this dialog, the Camera Raw settings are applied permanently. While you can still open and edit the resulting JPEG or TIFF file in Camera Raw, the sliders will reset to their default values. PSD files cannot be opened in Camera Raw.
Printing Photos from Adobe Camera Raw: A Step-by-Step Guide
You may want to see also
![]()
Using the File Save option in the ACR window
To save a camera raw image in another format, you can use the "Save Image" command in the Camera Raw dialog box. This will allow you to save the file in PSD, TIFF, JPEG, or DNG format.
- Open and adjust a photo in Camera Raw.
- In the lower-left corner of the dialog box, click "Save Image". This will open the Save Options dialog.
- Choose your desired destination. You can either select "Save in Same Location" or "Save in New Location". If you choose the latter, you will need to choose a location and then click "Select".
- In the File Naming area, choose a naming or numbering convention from the menu or enter a file name.
- Choose a format: Digital Negative, JPEG, TIFF, or Photoshop. Then, select any format-related options. For example, if you cropped the photo in Camera Raw and chose the Photoshop format, you will need to decide whether to check "Preserve Cropped Pixels".
- Click "Save". The copy of the file will appear in the designated location, while the original file will remain open in Camera Raw with its current settings.
Additionally, when saving a camera raw file as a JPEG, you can specify the amount of compression by entering a value from 0 to 12 or choosing from the menu. Selecting a higher value or choosing "High" or "Maximum" will result in less compression, increasing file size and image quality. JPEG is commonly used for displaying photographs and other continuous-tone images, such as in web photo galleries or slide shows.
It is worth noting that when you save a photo in JPEG, TIFF, or PSD format via the Save Options dialog, the Camera Raw settings are applied permanently. While you can still open and edit the resulting JPEG or TIFF file in Camera Raw, the sliders will reset to their default values. PSD files cannot be opened in Camera Raw.
How Shooting Raw Impacts Your Camera's Performance
You may want to see also
Frequently asked questions
Open the image in Adobe Camera Raw and click the "Save Image" button in the bottom left corner of the dialog box. In the Save Options dialog box, specify the location where you want to save the file and choose JPEG as the file format.
Yes, you can batch convert multiple raw files into JPEGs using the Organizer's Instant Fix Editor in Adobe Photoshop Elements.
To save an image as sRBG, set the color space to sRGB IEC6 1966-2.1 and the depth setting to 8 bits/channel. Then, use the "File Save" option and select JPEG as the file format.
JPEG files are smaller than RAW or TIFF files, which means you can store more photos on your device. JPEG files can also be used right out of the camera without any additional development, whereas RAW files need to be developed before they can be further manipulated.