Adobe Camera Raw is a powerful tool for photographers, offering greater control over the final image than shooting in JPEG. When you shoot in Camera Raw, your camera saves the image in its own raw file format, preserving the original, unprocessed pixels. This gives you the flexibility to reprocess the file at any time, making adjustments to white balance, tonal range, contrast, colour saturation, and sharpening.
To print files from Adobe Camera Raw, you first need to open the image files in Camera Raw. You can do this from Adobe Bridge, After Effects, or Photoshop. Once you've made your adjustments in the Camera Raw dialog box, you can either apply the changes and save the image or open a copy of the adjusted image in Photoshop for further editing.
It's important to note that the printing process may require additional steps to ensure accurate colour reproduction. This involves calibrating your monitor, setting the colour space in Camera Raw, and managing colour profiles in Photoshop to match your printing setup.
What You'll Learn
![]()
How to open files in the Camera Raw dialog box from Adobe Bridge
To open files in the Camera Raw dialog box from Adobe Bridge, you must have Photoshop or After Effects installed on your computer.
- Open Adobe Bridge and navigate to the folder containing the images captured in your camera's raw file format.
- Select an image by single-clicking on its thumbnail. Do not double-click, as this may open the image in Photoshop by default, depending on your preferences.
- Go to the File menu and choose "Open in Camera Raw" or simply click the "Open in Camera Raw" icon at the top of the Bridge interface.
- The Camera Raw dialog box will open, and you will still be able to see Adobe Bridge in the background.
- Make the desired adjustments to your image in the Camera Raw dialog box.
- Once you are happy with the results, click the "Done" button to accept your settings and close the dialog box.
By following these steps, you can take advantage of running Camera Raw in Adobe Bridge, which can improve your computer's speed and enhance your workflow.
Shipping Camera with Battery: Europe-Specific Guide
You may want to see also
![]()
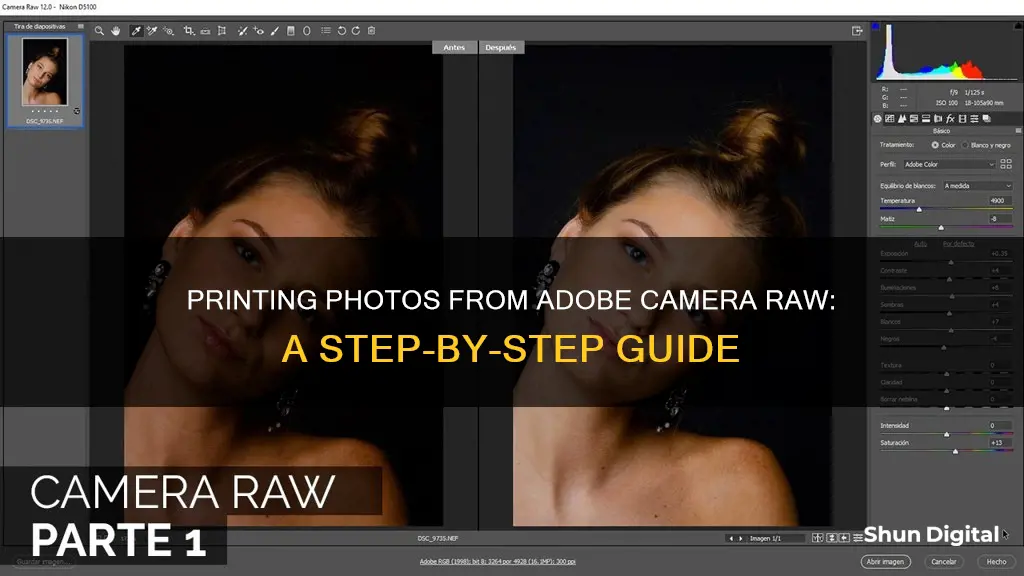
How to process and edit a camera raw file using the Camera Raw plug-in
To process and edit a camera raw file using the Camera Raw plug-in, follow these steps:
Step 1: Set Up Your Camera to Shoot in Raw
Firstly, you need to ensure your camera is set up to shoot in raw format. This can usually be done by navigating to the Menu button on your camera and selecting the option for Raw or Raw + JPEG under Image Quality.
Step 2: Transfer Files to Your Computer
Once you have captured your images in raw format, you need to transfer them from your camera's memory card to your computer. You can use Adobe Bridge to accomplish this by selecting "Get Photos From Camera" in the program.
Step 3: Open the Images in Camera Raw
Now, you can open your raw files in Camera Raw. You can do this by going to "File > Open" and navigating to your raw file location. You can also open JPEG and TIFF files in Camera Raw from Adobe Bridge.
Step 4: Make Basic Adjustments
In the Camera Raw dialog box, you can start making adjustments to your image. The Basic tab allows you to modify settings such as white balance, temperature, tint, exposure, highlights, shadows, whites, and blacks. Play around with these sliders to get your desired look.
Step 5: Fine-Tune with Other Tabs
The Camera Raw dialog box has several other tabs that offer more advanced adjustments. These include the Curve tab for fine-tuning the tonal scale, the Detail tab for sharpening and noise reduction, the Color Mixer tab for adjusting hues, the Optics tab for correcting lens defects, and more. Experiment with the different options to enhance your image.
Step 6: Save and Open in Photoshop
Once you are happy with your adjustments, you can save your image by clicking the "Save Image" button in the Camera Raw dialog box. This will allow you to save your file in various formats such as PSD, TIFF, JPEG, or DNG. After saving, you can then open your processed image in Photoshop for further editing by clicking the "Open Image" button.
Step 7: Continue Editing in Photoshop
Now, you can utilize the full capabilities of Photoshop to further refine your image. This may include adding adjustment layers, applying filters, making local adjustments with selection tools, or any other enhancements you desire.
Step 8: Save and Output Your Final Image
Finally, once you have finished editing your image in Photoshop, be sure to save your work. You can save your file in Photoshop's native PSD format to preserve layers and editing capabilities. If you want to share or print your image, you can then save a copy in a standard format such as JPEG or TIFF.
The Ultimate Battery Pack Guide for Photographers
You may want to see also
![]()
How to save a camera raw image in another format
To save a camera raw image in another format, you can convert and save a copy of the photo in the Digital Negative (DNG), JPEG, TIFF, or Photoshop (PSD) format. Here is a step-by-step guide:
- Open and adjust the photo in Camera Raw.
- In the lower-left corner of the Camera Raw dialog box, click the "Save Image" button.
- The "Save Options" dialog box will open, where you can specify the following options:
- Choose the destination folder for saving the file.
- Specify the filename and include relevant information such as the date and camera serial number for better organisation.
- Choose the desired file format from the "Format" menu.
Click "Save." The copy of the file will be saved in the designated location, while the original file will remain open in Camera Raw with its current settings.
Trail Camera Power: Battery or Solar?
You may want to see also
![]()
How to automate the processing of camera raw image files
To automate the processing of camera raw image files in Adobe Camera Raw, you can create an action or use the Batch command, the Image Processor, or the Create Droplet command. Here's a step-by-step guide:
- Open Adobe Photoshop and go to the "Window" menu. Select "Actions" to activate the Actions panel.
- Create a new action set by clicking on the "Create a new action set" button in the Actions panel. Name it appropriately, such as "Raw Processing."
- Click on the "Create a new action" button within the new action set. A dialog box will appear, prompting you to name the new action. You can name it something like "Raw Conversion."
- Start recording the action by clicking the Record button, which will turn red.
- Open a raw file by going to "File > Open" and selecting a raw image. It doesn't matter which file you choose as the name will be replaced later.
- The Adobe Camera Raw (ACR) dialog box will appear. Set the desired workflow options and conversion settings that you want to apply to your batch of raw images.
- Click "Open" to start the conversion. The image will open in Photoshop.
- In Photoshop, set the desired image mode and make any necessary adjustments.
- Go to "File > Save As" and select the appropriate file format, such as TIFF or PSD. Choose the desired options for saving the file.
- Click "OK" to close the "Save As" dialog box.
- Close the image window in Photoshop.
- Stop recording the action by clicking the Stop button, which will turn green.
- Save your action set by right-clicking on it in the Actions panel and selecting "Save Actions."
- To start the batch processing, go to "File > Automate > Batch."
- In the Batch dialog box, select the action set and action you just created.
- In the "Source" section, specify the folder containing the raw images you want to process. You can also select "Bridge" to process files selected in Adobe Bridge.
- In the "Destination" section, choose where you want the processed files to be saved. You can select the same folder as the source or a different destination folder.
- In the "Errors" section, choose whether to stop the process if an error occurs or to log the error and continue with the next file.
- Click "OK" to start the batch processing.
By following these steps, you can automate the processing of multiple camera raw image files using Adobe Camera Raw and Photoshop.
Camera Battery Care: How to Know if It's Dead
You may want to see also
![]()
How to adjust the tonality of your composite with curves
To adjust the tonality of your composite with curves, follow these steps:
- Add a curves adjustment layer: Long-press the plus icon on the taskbar to access the option for adding an adjustment layer.
- Select "Curves" as the adjustment option: Under Adjustments, you will find several adjustment options, including Brightness/Contrast, Black and White, and Curves. Choose Curves to apply curves adjustments.
- Understand the histogram: In the Curves panel, you will see a histogram, which is a graphical representation of pixels at different colour intensity levels in your image. Initially, the image's tonality is shown as a straight diagonal line. For an RGB image, the upper-right area represents highlights, the middle area represents mid-tones, and the lower-left area represents shadows.
- Adjust the curve: Tap on the straight diagonal line in the histogram to add nodes. Moving these nodes will change the shape of the curve, reflecting your adjustments. Moving a node in the upper part of the curve adjusts the highlights, in the centre adjusts the mid-tones, and in the bottom part adjusts the shadows. To darken the highlights, move a node near the top of the curve downward. To lighten the shadows, move a node near the bottom of the curve upward.
- Manually enter values: Instead of using nodes, you can manually enter an input value and the corresponding output value to apply a specific adjustment.
- Adjust the colour balance (optional): Choose the channel you want to adjust (Red, Green, or Blue) to fine-tune the colour balance of your composite.
- Draw a custom curve (optional): Select the Draw option to draw a custom curve and apply your adjustments.
By adjusting the curve, you can modify the tonal range of your composite, making targeted adjustments to specific tonal regions.
Mastering the Camera Raw Effect for All Images
You may want to see also
Frequently asked questions
To print files from Adobe Camera Raw, you must first process and edit the raw image file using the Camera Raw plug-in. Once you are happy with the adjustments, you can open the processed image in Photoshop or After Effects, or apply the adjustments to the camera raw file. From there, you can print the image from Photoshop or After Effects.
PSD, JPEG, TIFF, and DNG are all different file formats. PSD is Photoshop's native file format, which preserves layers and other data. JPEG is a commonly used file format for displaying photographs and is a compressed format. TIFF is a flexible bitmap image format that is supported by most paint, image-editing, and page layout applications. DNG is a non-proprietary, publicly documented, and widely supported format for storing raw camera data.
To save a camera raw image in another format, you can use the "Save Image" button in the Camera Raw dialog box. This will allow you to save the file in PSD, TIFF, JPEG, or DNG format. Alternatively, you can use the "Save As" command and choose the desired file format.
Yes, you can create an action to automate the processing of camera raw image files. This includes automating the editing process and saving the files in various formats such as PSD, DNG, JPEG, TIFF, and PDF. You can use the Batch command, the Image Processor, or the Create Droplet command in Photoshop to process multiple image files.
Snapshots are stored renditions of an image that capture the complete set of edits made at a specific time. You can create, rename, update, and delete snapshots using the Snapshots tab of the Camera Raw dialog box. Snapshots can be helpful for comparing adjustments and returning to earlier states of an image.