CCFL (Cold Cathode Fluorescent Lamp) is a type of backlight used in LCD monitors. If your LCD monitor is not lighting up, it might be time to replace the CCFL. This is a difficult task, even for experienced technicians, and if you do something wrong, you could permanently damage the LCD screen. However, if you are careful, it can be done successfully and without too much drama.
Before you start, make sure you are working in a clean room, as you don't want dust and lint inside your LCD screen. It is also a good idea to make notes and take pictures so that you know how to assemble your screen back together.
To replace the CCFL, you will first need to disassemble the LCD housing. This will differ depending on whether your LCD monitor is external or built into a laptop. Once you have accessed the CCFL, you will need to carefully remove it, taking extra care not to break anything, especially the CCFL, LCD board, etc.
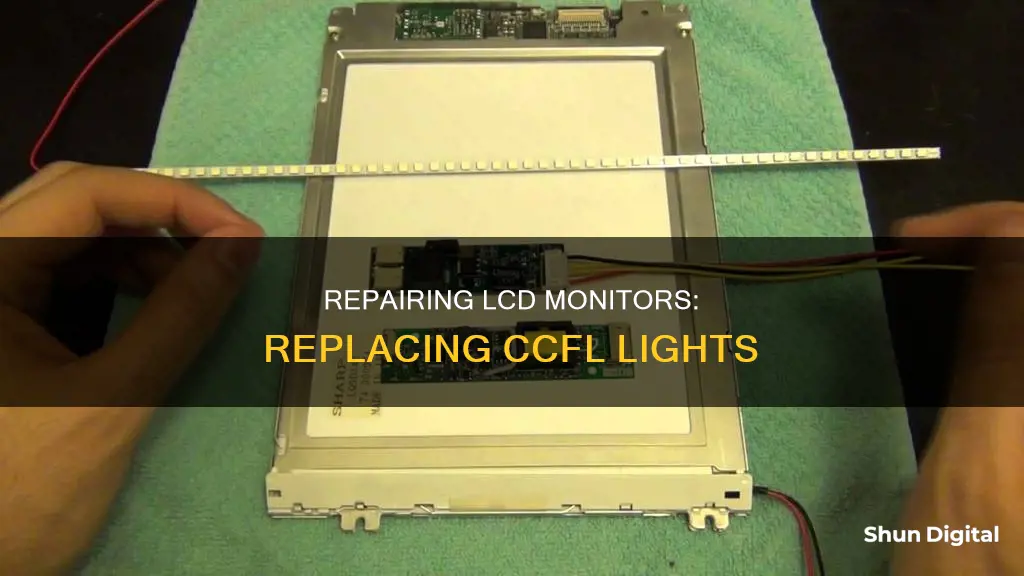
Next, you will need to determine the required length of LED strip to replace the CCFL. You can do this by measuring the total length of the CCFL and matching the LED strip, which can be cut for every 3 LEDs.
Finally, you will need to connect the wires to the LED strip, build the relay switch circuit, identify the relay circuit trigger pin to activate when the TV is on, connect the relay circuit to the logic board, and reassemble the LCD panel with the new LED strip.
Replacing the CCFL in your LCD monitor is a challenging task, but with patience and careful following of instructions, it can be done successfully.
| Characteristics | Values |
|---|---|
| Monitor type | LCD |
| Backlight type | CCFL |
| CCFL replacement type | LED |
What You'll Learn

Disconnect the power supply
Before you begin to replace the CCFL in your LCD monitor, it is important to disconnect the power supply to ensure your safety and prevent damage to the device. Here are some detailed instructions to guide you through this process:
Firstly, locate the power cord at the back of the LCD monitor and the power outlet it is connected to. Ensure that you have easy access to both the cord and the outlet. If the power cord is plugged into a power strip or surge protector, you may need to unplug the power strip from the wall outlet first.
Once you have located the power cord and outlet, it is important to turn off the LCD monitor using the power button. This step is crucial as it ensures that the device is not actively drawing power and can help prevent damage to the internal components. Wait a few seconds after turning off the monitor to ensure that all power has been cut off to the device.
Now, you can safely unplug the power cord from the wall outlet. Grip the power cord firmly but gently, and then remove it from the outlet. Be careful not to pull or strain the cord excessively, as this can damage the connection over time. If the cord is difficult to remove, check that the outlet is not faulty or damaged.
After unplugging the power cord, you can also disconnect the power cord from the LCD monitor itself. This step is optional but can provide easier access when working on the device. Again, be gentle and avoid straining the connection when unplugging the cord from the monitor.
Finally, before beginning any repairs or replacements, it is advisable to ground yourself to prevent static electricity discharge, which could damage the sensitive electronic components. You can do this by wearing an anti-static wrist strap connected to a grounded part of your workbench or by periodically touching a grounded part of the workbench with your hands.
By following these steps, you have successfully disconnected the power supply from your LCD monitor and can now proceed with replacing the CCFL, ensuring your safety and the protection of the device's internal components.
Finding the Hz of Your LCD Monitor
You may want to see also

Remove the LCD panel from the case
To remove the LCD panel from the case, you will need to first disconnect the power. If you are working with an external monitor, simply take out all the screws on the back of the display and pull it apart. If you are working with a laptop, first open up the laptop and locate all the screws (sometimes these can be hidden under rubber feet). After removing the screws, you may also need to use a flat-head screwdriver to pry the housing open little by little. Be gentle, but don't be afraid to use a little force. After getting the back of the housing off the computer, disconnect the LCD from the inverter. Now, completely detach the LCD from the housing by removing the remaining screws.
Monitoring Kids' Xbox Usage: Email Alerts for Parents
You may want to see also

Disconnect the LCD from the inverter
Disconnecting the LCD from the inverter is a crucial step in replacing the CCFL in an LCD monitor. Here is a detailed guide on how to perform this task:
Step 1: Disconnect the Power
Before beginning any work on the LCD monitor, it is essential to disconnect the power source to ensure your safety and prevent any accidental damage. Make sure the monitor is switched off and unplugged from the power outlet.
Step 2: Disassemble the LCD Housing
The process of accessing the LCD screen and the backlight depends on whether you are working with an external monitor or a laptop. For an external monitor, simply remove all the screws at the back of the display and carefully pull it apart.
For a laptop, the process is a bit more intricate. Open the laptop and locate all the screws, which may sometimes be hidden under rubber feet. After removing the screws, you may need to use a flat-head screwdriver to gently pry open the housing. Be cautious and apply only the necessary amount of force to separate the parts.
Step 3: Detach the LCD from the Housing
Once you have successfully removed the back of the housing, you will need to disconnect the LCD from the inverter. At this point, you can completely detach the LCD from the housing by unscrewing any remaining screws.
Step 4: Organise and Label Components
As you proceed, it is crucial to stay organised and keep track of the components you remove. Ensure that every element of the LCD you detach is carefully arranged in a logical order, making it easier to reassemble later.
Step 5: Remove the Backlight
This step requires gentleness and patience. The backlights contain mercury and are extremely fragile, so avoid using force when handling them. First, loosen the wires connected to the LCD, and then carefully remove the CCFL (Cold Cathode Fluorescent Tube).
Step 6: Prepare for Reassembly
After successfully removing the old CCFL, you can prepare for the reassembly process. Have your replacement CCFL ready, and insert it precisely where the old tube was located. Be gentle and take your time during this step.
Step 7: Reattach the Inverter and Cables
Once you have inserted the new CCFL and routed the cables correctly, it's time to reattach the inverter and any other cables that were previously connected to the display. Ensure that all connections are secure and tight.
Step 8: Test the Display
Before putting the housing back together, it is essential to test the display to ensure everything is functioning correctly. Be cautious when handling the exposed connections and cables, especially the inverter, as incorrect handling can lead to injury or damage to the display.
Step 9: Finish Reassembling the LCD Housing
If your display is working correctly, you can finish reassembling the LCD housing. Screw all the parts back together, ensuring there are no loose screws left inside the housing.
By carefully following these steps, you can successfully disconnect the LCD from the inverter and replace the CCFL in your LCD monitor.
ASUS Folding Monitor Stands: Sturdy, Adjustable, Space-Saving
You may want to see also

Remove the backlight
To remove the backlight from an LCD monitor, you must first disconnect the power. This is very important for safety reasons.
Next, you need to disassemble the LCD housing. This process varies depending on the type of monitor you have. For an external monitor, simply remove all the screws on the back of the display and pull it apart. For a laptop LCD, you will need to locate and remove all the screws (sometimes hidden under rubber feet) and then use a flat-head screwdriver to gently pry the housing open. Once you have removed the back of the housing, disconnect the LCD from the inverter. Then, detach the LCD from the housing by removing any remaining screws.
Now, you need to disassemble the LCD itself. This is a delicate process, so it is important to be organised and careful. Remove any necessary layers of transparent sheets that are used to spread the light uniformly throughout the screen. Then, locate and remove the screws holding the LCD assembly together and take the assembly apart.
Finally, you can remove the backlight. This step requires gentleness and patience. The lights contain mercury and are very fragile, so do not use force when removing the CCFL or it will break. It is recommended to loosen the wires from the LCD first and then gently remove the CCFL.
Best Monitor Size for Pro Tools Users
You may want to see also

Insert the new backlight
Now that you have removed the old backlight, it's time to install the new one. Take your new CCFL and insert the lamp exactly where the old tube was located. Again, be gentle and this step will be easy. After inserting the new CCFL and routing the cables correctly, reassemble the LCD the same way you took it apart.
Make sure to test the new backlight before you install it back into the screen. Connect the backlight lamp into the inverter board and turn on the laptop. The backlight lamp should light up. From my experience, on some laptops the backlight lamp will not light up until the video cable is connected to the LCD screen. In this case, you'll have to assemble the LCD screen and then test it.
After putting your LCD back together, reattach the inverter and any other cables that may have been connected to the display. Next, before putting the housing back together completely, test out your display to make sure everything is in correct working order.
Note: Be VERY careful with the exposed connections and cables, ESPECIALLY the inverter. Touching the wrong part could not only hurt you, but damage your display. Yet again, I speak from experience.
Make sure all your connections are tight, and there's no extra screws. Finish reassembling the LCD housing and you're all set!
Monitoring Home Electricity Usage: A Guide for Indian Households
You may want to see also
Frequently asked questions
CCFL stands for Cold Cathode Fluorescent Lamp. It is a type of light source used in LCD screens.
If your LCD screen is not lighting up, or is getting dim or has a reddish or pinkish hue, you may need to replace the CCFL.
You will need a small Phillips screwdriver, electrical tape, and a soldering iron.
First, disconnect the power and remove the LCD panel from the monitor case. Then, carefully remove the CCFL, taking care not to break anything. Next, determine the required length of the replacement CCFL or LED strip and connect the wires. Finally, reassemble the LCD panel and enjoy your repaired monitor!
You can buy replacement CCFL lamps online from websites like CCFLwarehouse.com, which offers a wide range of CCFL lamps for different LCD monitors.


