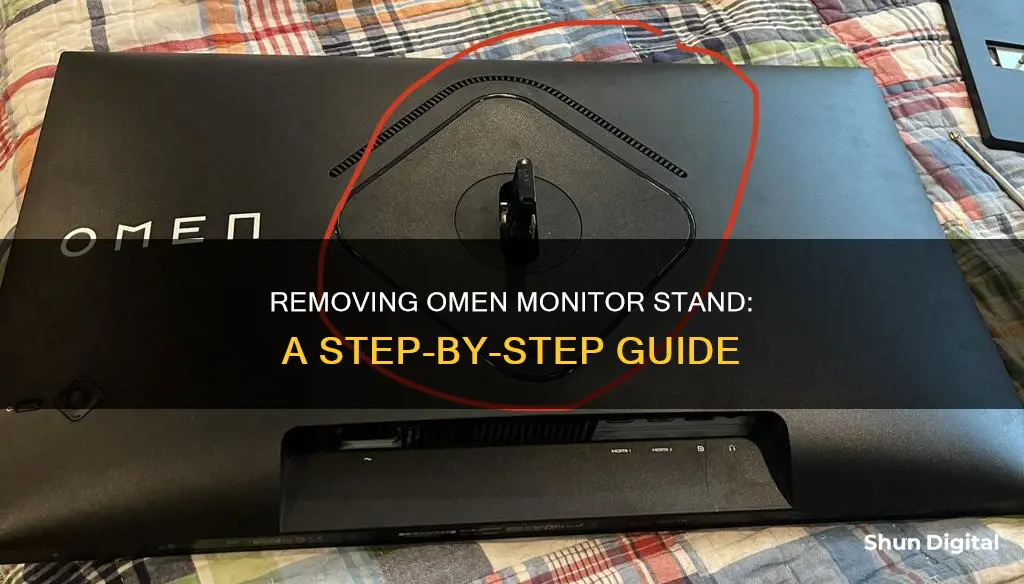
If you want to remove the stand from your HP Omen monitor, you'll need to first disconnect and remove all cables from the monitor. Then, lay the monitor face down on a flat surface covered by a clean, dry cloth. From here, the steps differ depending on the model of your monitor. For the HP Omen 25, press down on the release latch and slide the stand off the connector on the display head. Loosen the thumbscrew and remove the base from the neck. For the HP Omen 27, tilt the bottom of the monitor stand upward, use an Allen tool to loosen the two screws on the underside of the monitor's hinge, and then slide the stand off the monitor head.
What You'll Learn

Disconnect and remove cables from the monitor
To disconnect and remove the cables from your HP OMEN monitor, start by turning off the monitor and unplugging the power cord from the power outlet. Once the monitor is safely powered down, locate the cables connected to the monitor. These may include power cables, HDMI or DisplayPort cables, and any other peripheral connections. Gently grip each cable and follow it to the corresponding port on the monitor. With a steady hand, press and hold the latch or locking mechanism on the connector, then carefully pull the cable out of the port. Repeat this process for all cables attached to the monitor. It is important to handle the cables with care to avoid damage to the connectors or ports.
If your HP OMEN monitor has a complex cable management system, such as built-in cable routing or bundling, take note of how the cables are organized to facilitate easy reassembly. Detaching the cables can be tricky, so be sure to use a gentle back-and-forth motion while applying minimal force to avoid damaging the connectors or the monitor itself. Some cables may have retention mechanisms, so be sure to release any latches or locks before unplugging.
For a smooth removal process, lay the monitor face down on a flat surface covered with a clean, dry cloth. This will protect the screen from scratches or damage during the disassembly process. Once the monitor is securely positioned, proceed to disconnect and remove all cables. Starting with the power cable, gently pull it straight out of the port. Repeat this process for any other cables, such as HDMI, DisplayPort, USB, or audio cables. Ensure you are pulling the cable and not the connector to avoid accidental damage.
After all the cables have been successfully disconnected and removed, take a moment to inspect the monitor's ports for any debris or damage. Use a gentle, soft-bristled brush or compressed air to carefully clean the ports if needed. This step will help ensure reliable connections when you reassemble the monitor. Remember to handle the cables and connectors with care throughout the entire process to avoid damage or loss of essential components.
China's Internet Surveillance: Monitoring Online Activities
You may want to see also

Place the monitor face down on a flat surface
To remove the stand from your HP Omen monitor, you'll need to place the monitor face down on a flat surface. This is an important step to ensure the monitor screen is protected and not damaged during the process of removing the stand.
Firstly, gather a clean, dry cloth and lay it on a flat surface, such as a table or desk. Next, carefully place your monitor face down on the cloth, ensuring the screen is flat against the covered surface. This will protect the screen from scratches or other damage while you work on removing the stand.
With the monitor securely in place, you can now begin the process of removing the stand by following the steps outlined in the user manual. This may include disconnecting cables, loosening screws, and sliding off the stand, depending on your specific monitor model.
It is important to take your time and be gentle during this process to avoid accidentally damaging any parts of the monitor, including the screen, buttons, or ports.
Blind Spot Monitoring: Is It Available on the GR86?
You may want to see also

Loosen the screws on the underside of the monitor's hinge
To loosen the screws on the underside of the monitor hinge of an HP Omen monitor, you must first disconnect and remove all cables from the monitor. Then, lay the monitor facedown on a flat surface covered by a clean, dry cloth.
Now, tilt the bottom of the monitor stand upward and use an Allen tool to loosen the two screws on the underside of the monitor's hinge. After loosening these screws, you can then slide the stand off the monitor head.
It is important to ensure that your monitor is turned off and all cables are disconnected before beginning any disassembly. Additionally, when mounting the monitor head to a wall, swing arm, or other third-party mounting solution, it is crucial to verify that the manufacturer's mounting solution complies with the VESA standard and can support the weight of the monitor head.
Monitors: DisplayPort or Not?
You may want to see also

Slide the stand off the monitor head
To slide the stand off the monitor head, you will need to first place the monitor on a flat surface, facing down. This surface should be covered with a clean, dry cloth to protect the screen from scratches.
Next, you will need to remove the two screws on the underside of the stand's hinge. Depending on the model, you may need to tilt the bottom of the monitor stand upward to access these screws. For the OMEN 25 model, you will need to press down on the release latch to slide the stand off the connector on the display head. For other models, an Allen tool is required to loosen the screws.
Once the screws have been removed, carefully slide the stand off the monitor head. This will allow you to separate the monitor head from the stand, and you can then proceed to install the monitor head on a wall, swing arm, or other mounting fixture.
It is important to note that before beginning the disassembly process, you should ensure that the monitor is turned off and all cables are disconnected. Additionally, when reattaching the monitor head, be sure to use the power and video cables provided with the monitor for optimal performance.
Identifying Your LG Monitor: A Step-by-Step Guide
You may want to see also

Remove the plastic cover on the back with a flathead screwdriver
To remove the plastic cover on the back of your HP Omen monitor, you will need a small flathead screwdriver or a similar tool.
First, locate the small tab on the plastic cover. This tab is designed to allow you to slip a flat edge into it. Carefully insert the flathead screwdriver into this tab. Gently apply force to pop off the plastic cover. Be careful not to apply too much force, as you don't want to damage the plastic.
Once the plastic cover is removed, you will expose a standard VESA threaded plate. If you have the newer OMEN model with the diamond-shaped back, you will need to remove this plate as well. This plate can be rotated 45 degrees to access the VESA mount.
It is worth noting that some users have reported difficulty in removing the plastic cover and have resorted to prying it off with a screwdriver, which may ruin the stand. Therefore, it is essential to be cautious and patient during this process.
Additionally, before beginning any disassembly of the monitor, ensure that the monitor is turned off and all cables are disconnected for safety.
Monitoring Bandwidth Usage: Control by Device
You may want to see also
Frequently asked questions
First, disconnect and remove all cables from the monitor. Then, lay the monitor face down on a flat surface covered by a clean, dry cloth. For the HP Omen 25 monitor, press down on the release latch and slide the stand off the connector on the display head. For the HP Omen 27 monitor, tilt the bottom of the monitor stand upward, use the Allen tool to loosen the two screws on the underside of the monitor's hinge, and then slide the stand off.
You will need an Allen tool (also known as a hex key) to loosen the screws on the underside of the monitor hinge. You may also need a small flathead screwdriver or similar tool to carefully pop off the plastic cover on the back of the monitor.
After removing the stand, you can install the monitor head on a swing arm or a UL- or CSA-listed wall mount bracket. To do this, you will need four 4mm, 0.7 pitch, and 10mm-long screws. Be sure to verify that the manufacturer's mounting solution is compliant with the VESA standard and can support the weight of the monitor head.


