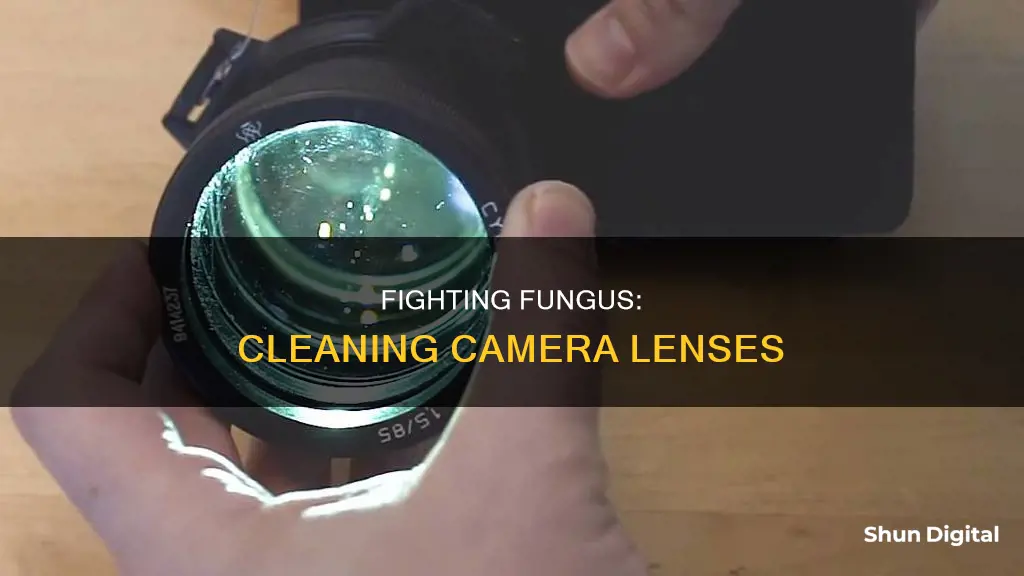
Discovering fungus on your camera lens can be incredibly frustrating, especially if it's an expensive piece of equipment. Fungus is commonly found in older lenses and can develop if there is too much humidity. While you may be tempted to try and clean it off with a standard lens cleaner, this will likely only result in scratches and damage to your lens coatings.
One way to remove the fungus is to disassemble the lens and soak the elements in a solution of equal parts hydrogen peroxide and ammonia. This method requires specific tools and should only be attempted if you are comfortable with this type of project. Alternatively, you can try exposing the lens to direct sunlight or UV light, which will kill the fungus. However, this may not completely remove it, and you will likely need to continue exposing the lens to UV light regularly to prevent the fungus from growing back.
| Characteristics | Values |
|---|---|
| Fungus removal method | Soak in 50/50 hydrogen peroxide and ammonia solution |
| Tools required | Lens spanner, JIS screwdriver set, desk lamp, parts dish, soaking dish, tweezers, nitrile gloves, safety glasses, microfiber lens cloth, lens poofer |
| Fungus prevention | Store lenses in a cool, dry place |
| Alternative methods | Soak in muratic acid and baking soda solution, expose to UV light, freeze |
What You'll Learn

Use a lens spanner to disassemble the lens
To remove fungus from your camera lenses, you'll need to disassemble the lens using a lens spanner. This is a specialised tool used to remove lens retaining rings and collars, small caps and covers, and screws with special heads.
Lens spanners are available in various designs, prices and qualities. You can either buy one or make your own. If you're making your own, you'll need to measure the inner diameter of the lens tube using a calliper, then find a piece of scrap acrylic, plexiglass or any hard plastic material and trim it to the same measurement. File, sand or grind the edge until you get a nice wedge. Insert the wedge into the barrel and check the fit. It may take several attempts to get it right.
If you're buying a lens spanner, you'll want one with the following characteristics:
- A positive fit. The tip must fit securely in the component's holes or slots, with little to no wiggle room.
- Free of play when tightened. The tool's arms and tips shouldn't wiggle or move when tightened.
- Ease of use. The tool should offer smooth, precise adjustment; a good hand grip; no shift in tip positions while tightening; and no flex when torqued.
- A good range of span. The ideal span should adjust from several millimetres to around 100mm, though you may need to buy more than one spanner to achieve this.
- A selection of tips. To facilitate various jobs, the spanner should accommodate several different tips, including points, flats and half-flats, as well as various tip lengths for jobs that require a long reach.
When using your lens spanner to disassemble the lens, follow these steps:
- Using a JIS screwdriver (for lenses made in Japan), remove the screws holding down the chrome lens mount.
- Remove the aperture ring. Be careful of the tiny steel ball and spring mechanism that creates the aperture click.
- Clean the back of the lens body.
- Use the lens spanner to remove the retainer ring and free the rear element from the lens.
- Remove the glass by tipping the lens upside down and allowing the glass to drop out. If it doesn't come free, try reinstalling the retainer ring and using a blunt, non-metal object to gently tap the side.
- Assess and lay out the pieces in the order they were removed, being careful not to let any metal or glass touch the faces of the elements.
- Soak the elements in a solution of equal parts hydrogen peroxide and ammonia to remove the fungus.
- Rinse the elements with water, blow away the water droplets with a lens poofer, then wipe the elements with a clean microfiber cloth.
- Inspect the elements under lighting to ensure all fungus has been removed.
- Work backwards to reassemble the lens.
Fire TV and Camera: What's the Deal?
You may want to see also

Soak the lens in a solution of hydrogen peroxide and ammonia
So, you've got a lens with fungus on it. It's a common problem, especially with older lenses, and it can be frustrating to deal with. But don't worry, I can walk you through the process of removing that fungus and getting your lens back to its former glory!
First things first: you'll need to disassemble the lens to access the affected glass elements. This will vary depending on the lens, but it usually involves removing the lens mount, aperture ring, and retainer ring. Be very careful during this process, as some lenses have tiny steel balls that can go flying, and you don't want to lose any parts! Take your time, and maybe even document each step with photos so you can more easily reassemble the lens later.
Now, let's talk about the fungus-killing solution: hydrogen peroxide and ammonia. These two household chemicals, when combined in equal parts, create a powerful fungus-removing mixture. Wear gloves and safety glasses for protection, and work in a well-ventilated area as the ammonia fumes can be strong.
Here's what you do: place a disposable lens wipe or a similar protective covering at the bottom of a small dish. This will prevent the lens element from getting scratched during the soak. Gently place the affected lens element into the dish, ensuring it's fully covered by the solution. Let it soak for at least 2 minutes. You may see some bubbles as the solution does its work.
After the soak, use a cotton ball to gently wipe away any remaining fungus. It shouldn't take much pressure, as the solution does the heavy lifting chemically, not mechanically. If any fungus remains, simply put the element back in the solution for a longer soak. Rinse the element with water and then use a lens poofer to blow away any water droplets. Finish up by giving the lens a light wipe with a clean microfiber cloth.
Now, inspect the lens under good lighting, checking for any remaining fungus, dust, or smudges. If it looks good, set it aside on a soft microfiber cloth and cover it to prevent dust from settling. Repeat this process for any other affected elements.
And that's it! You've successfully removed the fungus from your camera lens using a hydrogen peroxide and ammonia solution. Remember to work carefully, protect yourself, and always make sure you have the right tools and a well-ventilated workspace. Good luck, and happy shooting!
Underwater Camera to TV: Easy Setup Guide
You may want to see also

Rinse the lens with water
Rinsing the lens with water is the final step in removing fungus from your camera lens. But before you get to that stage, you'll need to disassemble the lens and create a solution to soak the affected elements in.
Disassembling the lens
First, you'll need to remove the lens mount and the aperture ring. Be careful when removing the aperture ring, as there is a tiny steel ball with a coil or leaf spring behind it that could launch across the room. Next, remove the retainer ring and the rear element. The glass should drop out, but if it doesn't, try reinstalling the retainer ring and gently tapping the side of it. If that doesn't work, you may need to remove the front-side lens elements and use a soft silicone spudger to press the glass out from the inside of the lens.
Soaking the lens
Once you've removed the affected glass, you'll need to create a solution of equal parts hydrogen peroxide and ammonia. Place a disposable lens wipe in the bottom of a small bowl and gently place the glass into the solution. Let it soak for at least two minutes. You may see bubbles as the solution removes the fungus. After soaking, use a cotton ball to gently wipe away any remaining fungus. If fungus remains, put the glass back in the solution for a longer soak.
Rinsing the lens
After removing the fungus, take the glass to a sink and run water over it. Don't rub the lens, just let the water run over it. Once the solution has been rinsed off, use a lens poofer to blow away the water droplets, then lightly wipe the lens with a clean microfiber cloth. Inspect the lens under good lighting to ensure all the fungus has been removed.
Viewing Camera Systems via Fire TV Stick
You may want to see also

Dry the lens with a lens poofer
Drying your lens with a lens poofer is the final step in the lens fungus removal process. Before you get to this stage, you will have already soaked the lens in a solution of hydrogen peroxide and ammonia, rinsed it with water, and blown away the water droplets with a lens poofer.
Once you have completed those steps, you will need to dry the lens with a lens poofer. A lens poofer is a tool that helps to remove dust and debris from your camera lens. It is important to ensure that your lens is completely dry before you put it back together, as any remaining moisture could reactivate the fungus or cause new fungus to grow.
To dry your lens with a lens poofer, simply blow air onto the lens using short, controlled bursts. Be sure to move the lens poofer around as you blow so that you are drying all areas of the lens, including the edges and crevices. Continue this process until the lens is completely dry.
Once the lens is dry, you can proceed to the final step of the lens fungus removal process, which is to inspect the lens for any remaining fungus or debris. If any fungus or debris remains, repeat the cleaning process until the lens is completely free of fungus.
Using LG V30 Camera: Full-Screen View Guide
You may want to see also

Wipe the lens with a microfiber cloth
To wipe your lens with a microfiber cloth, it's important to ensure the cloth is extremely clean. Do not use one that's been carried in your pocket or camera bag, as any dust or skin oil on the cloth will be transferred to the internal elements of your lens. It's also crucial to use a microfiber cloth that's designed specifically for camera lenses. While cloths marketed for car cleaning or other not-as-delicate items may be tempting, they can be too harsh for your camera lens.
When using the microfiber cloth, be sure to handle the lens with care. Avoid applying too much pressure, as this can result in scratches or damage to the lens coatings. Instead, use gentle, light pressure and wipe the lens surface in a circular motion. It's also a good idea to blow off any dust or debris from the lens before wiping it with the cloth.
After each use, inspect the microfiber cloth for any dirt or oil buildup. If it looks dirty, wash it with warm water and a mild detergent. Rinse it thoroughly and allow it to air dry. Do not reuse the cloth until it is completely dry. Storing the cloth in an airtight plastic bag when not in use can also help keep it clean.
By following these steps, you can effectively use a microfiber cloth to wipe your camera lens, ensuring it remains spotless and free from any damage.
Removing Camera Data from Flickr Photos: A Step-by-Step Guide
You may want to see also
Frequently asked questions
The best way to remove fungus from a camera lens is to disassemble the lens and soak the elements in a 50/50 hydrogen peroxide and ammonia solution.
Yes, other methods include:
- Exposing the lens to UV light.
- Freezing the lens.
- Soaking the lens in alcohol.
- Using a combination of muriatic acid and baking soda.
You will need a lens spanner and a set of Japanese Industrial Standard (JIS) screwdrivers for lenses made in Japan.
You will need household ammonia and hydrogen peroxide. Alternatively, you can use muriatic acid and baking soda.
To prevent fungus from growing on your camera lenses, store them in a cool, dry place. You can use moisture absorbers in a sealed plastic container to keep the lenses dry.


