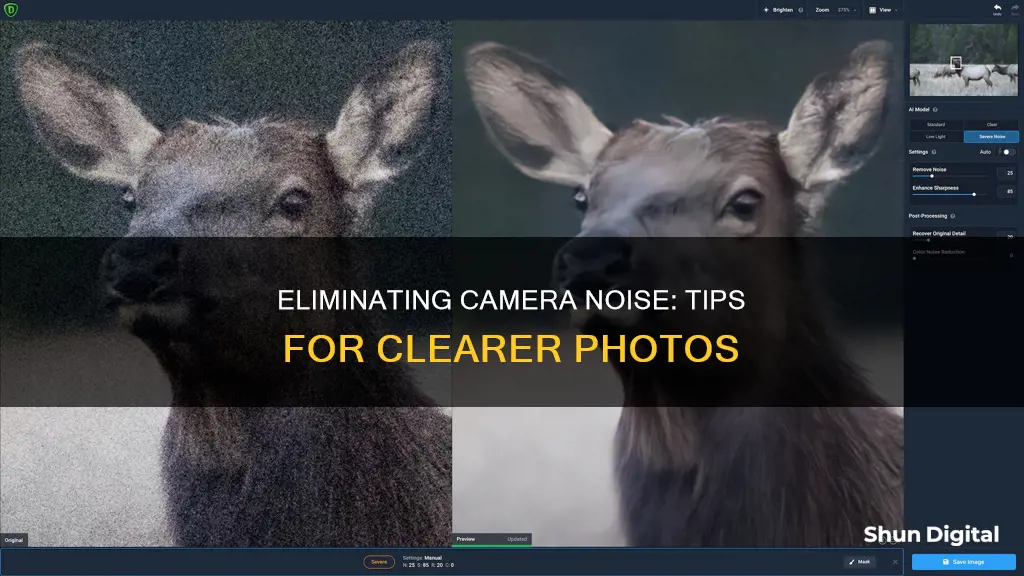
Whether you're a professional photographer or an amateur, you've likely encountered noise in your photos at some point – those grainy, speckled distortions that can ruin an otherwise perfect picture. While it's always best to avoid noise from the outset, it's not always possible, and sometimes you need to remove it in post-production.
Noise in photography is caused by a random variation in the image signal and can be the result of a number of factors, including poor lighting, high ISO settings, long exposure times, and heat. There are two types: luminance noise, which appears as grainy black and white spots, and colour noise, which appears as colourful dots or pixels.
There are several ways to reduce noise in your photos, both in-camera and during post-production. Firstly, you can try to avoid it by using a lower ISO setting, a tripod, a remote shutter release, and shooting in RAW format. If you still end up with noise, you can use software such as Photoshop, Lightroom, or a dedicated noise reduction program to remove it.
While it is possible to remove noise, it's important to remember that doing so will always involve a trade-off with image sharpness, so it's best to avoid it in the first place if you can!
| Characteristics | Values |
|---|---|
| Shoot with the lowest possible ISO setting | Reduces noise but requires slower shutter speed and higher aperture |
| Shoot in RAW format | Captures all data from the camera sensor |
| Expose correctly from the start | Avoid boosting a too-dark exposure, which will reveal noise |
| Be careful when doing long exposures | Can cause the camera sensor to heat up, leading to noise |
| Use in-camera noise reduction | Takes the same amount of time as the original exposure |
| Use noise-reducing software | E.g. Lightroom, Photoshop, Denoise AI, or DXOPureRAW2 |
What You'll Learn

Use noise-reducing software
Adobe Lightroom
Lightroom is a powerful industry-standard raw photo editor with excellent noise reduction capabilities. Its Denoise section has a one-click function, after which you can manually adjust the Denoise amount. The process may take up to a minute, but the results are worth it. Lightroom is available as part of the Adobe Cloud subscription.
DxO PhotoLab
DxO PhotoLab's noise reduction abilities have been developed over the past few years. Its technology is called DeepPRIME, which offers different noise reduction levels. The current best iteration is XD/XD2s. The adjustment works as a one-click function but also provides a Luminance, Dead Pixels, and Force Details slider for control. DxO PhotoLab is available as a one-off purchase.
Luminar Neo
Luminar Neo is a photo editing software that provides photographers with opportunities to perform complex edits with single-click approaches, thanks to the use of AI and image-reading technology. Its noise reduction software is called Noiseless AI and has three different configurations – low, middle, or high. You can also edit the luminosity, colour, details, and sharpness with sliders. Luminar Neo is available for a fixed price.
PhotoDirector 365
PhotoDirector 365 produces good results in its noise reduction software. Its Denoise AI adjustment comes with an intensity slider so you can fine-tune the results. Denoise AI does a great job of identifying the areas to smooth over, and it can also enhance the edges. PhotoDirector 365 is available for a one-off purchase.
ON1 Photo RAW
ON1 Photo RAW's noise reduction software is called NoNoise AI and employs AI to identify and reduce noise in photographs. The most noticeable feature of NoNoise AI is the amount of sharpening that comes with it. ON1 Photo RAW is full of other AI abilities and one-click edits. It is available for a one-off purchase.
Corel AfterShot Pro
Corel AfterShot Pro's noise reduction technology is called the RAW Impulse Noise Removal. It is a simple one-click button with a Noise and Threshold slider. Unlike other noise reduction software, it does not use AI. AfterShot Pro doesn’t compensate for sharpness, which could be ideal for some photographers. Corel AfterShot Pro is available for a one-off purchase.
Exploring Camera Lenses: Capturing the Full 180-Degree View
You may want to see also

Shoot in RAW format
Shooting in RAW format is a great way to get the best out of your images and capture as much information as possible. RAW format captures all of the data from your camera sensor, giving you more information to work with when editing.
JPEGs, on the other hand, come with compression, which can bake noise into your images and make it much harder to adjust exposure and remove noise in post-production. With RAW, you can adjust the white balance during post-processing without any loss of quality.
Shooting in RAW gives you more flexibility when editing your images, but it's not always necessary. If you're happy with the lighting conditions and don't anticipate needing to make significant adjustments to your images, then shooting in JPEG will result in smaller file sizes and faster processing times.
However, if you're shooting in low-light conditions and plan on making adjustments to your images, then shooting in RAW will give you more options for reducing noise and improving image quality.
Keep in mind that RAW files will require more storage space and take longer to process, so it's important to consider the trade-offs before deciding which format to use.
Exploring Albuquerque Airport Through Live City Cameras
You may want to see also

Use a tripod
Using a tripod is a great way to reduce noise in your photos. A tripod is a three-legged camera stand that stabilises your shot. It helps you take sharper photographs, even in poor lighting. Here are some tips for using a tripod to reduce noise in your photos:
- Choose a sturdy tripod: Opt for a solid tripod that can withstand windy conditions and other environmental factors that may cause camera shake. Look for a tripod with a built-in bubble level to help you stabilise the rig.
- Set up the tripod properly: Adjust the legs of the tripod so that they stand stably on the ground. Make sure the legs are securely locked in place before mounting your camera.
- Mount your camera: Screw the camera directly onto the tripod or use the clamp mechanism if your tripod has one. Ensure the connection is snug but not too tight, as over-tightening can damage your camera or tripod.
- Use a remote shutter release: Consider using a remote shutter release or the self-timer setting on your camera to reduce the risk of camera shake caused by touching the camera.
- Check your camera settings: Lower ISO settings and shorter exposure times can help reduce noise in your photos.
- Use noise-reducing software: If you still notice noise in your photos, you can use software like Adobe Photoshop to remove luminance and colour noise.
Is My Camera Watching Me?
You may want to see also

Use a remote shutter release
A remote shutter release is a remote trigger that can be connected to your camera either wirelessly or by using a cable to perform its main function: to release the shutter even remotely without physically touching your camera’s built-in shutter release button.
There are two types of remote shutter releases: the untethered and the tethered releases. The untethered release uses a wireless technology to do its job, such as infrared or a radio wave like Bluetooth. On the other hand, the tethered release is a wired remote trigger, also known as a "cable release", which is connected to the actual camera via wired technology.
The type of remote shutter release you use will depend on the type of camera you have. Most cameras can freely use a wireless shutter release, but you have to double-check if you’re getting the right model.
The main reason photographers purchase remote releases is to reduce physical contact with the camera, which could cause blurry images. A remote shutter release can easily remove the most common causes of blurry images when taking photos. Pressing the shutter button on a remote does not move or shake your camera, while the same cannot be said of the camera’s own shutter button.
A remote shutter release is also useful when you are the designated photographer in a group and want to be included in the photo without having to set a timer and rush back to the group.
In addition, a remote shutter release is perfect for capturing tricky and dangerous shots of wildlife at a safe distance. It is also useful for capturing millisecond-long moments like water drops, lightning, and many high-speed events.
Removing Camera from Your iPad: A Step-by-Step Guide
You may want to see also

Shoot with the lowest possible ISO setting
Shooting with the lowest possible ISO setting is one of the most important ways to reduce noise in your photographs. ISO measures a camera's sensitivity to light, and the higher the ISO, the more noise will be generated by your camera.
In digital photography, ISO is a camera setting used to control picture brightness. When you increase the ISO, you are amplifying the electrical signals generated when light strikes the sensor, resulting in a brighter image. However, this also leads to increased noise or grain in your photos, which can be unappealing and ruin an otherwise perfect picture.
By lowering the ISO setting, you are reducing the camera's sensitivity to light, which means that less noise will be introduced into the image signal. This is especially important if you are shooting in low-light conditions, as a lower ISO will help to reduce the amount of grain in your photos.
While it is generally best to use a low ISO setting, there may be times when you need to increase the ISO. For example, if you are shooting handheld in low light, a higher ISO setting can allow you to use faster shutter speeds to create bright, sharp images. Additionally, if you are photographing a group of people outside on a cloudy day, a high ISO setting with a narrow aperture can result in a brilliant image with a deep depth of field.
In these situations, it is crucial to find a balance between a bright and balanced exposure and excessive noise. You can do this by experimenting with different ISO settings and evaluating the results to determine the ideal range for your camera.
Remember, the key to avoiding noise is to use the right camera settings and get an image that is as clean and sharp as possible. By shooting with the lowest possible ISO setting, you can effectively reduce noise and improve the overall quality of your photographs.
Removing Corroded Camera Batteries: A Step-by-Step Guide
You may want to see also
Frequently asked questions
Camera noise is an unwanted element in a photograph that appears as random variations in the image signal, often caused by poor lighting conditions, high ISO settings, long exposure times, and heat. It can ruin an otherwise perfect picture.
To prevent camera noise, try using a lower ISO setting, especially when shooting in low-light conditions. Use a tripod to keep your camera stable and avoid any shaking that could introduce noise. Shoot in RAW format to capture all the data from your camera sensor, giving you more information to work with when editing.
There are several software tools available to reduce camera noise, including Adobe Photoshop, Lightroom, and Topaz DeNoise AI. These tools offer noise reduction features that can help remove noise and enhance the sharpness of your images.
While most cameras have built-in noise reduction features, they don't offer the same level of control as dedicated software solutions. In-camera noise reduction can also smooth out the image too much, resulting in a loss of detail. It's usually designed to work with JPGs, which are less editable than RAW format photos.
To reduce noise when shooting, try to get a correct exposure, keep the ISO setting as low as possible, and avoid super long exposures. Use large apertures and large aperture lenses to allow more light to reach the sensor. Additionally, consider investing in a full-frame sensor camera, as they capture more light and generate less noise.


