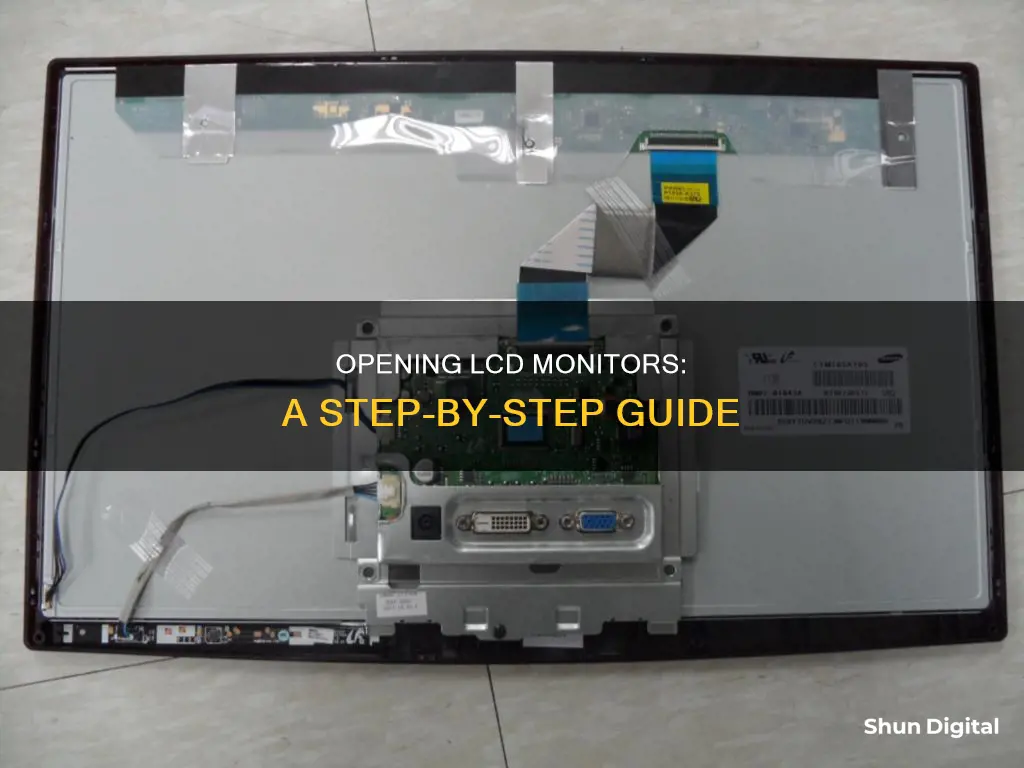
If your LCD monitor is malfunctioning, it may be tempting to try to fix it yourself, especially if it's no longer under warranty. While it's possible to open up an LCD monitor without specialized tools, it's important to exercise caution when doing so. Before attempting any repairs, be sure to disconnect the monitor from its power source and any connected devices. Then, place the monitor face down on a soft surface to avoid damaging the screen. Depending on the make and model of your monitor, you may need to remove screws or plastic tabs to access the internal components. Be sure to keep track of the screws you remove, as you'll need to replace them when reassembling the monitor. With the back panel removed, you should be able to access the circuitry and internal components for repair or replacement.
What You'll Learn

Disconnect power and video cables
Disconnecting the power and video cables is the first step to opening an LCD monitor. This is an important safety measure that must be taken before proceeding with any other steps.
Firstly, turn off the power to your monitor and unplug it from the wall outlet or power surge. If your monitor is connected to a computer, shut down the computer before turning off or disconnecting your monitor. This will ensure that no power is running to the device, preventing any potential damage to the circuitry or electrical shocks.
Next, locate the video cable connecting your monitor to the computer and unplug it. This will disconnect the visual output signal from the monitor, allowing you to safely separate the two components.
Now that the power and video cables have been disconnected, you can proceed to place the monitor face-down on a padded, flat surface to begin the process of opening the monitor. It is recommended to cover the surface with a towel or soft cloth to prevent scratches to the screen.
At this point, you can continue with the process of opening your LCD monitor by following the specific instructions for your monitor's model and brand. Remember to exercise caution and patience throughout the process, especially when handling cables and connectors, to avoid any potential damage to the internal components.
Monitoring Chrome's CPU Usage: Tab-Specific Performance Insights
You may want to see also

Place screen-side down
To open an LCD monitor, you will need to place the monitor screen-side down on a soft cloth or padded surface to prevent scratches to the screen. Ensure that the monitor is switched off and unplugged before you begin.
Once the monitor is in the correct position, you can start to remove the screws from the back of the monitor. These screws are typically located around the perimeter of the back panel and in the middle. You may need a Phillips-head or flat-head screwdriver for this task, depending on your monitor model.
After removing the screws, carefully insert the screwdriver between the two halves of the monitor, the front and back. Gently slide the screwdriver through the gap, feeling for any plastic clips holding the two halves together. Depress these clips until the back of the monitor comes away from the front.
Now that you have accessed the interior of the monitor, you can proceed with your repairs or further disassembly, following relevant safety precautions.
It is important to note that opening your monitor may void its warranty, and you should proceed with caution to avoid damaging the delicate components inside.
Monitoring Internet Usage: Netgear Genie's Parental Controls
You may want to see also

Remove stand
To remove the stand from an LCD monitor, you will need to disassemble its various components. Before you begin, refer to the user manual for specific instructions regarding your monitor model. If you do not have the user manual, you can usually download it online by searching for the model name and number. This information is typically found on the front or back of the monitor. Alternatively, on a Windows device, you can press the Windows + I keys, go to System > Display, and then under Related settings, select Advanced display to find the model name and number.
Now, onto the process of removing the stand:
- Disconnect all cables connected to the monitor, including power cables and any cables from the PC.
- Place a towel on your work surface to protect the monitor.
- Lay the monitor on the towel with the screen facing down.
- Identify the base of the stand, which is the part that rests on a surface and provides stability. It can be shaped like a circle, rectangle, or arc.
- Invert the monitor and look for a screw that holds the base in place. Some monitors may have a hook that needs to be rotated anti-clockwise to remove this screw. Remove the screw and gently detach the base plate.
- Proceed to the vertical stand, which is the upright portion connected to the base. Check for any connection points or screws holding it in place. If there are screws, remove them, and if not, look for dedicated buttons near or on the vertical stand. Some monitors, like Dell and Acer, have such buttons to facilitate stand removal. Press the button and pull the stand outwards. If it still doesn't come off easily, a small amount of mechanical oil can be applied to the joints to help loosen them.
- If your monitor has a vertical stand holder that connects the stand to the monitor, you may need to remove the back panel to access it. Refer to the user manual for specific instructions, as the process may vary depending on your monitor model. Removing the back panel typically involves unscrewing the panel, gently lifting it off, and disconnecting any cables connected to the ports and buttons on the panel.
- Once the back panel is removed, unscrew any screws connecting the vertical stand holder to the monitor.
- Reassemble the monitor by reconnecting all the cables and screwing the back panel in place.
Remember to handle the monitor with care, especially when holding or moving it. Avoid holding it by the screen, and always support it firmly by the sides. Additionally, be gentle when prying or applying force to any components to avoid breakage.
Asus Monitors: VESA Mount Compatibility and Your Options
You may want to see also

Unscrew back panel
Unscrewing the back panel of an LCD monitor is a delicate process, but it can be done without the need for specialised tools. Before starting, ensure that the monitor is unplugged and that you have a suitable workspace. Place the monitor face-down on a flat, padded surface to prevent scratches to the screen.
The first step is to remove the screws attaching the monitor to the stand. This will vary depending on the make and model of your monitor, but generally, you will need to remove the stand and then unscrew the screw at the bottom, covered by a warranty sticker.
Next, you will need to remove any screws attaching the back cover of the monitor to the front cover. This will typically include a few Phillips-head screws on the back of the monitor and near the monitor's stand. Be sure to keep track of which screws came from which holes, as they may need to be reinserted with a specific torque.
With the screws removed, you can now carefully pry the back cover away from the front. Insert the head of a flat-head screwdriver into the groove on the bottom of the monitor where the back cover meets the body, and gently pry and lift the back cover upward.
At this point, you should have access to the internal components of the monitor. Be cautious when handling these components, as some may still hold an electric charge.
It is important to note that opening your LCD monitor may void your warranty, so proceed with caution and consider seeking professional assistance if you are unsure about any part of the process.
Monitoring Power Usage: Strategies for Energy-Efficient Businesses
You may want to see also

Pry up tabs on the shield lamp
To begin, ensure that you have unplugged your monitor and placed it face-down on a flat, padded surface. This is important for safety reasons and to prevent scratches on your screen.
Now, let's focus on prying up the tabs on the shield lamp. First, locate the shield lamp inside your LCD monitor. It is usually positioned near the back of the monitor, close to the power supply and the LVDS cable. Once you have identified the shield lamp, take your flat-head screwdriver and gently insert it under each tab. Start by prying up one tab at a time, applying gentle force to lift the tab without causing any damage. Work your way around the shield lamp, prying up each tab systematically. Be careful not to apply too much force, as you could accidentally snap the tabs or damage nearby components.
As you pry up each tab, you may notice that some tabs are more resistant than others. If you encounter a particularly tight tab, try wiggling the screwdriver gently to loosen it before applying upward pressure again. It is important to take your time with this step and work with care and precision. Ensure that you do not lose track of which tabs you have already pried up, as you may need to apply a consistent force to each tab to lift the shield lamp away successfully.
Once all the tabs are pried up, you should be able to lift the shield lamp gently away from the monitor. This will expose the underlying circuitry and components, allowing you to proceed with your repairs or further disassembly. Remember to keep track of the tabs you have lifted, as you will need to secure them again if you reassemble your monitor.
Water Watchdogs: Who Monitors Our Usage?
You may want to see also
Frequently asked questions
Before opening your LCD monitor, disconnect it from the power source and your computer. Place the monitor face down on a padded, flat surface to avoid damaging the screen.
You will need a screwdriver, ideally a Phillips-head screwdriver, to remove the screws from the back of the monitor. You may also need a flat-head screwdriver to pry apart the casing.
Once you have removed all visible screws from the back of the monitor, insert the screwdriver between the two halves of the monitor (the front and back). Carefully slide the screwdriver through the gap, depressing any plastic clips holding the two halves together.
Once the back panel is removed, you will be able to access the internal components. Be careful not to touch any of these components without first discharging any static electricity by grounding yourself or wearing an electrostatic wristband.


