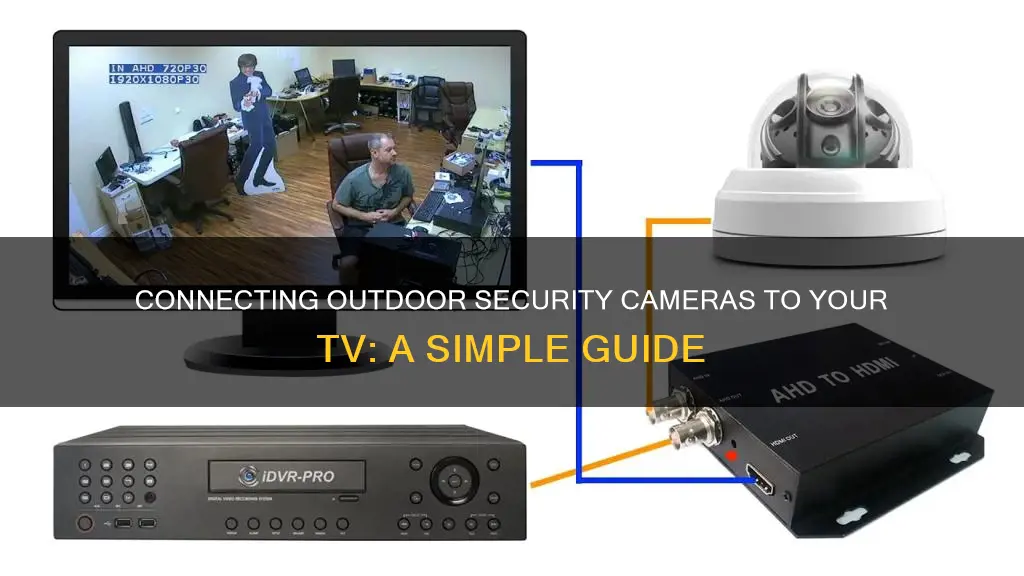
There are several ways to connect an outdoor security camera to a TV, depending on the type of camera and the TV's compatibility. The most common methods involve using HDMI, Ethernet, VGA, RCA, or BNC cables, or wireless connections via Wi-Fi, mobile apps, or smart TV apps. Some setups may also require converters or adapters to facilitate the connection. It is important to ensure that the TV has the necessary input ports and is compatible with the camera's video resolution.
| Characteristics | Values |
|---|---|
| Reasons to connect a security camera to a TV | To access real-time video feeds and enhance security by providing a larger screen for monitoring areas of concern |
| Types of security cameras | CCTV Cameras (Analog Cameras), HD-over-Coax Security Cameras, IP Security Cameras, Wireless Cameras |
| Connection methods | DVR, direct connection with cables (HDMI, Ethernet, RCA, BNC), wireless connection with mobile apps or smart TV apps |
| Benefits of using an NVR system | Easy wiring, large storage space, no need for a network connection, more stable signal |
| Steps to connect security camera to TV with DVR | 1. Connect the camera to DVR with Eternal/BNC cables. 2. Connect DVR to TV with HDMI/VGA cable. 3. Power on DVR and TV, configure input source. 4. View camera feeds through DVR's interface |
| Steps to connect security camera to TV without DVR | Use HDMI/Ethernet cables or wireless methods like mobile apps, smart TV apps, or streaming devices |
| Steps to connect a wireless security camera to a TV | 1. Download and launch the security camera app. 2. Connect the camera to Wi-Fi. 3. Stream video from your phone to TV using an app like Google Home |
What You'll Learn

Connect security cameras to TV without DVR
There are several ways to connect a security camera to a TV without a DVR. Here is a step-by-step guide:
Connect CCTV Camera to TV using HDMI Cable
If you don't want to use a video receiver, you can directly connect the CCTV camera to the TV using an HDMI cable. You will need a standard BNC cable and an HDMI female to BNC male converter.
- Connect your camera to the converter using the BNC cable.
- Plug the converter into the HDMI port on your television.
- Power on your TV and security camera.
- Switch the TV's input source to HDMI.
- You should now be able to view the live feed from your security camera.
Connect CCTV Camera to TV using AV (Composite) Cable
This method uses an RCA converter that you plug into a BNC cable coming out of your camera and into the AV input on your TV.
- Connect the BNC cable from your camera to the RCA converter.
- Plug the RCA converter into the AV input on your TV.
- Power on your TV and security camera.
- Switch the TV's input source to AV.
- You should now be able to view the live feed from your security camera, but note that this method does not support HD quality signals.
Connect CCTV Camera to TV using VGA Cable
This method requires a CCTV camera that supports AV-out or VGA-out functions. You will need a VGA cable (VGA to VGA) and an RCA cable for audio (2 RCA male to male).
- Connect the BNC connector on your camera to the VGA cable.
- Connect the RCA connector on your camera to the RCA cable for audio.
- Connect the VGA cable to your TV, computer monitor, or LCD display.
- Connect the RCA cable to your TV for audio.
- Power on your TV and security camera.
- Switch the TV's input source to VGA.
- You should now be able to view the live feed with audio from your security camera.
Connect CCTV Camera to TV using Component Cable
- Plug the power adapter into a power outlet and run the cable to your camera.
- Connect the component video output on your security camera to the component video input on the back of your TV.
- Power on your TV and security camera.
- Switch the TV's input source to the component video input, often by pressing the "Input" or "Source" button on your remote control.
- You should now see the live camera image on the screen.
Connect CCTV Camera to TV using a USB cable
This method requires a USB port on your security camera, which is compatible with a personal computer.
- Connect your security camera to your TV using a USB cable.
- Power on your TV and security camera.
- Switch the TV's input source to the USB input.
- You should now be able to view the live feed from your security camera.
Connect CCTV Camera to TV using Ethernet Cable
If your TV has an Ethernet port, you can try connecting your security camera directly to your TV using an Ethernet cable. If this doesn't work, you may need an adapter, such as an Ethernet-to-HDMI adapter.
- Connect your security camera to one end of the Ethernet cable and the adapter to the other end.
- Connect the adapter's HDMI output to the HDMI input on your TV.
- Power on your TV and security camera.
- Switch the TV's input source to HDMI.
- You should now be able to view the live feed from your security camera.
Apple Watch Series 3: GPS and Camera Features Explored
You may want to see also

Use an RCA Converter Box
If you have an older CCTV camera that outputs to an RCA video jack, you can use an RCA converter box to connect it to a modern monitor. This is a simple process: just plug your camera's output jack into the yellow RCA "S-Video" port on the converter box, and then connect the converter box to your monitor using a VGA cable.
RCA converter boxes are a good option if you have an older-style camera that is compatible with them. However, it's important to note that the resolution of S-Video is only 480 pixels, so you won't be getting a high-definition picture.
If your TV doesn't have a VGA input, you may need to use a different type of converter or adapter, such as VGA to HDMI.
It's also worth noting that converters do not carry an audio signal, so if you need to hear audio, you will need to set up a separate microphone connected to a speaker.
Vine Camera: Reliving the Vines
You may want to see also

Connect wireless cameras to a monitor
There are several ways to connect wireless security cameras to a monitor. Here is a step-by-step guide:
Step 1: Understand the Components
A typical wireless security camera setup with a computer monitor includes three main components: the wireless digital video camera(s), the wireless receiver, and the computer monitor. The camera captures video images and transmits them to the receiver, which then sends the images to the monitor for viewing.
Step 2: Choose the Right Camera Type
Wireless security cameras come in different types, such as indoor and outdoor cameras. Outdoor cameras are typically designed to withstand environmental factors like dust, water, and weather conditions. They are ideal for monitoring perimeters, driveways, and entrances. Indoor cameras are suitable for offices, retail stores, and homes, offering discreet surveillance without the need for cabling.
Step 3: Consider Lighting Conditions
Wireless security cameras use highly sensitive image chips, such as Charge Coupled Device (CCD) or Complimentary Metal Oxide Semiconductor (CMOS), to capture images in different lighting conditions. Day/night vision cameras can produce high-quality colour images in low-light conditions and are often rated in "lux," the unit of measurement for light intensity. Night vision infrared cameras, on the other hand, switch to infrared mode when there is no longer enough visible light, illuminating the target area with infrared light invisible to the human eye.
Step 4: Select a Suitable Monitor
Computer monitors with high resolutions and fast display rates are ideal for wireless security camera systems. Additionally, consider monitors with built-in speakers if audio monitoring is important. Ensure that the monitor has the necessary input types, such as HDMI, BNC, or RCA, to accommodate the connections required by your camera system.
Step 5: Connect the Camera to the Monitor
The specific connection method will depend on the type of camera and monitor you are using. For example, if you are using a wireless webcam security camera, attach it to the same wireless router as your computer using an Ethernet cable and run the webcam setup software. Remove the Ethernet cable after configuration, and install the webcam in your desired location. You can then monitor the feed using the software provided by the camera manufacturer.
If you are using a CCTV camera, you will need additional hardware as the connections are typically not the same as those on a computer monitor. Acquire a video-to-VGA converter box and a VGA switch box to connect the CCTV camera to the monitor. Use a VGA cable to connect the converter box to the switch box and then connect the monitor cable to the switch box. You can then switch the video feed between the computer and the camera as needed.
Alternatively, if your camera and monitor both have HDMI ports, you can use an HDMI cable for a simple and direct connection.
Connecting Your HDMI Camera to TV: A Simple Guide
You may want to see also

Connect security cameras to TV with DVR
Connecting security cameras to a TV with the help of a DVR is a great way to enhance your security setup. This method allows you to view real-time video feeds from multiple cameras on a larger screen, providing better monitoring of your property. Here is a detailed guide on how to connect security cameras to your TV using a DVR:
Step 1: Understand Your Camera and TV Setup
Before beginning the connection process, it's essential to know the type of security camera you have, whether it's an analog or digital camera, and its specific technical features. Common types include CCTV cameras, HD-over-Coax cameras, IP cameras, and wireless cameras. Knowing your camera type will help you choose the right connection method.
Additionally, ensure your TV is compatible with your camera. Check for supported TV inputs like HDMI, AV, or BNC, and confirm if your TV can display the camera's video resolution.
Step 2: Connect the Security Camera to the DVR
To connect your security camera to the DVR, use the appropriate cables. For digital cameras, use Eternal cables, and for analog cameras, use BNC cables. This step is crucial for transmitting the camera feed to the DVR.
Step 3: Connect the DVR to the TV
Once your camera is successfully connected to the DVR, it's time to connect the DVR to your TV. Use an HDMI or VGA cable for this step. Most modern DVRs support HDMI connections for improved image quality.
Step 4: Power On and Configure
Power on both the DVR and the TV. Then, configure the proper input source on your TV. You may need to switch the TV's input to match the connection type used, such as HDMI or VGA.
Step 5: View Camera Feeds on the TV
After completing the setup, you can now view the security camera feeds directly on your TV through the DVR's interface. You may need to follow any additional on-screen instructions provided by your DVR to finalise the setup.
By following these steps, you can effectively connect your security cameras to your TV using a DVR, providing a comprehensive security monitoring solution for your home or business.
Using Altec Lansing Cameras on PC: A Guide
You may want to see also

Connect security cameras to TV using an NVR system
There are several ways to connect security cameras to a TV, but an NVR system is the easiest and most reliable method. Here's a step-by-step guide on how to connect security cameras to a TV using an NVR system:
Step 1: Understand the Benefits of an NVR System
- Easy Wiring with No Connection Failure: The NVR system uses simple wiring with Ethernet Cat 5/6 cables and an HDMI cable, ensuring a reliable connection without the complexity of other methods.
- Large Storage Space and Continuous Recording: NVR systems offer ample storage space, allowing you to record and save footage continuously without worrying about overwriting older footage.
- Works Without a Network: You can connect security cameras to the TV and NVR without the need for a router network, avoiding the hassle of IP camera configuration.
- More Stable Signal: NVR systems provide a stable signal with no "No Signal" warnings, ensuring a seamless viewing experience.
Step 2: Prepare the Necessary Equipment
Before starting the setup process, ensure you have the following:
- Security cameras (CCTV, HD-over-Coax, IP, or wireless cameras).
- A compatible TV with an HDMI port.
- An NVR (Network Video Recorder) system, which includes the necessary cables and power adapter.
Step 3: Connect the CCTV Cameras to the NVR
Use Ethernet Cat 5/6 cables to connect your CCTV cameras to the NVR. This step may vary depending on the type of security cameras you have. For instance, HD-over-Coax cameras typically use BNC connectors, while IP cameras use Ethernet cables.
Step 4: Connect the NVR to the TV
Use an HDMI cable to connect the NVR to the HDMI port on your TV.
Step 5: Power the NVR and Turn on the TV
- Plug the power adapter into the NVR and turn on the power source.
- Turn on your TV and select the correct HDMI input.
Step 6: View the Live Camera Feed
Once the setup is complete, you should be able to view the live camera feed from your security cameras directly on your TV screen.
By following these steps, you can easily connect your security cameras to your TV using an NVR system, providing a simple and reliable way to monitor your security footage.
Cameras Watching You: What's the Right Term?
You may want to see also
Frequently asked questions
You can connect your security camera directly to your TV or monitor to view the signal without recording. First, turn off your TV and disconnect the security camera's power cord from the electrical outlet. Then, connect the video cable from the output jack on the camera to the matching input jack on the TV. Plug in the DC power adapter cable, and switch on the power for the TV. Finally, press the video input button on the front panel to activate the connection.
The easiest way to connect your security camera to your TV is by using an NVR system. This method offers easy wiring with no connection failure, large storage space, and a more stable signal.
If you have a wireless security camera with its own application, you can use the app to stream the camera's video feed to your TV via a Wi-Fi connection. First, download and launch the security camera app on your phone, then connect your security camera to Wi-Fi. Finally, use an app like Google Home to stream the video from your phone to your TV.


