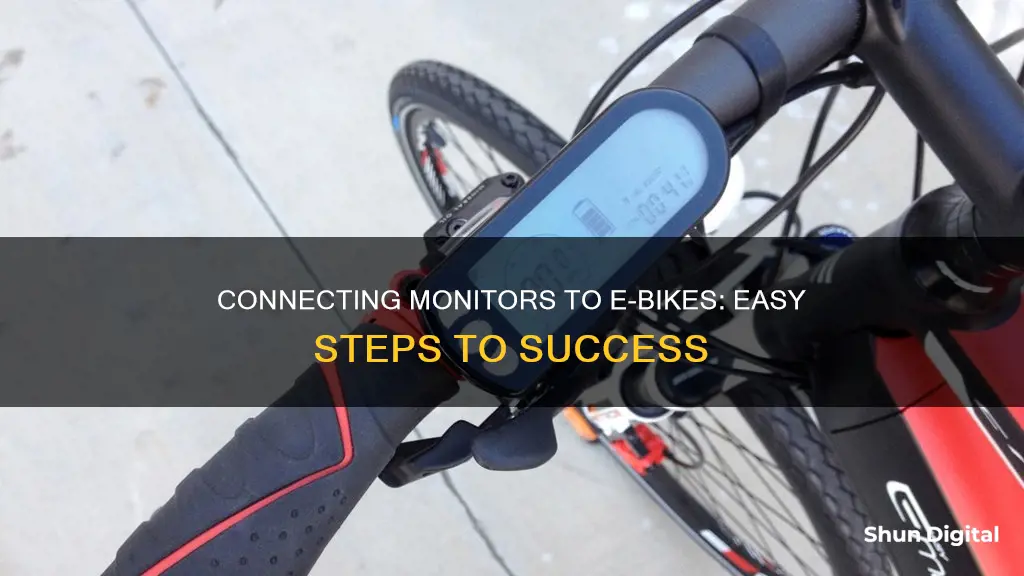
Many e-bikes are equipped with an LCD control display that monitors motor assistance, speed, odometer, trip distance, riding time, and battery energy level. This display is usually placed in the middle of the handlebar. To turn on the display, press the power button located near the left grip on the handlebars. The power button may also be used to turn off the display by holding it down for a few seconds. The display will also automatically shut off when the e-bike is not used for 5 minutes.
What You'll Learn

How to hook up a monitor to an ebike: the basics
Hooking up a monitor to your e-bike is a simple process, but it's important to ensure you have the right display and that it's compatible with your bike. Here's a step-by-step guide on how to do it:
Step 1: Choose the Right Display
When choosing a replacement display for your e-bike, it's crucial to ensure compatibility. If you're unsure of the technical details of your current display, look for printed numbers on the back, which can help identify the correct replacement. You can also refer to the model and manufacturer of your e-bike to find a suitable display.
Step 2: Prepare for Maintenance
Before beginning the installation process, turn off your e-bike and disconnect the controller and battery from the display. This step ensures safety and prevents any potential damage during the replacement.
Step 3: Disconnect the Old Display
Carefully snip the zip tie that secures the display cable. Then, trace the cable to the silver metal connector. Untwist the metal portion and gently pull it apart without twisting to unplug the cable from the old display.
Step 4: Remove the Old Display and Remote
Using a 3 mm Allen wrench, remove the bolts securing the display and remote. Set the bolts aside in a safe place so you can reuse them later. Carefully open the remote and display clamps and pull them off the handlebar.
Step 5: Install the New Display
Position the new LCD display in the middle of your handlebar. Tighten it securely with the bolts you set aside earlier. Ensure the display is at a right angle for optimal viewing while riding.
Step 6: Secure the Display Remote
Check the wire running from the display to the remote to ensure it's not twisted and runs smoothly. Pass the display remote clamp over the left side of the handlebar and tighten the bolt securely.
Step 7: Connect the New Display
Line up the internal notches and pins, as well as the external arrows, and push the connector ends together without twisting. Then, twist just the silver metal portion to fully secure the connection.
Step 8: Finalize the Installation
Snip the zip tie so that it's flush and smooth. Reinstall the battery and other wires, making sure that all components, such as the controller and battery, are connected correctly. Test the e-bike thoroughly before riding to ensure everything is functioning properly.
Now you're ready to hit the road with your new e-bike monitor! Remember to review the user manual for any specific instructions related to your e-bike model and display.
Unplugging an Asus Monitor: A Step-by-Step Guide
You may want to see also

Choosing the right monitor for your ebike
- Compatibility: Ensure that the monitor is compatible with your ebike's controller. Different controllers use different communication protocols, so it's important to check that the monitor you choose will work with your specific ebike model.
- Display type: Monitors typically come with an LCD or LED display. LCD displays tend to have more features and settings, while LED displays often use analog signals and read the battery voltage directly.
- Size: Consider the size of the monitor and how it will fit on your handlebar. Smaller displays are less bulky and inconspicuous, while larger displays may be easier to read.
- Mounting: Decide where you want to mount the monitor on your handlebar. Center-mounted monitors can be more stable, but they may interfere with mounting other accessories, like baskets.
- Features: Different monitors offer a variety of features, such as battery life, pedal-assist level, speed, odometer, trip distance, riding time, and more. Choose a monitor that displays the information that is most important to you.
- Brightness: Look for a monitor with adjustable brightness settings, so you can ensure it is visible in different lighting conditions.
- Ease of use: Consider how easy the monitor is to use. Look for a monitor with intuitive controls and easy-to-navigate settings.
- Smartphone integration: Some monitors offer smartphone integration, allowing you to connect wirelessly and access additional features through apps.
When choosing a monitor for your ebike, it's important to consider your specific needs and preferences. Compare different models and read reviews to find the best option for you. Additionally, make sure you have the correct technical details or printed numbers on the back of your current display to ensure you get a compatible replacement.
Connecting an LCD Monitor to Raspberry Pi Directly
You may want to see also

Step-by-step guide to installing an ebike monitor
A monitor or display on your ebike allows you to track important metrics such as motor assist, speed, odometer, trip distance, riding time, and battery energy level. Here is a step-by-step guide to installing an ebike monitor:
- Turn off your ebike and its current display: Power off your ebike and its display, if it has one. This is an important safety measure before proceeding with any electrical work.
- Disconnect the controller and battery: Disconnect the wires and cables connecting the controller and battery to the display. This will ensure that you can safely remove the old display and prepare for the new one.
- Remove the old display: Depending on the model of your ebike, you may need to snip any zip ties or clamps holding the display in place. Carefully remove the old display, making sure to note how it is attached to the handlebars.
- Install the new display: Position the new display on the handlebars, ensuring it is secure and at the correct angle for optimal viewing. You may need to use bolts or clamps to tighten it in place.
- Connect the wiring harness: Plug in the new display by connecting the wiring harness. Ensure that the internal notches and pins, as well as the external arrows, are lined up correctly before pushing the connector ends together. Then, twist the silver metal portion to secure the connection.
- Reinstall the battery and other wires: Reconnect the controller, battery, and any other necessary wires to the new display. Double-check that all connections are secure and correct.
- Test the ebike: Before riding, test the ebike to ensure that the new display is functioning properly. Adjust the display settings as needed to suit your preferences.
It is important to ensure that you have the correct display for your ebike model and that you follow any specific instructions provided by the manufacturer. Additionally, always exercise caution when working with electrical components, and if you are unsure, consult a professional or a mechanic.
Monitoring Docker Container Resource Usage: A Comprehensive Guide
You may want to see also

Tips for using your ebike monitor
- Ensure your e-bike battery is charged before turning on the display. The monitor will display the amount of power remaining in the battery through a series of bars. The more bars displayed, the more battery power is available.
- To turn on the display, press the power button on the button selector located near the left grip on the handlebars. You can then adjust the motor-assist power level by pressing the increase or decrease pedal assist buttons.
- Experiment with the different levels of pedal assist to find the right power level for your needs. Different riding conditions will require different levels of assistance.
- When the pedal assist function is activated, the motor will supply power when you pedal forward. In pedal assist level 1, you will receive assistance measuring around 20% motor power. In level 3, you will receive assistance utilizing 100% of the motor's power.
- The monitor display will automatically shut off when the e-bike is not used for 5 consecutive minutes. To turn off the display manually, hold down the power button for several seconds.
- If your LCD display is damaged, you can replace it. First, ensure you have the correct replacement display, then turn off your current display, disconnect the controller and battery, and unplug and remove the old display. Install the new display, ensuring the wire runs smoothly from the display to the remote, and plug it in. Reinstall the battery and other wires, and test the bike before riding.
- Some monitors have additional features, such as a charging port for mobile devices.
Monitoring Employee Car Usage: Strategies for Effective Surveillance
You may want to see also

Troubleshooting common issues with ebike monitors
Troubleshooting common issues with e-bike monitors:
E-bike monitors are essential for a safe and enjoyable riding experience, providing crucial data such as speed, battery level, distance travelled, and assist mode. However, they can sometimes malfunction, displaying issues such as a blank screen, flickering, incorrect readings, or unresponsive buttons. Here are some troubleshooting tips to address common problems with e-bike monitors:
Blank Screen:
- Check battery level: Ensure the battery is sufficiently charged. If low, recharge and try again.
- Inspect connections: Examine cables connecting the display, battery, and controller for loose or damaged wires. Secure any loose connections.
- Power cycle: Turn off the e-bike, remove the battery, wait a few minutes, then reassemble and turn it on.
- Basic reset: Refer to the user manual for specific reset instructions.
- Software update: Check for firmware updates for your display.
Flickering Display:
- Check connections: Inspect all cables for loose or damaged connections and secure them.
- Battery voltage: Ensure the battery is sufficiently charged. Low voltage can cause display instability.
- Moisture: If the e-bike has been exposed to moisture, allow it to dry completely before use, and avoid riding in heavy rain or through deep puddles.
Incorrect Readings:
- Sensor check: Verify that all sensors (speed, cadence, battery level) are securely installed and clean.
- Calibration: Consult the user manual for calibration instructions.
- Software update: Check for firmware updates that might address calibration issues.
Unresponsive Buttons:
- Clean the buttons: Gently clean the buttons with a soft, dry cloth to remove dirt or debris.
- Moisture check: If the e-bike has been exposed to moisture, allow it to dry completely before use.
- Professional inspection: If issues persist, consult a professional for potential hardware damage.
Connection Issues:
- Check connections: Inspect all cables for loose or damaged wires and secure any loose connections.
- Connector inspection: Examine the connector between the display and controller for damage.
- Electromagnetic interference: Move electronic devices away from the e-bike to reduce potential interference.
If basic troubleshooting does not resolve the issue, you may need to perform advanced troubleshooting techniques, such as using a multimeter to test electrical connections and voltage. If issues persist, it is recommended to seek professional assistance from a qualified e-bike technician.
Tethering Usage: Monitor Your T-Mobile Data Like a Pro
You may want to see also
Frequently asked questions
Press the power on/off button located near the left grip on the handlebars to turn the display on.
You can adjust the motor-assist power level by pressing the INCREASE PEDAL ASSIST or DECREASE PEDAL ASSIST button.
The LCD control display on your ebike monitors motor assist, speed, odometer, trip distance, riding time, and battery energy level.


