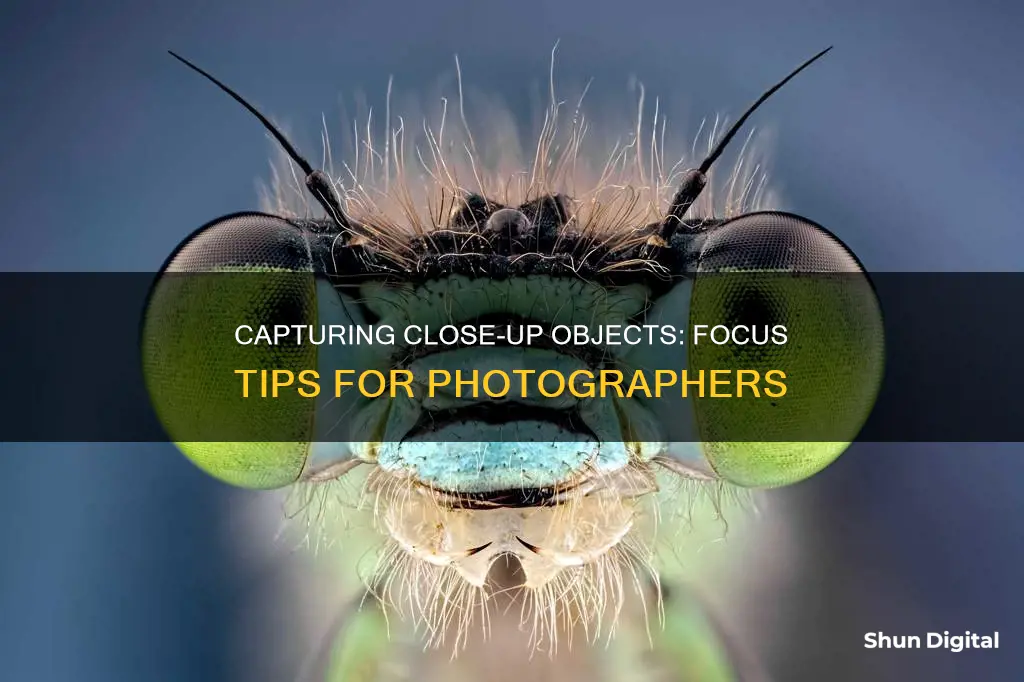
Focusing a camera on close objects can be challenging, especially when dealing with shallow depth of field or autofocus struggles to lock onto the desired subject. Here are some tips to help you master the art of focusing your camera on nearby objects:
- Utilize the Close-up or Macro mode on your camera. These modes enable focusing on objects just a few inches away and often focus on the center of the image, simplifying the process.
- Pay attention to autofocus. In close-up shots, the shallow depth of field can result in the camera focusing on the background instead of the intended subject. Keep the object you want in focus at the center of the frame when using Auto-Focus.
- Once your camera has focused, avoid moving it. Any slight movement can cause your image to become blurry. If you need to adjust the composition, remember to refocus before capturing the shot.
- Consider switching to manual focus. Manual focus gives you more control and can be easier for very close subjects, as autofocus tends to struggle with such scenarios.
- Try using Live View technology, which allows you to enlarge the image on the screen and fine-tune the focus until it is perfectly sharp.
- Avoid using flash for close-up shots, as it won't work effectively at such short distances. Instead, opt for natural lighting or cloudy weather to bring out the details in your photos.
| Characteristics | Values |
|---|---|
| Camera type | DSLR, autofocus, point-and-shoot, manual |
| Camera model | Canon, Nikon, Voigtlander, Sony |
| Camera lens | Wide-angle, telephoto, zoom, macro |
| Camera settings | Aperture, focal length, shutter speed, ISO, autofocus, manual focus |
| Camera focus | Infinity, hyperfocal distance, focus peaking, autofocus lock |
| Other equipment | Tripod, flashlight, laser pointer |
What You'll Learn
![]()
Use the Close-up or Macro mode
Close-up photography, or macro photography, is a very rewarding form of photographic expression. It allows you to capture the intricate details of a subject, such as its eyes, scales, or petals, while still encapsulating its overall essence.
To achieve true macrophotography, you need a macro lens with a magnification of 1:1, meaning your camera's sensor will render a life-like image of your subject. However, you can also achieve close-up photography with any lens by simply zooming in on your subject.
- Get as close to your subject as possible. This will help isolate the subject and blur the background.
- Use a tripod to stabilise your camera, especially when using manual focus.
- Experiment with different lenses. Prime lenses are a good place to start due to their clarity and sharpness.
- Play with different exposures; sometimes, slightly overexposing or underexposing can add to the image.
- Be patient when photographing moving subjects like insects or flowers on a windy day.
- Use a fast shutter speed to avoid blurring in your macro photos.
- Fill the frame of your shot with the pattern or subject to avoid needing to crop later.
Remember, what's important is that your photo pleases those who view it. So, get creative, experiment, and have fun with close-up and macro photography!
The Evolution of Panavision Cameras: A Manufacturing Overview
You may want to see also
![]()
Watch the autofocus
Autofocus point-and-shoot cameras can produce sharp pictures when used properly. However, sometimes you need to tell the camera where to focus.
A common focusing problem occurs when you deliberately place a subject off-centre in the viewfinder frame. For example, you want to compose a shot of your friends with mountains in the background. You ask your friends to stand to the right so that they block less of the background, giving the mountains centre stage in your composition. You point and shoot. But the camera focuses on the mountains because that's where your composition has landed the focus point, and your friends end up unsharp in the print.
Locking the focus
Lock the focus any time your composition does not place the viewfinder's focus point on the most important part of the scene you're shooting. Locking the focus means that you deliberately make your camera focus on some object in the scene and keep the focus locked at that exact distance until you take the picture. Here's how you do it:
- Look through the viewfinder and position its focus point on the most important part of the scene — your main subject.
- Press the shutter button halfway down, until the green focus-OK lamp in the viewfinder eyepiece glows steadily.
- Holding the shutter button halfway down, reorient the camera so that your desired composition appears in the viewfinder.
- Press the shutter button all the way down to take the picture.
Making sure your focus is locked
When you lock your focus, you can't actually see the subject getting sharp in the viewfinder. However, you can verify that your point-and-shoot has autofocused by looking at its focus-OK lamp.
The focus-OK lamp lights up whenever you press the shutter button halfway. If it glows steadily, it's telling you that the camera has successfully focused. If the focus-OK lamp blinks or doesn't light, it's telling you that the camera can't focus.
More often than not, your camera can't focus because you're too close to the subject. Fix the problem by easing up on the shutter button, stepping back a foot or two, and then pressing the shutter button again.
If you move, the focus doesn't
Locking the focus is vitally important to getting consistently sharp pictures. But remember that when you have that shutter button pressed halfway, the focus doesn't budge. If you ask your subject to move closer or farther away, or you move closer or farther from it to adjust your composition, your subject's no longer in focus. If the distance to the subject changes after you've locked the focus, let up on the shutter button and repeat the focus-locking procedure.
iPad Camera: What Materials Make It?
You may want to see also
![]()
Avoid using flash
When taking close-up photos, it's best to avoid using flash. Here are some reasons why, as well as some alternatives to using flash:
Unwanted Attention
Using a flash can be a surefire way to draw unwanted attention to yourself and your camera. This can be especially problematic if you're trying to capture candid photos of people or events. In such cases, it's best to avoid using flash and instead adjust your camera's settings to accommodate low-light conditions.
Red-Eye Effect
The red-eye effect is a common issue when using flash, especially in low-light conditions. It occurs when light from the flash bounces off the retina at the back of a person's eye, causing their eyes to appear red in the photo. While some cameras have a built-in red-eye reduction feature, it's often more effective to simply avoid using flash altogether.
Flat and Artificial Lighting
Flash photography often results in flat and artificial-looking images. This is because the flash illuminates the subject from the same angle as the camera, creating harsh shadows and reducing the sense of depth in the photo. By using alternative light sources or reflecting natural light, you can achieve more flattering and three-dimensional lighting.
Camera Shake
When using a slow shutter speed in low-light conditions, it's crucial to avoid camera shake to prevent blurry photos. Using a flash can actually exacerbate this issue, as the bright burst of light from the flash may cause you to inadvertently move the camera during the exposure. It's often better to use a stable tripod and longer exposure time to capture sharp photos in low light.
Overpowering the Scene
In certain situations, the light from a flash can be too strong and overpower the scene, resulting in blown-out highlights and loss of detail. This is particularly common when photographing small objects up close, as the flash illuminates them from a very short distance. By using alternative light sources or reflecting natural light, you can achieve a more balanced exposure.
Alternative Lighting Techniques
There are several alternatives to using flash that can provide more flattering and natural-looking lighting for your close-up photos:
- Bounce Flash: Instead of directing the flash straight at your subject, try bouncing it off a wall or ceiling. This will diffuse the light and create softer shadows, resulting in a more natural-looking image.
- External Flash Units: Using an external flash unit that can be positioned away from the camera can give you more control over the direction and intensity of the light. This allows you to create more complex lighting setups and avoid the flat look that on-camera flash often produces.
- Slow Sync Flash: This technique combines the use of flash with a slower shutter speed, allowing more ambient light into the scene. It can create interesting effects, especially when there are coloured lights in the environment.
- Manual Light Sources: Instead of relying on flash, consider using continuous light sources such as LED panels or studio strobes. These give you more control over the direction and intensity of the light, allowing you to shape and mould the light to your liking.
Camera Battery Explosions: How Common Are They?
You may want to see also
![]()
Try shooting in cloudy weather
When it comes to photography, cloudy weather can be your best friend. Here are some tips to make the most of your next shoot on a cloudy day:
Embrace the Softbox Effect
On a cloudy day, the clouds act as a natural diffuser, softening the sunlight and creating a giant softbox in the sky. This even, diffused light results in beautiful, soft shadows and even skin tones for your subjects. So, if you're going for a light and airy style, an overcast day is perfect!
Make Colour Pop
The flat, even lighting on cloudy days is ideal for making colours pop. Colours in the red and yellow families, in particular, will stand out. So, don't be afraid to incorporate some bright, colourful props or clothing to add interest and a focal point to your images.
Create Directional Light
One challenge of shooting on a cloudy day is the lack of directional light, which can make your images appear flat and dimensionless. To add dimension, use your surroundings—buildings, trees, fences, or even a reflector—to block light from one or more directions. This will help create shadows and give your images more depth.
Use Cloud Breaks
Keep an eye out for cloud breaks or light pools, where the clouds shift and allow a beam of sunlight through. Take advantage of these moments to change up your settings and add some variety to your shoot. If you're shooting during the day, find spots where the light reflects to make the most of these natural highlights.
Face the "Sun"
On a cloudy day, have your subjects face the direction of the sun to ensure they're lit evenly. If you're unsure where the sun is, use an app like Sun Seeker to help you out. This will ensure your subjects' skin tones are correctly exposed and free from unwanted shadows.
Expose Correctly
It's easy to blow out highlights on an overcast day, especially when it comes to skin tones. To avoid this, be sure to expose correctly in-camera or even underexpose by half a stop. Don't overexpose, as this will wash out skin tones and ruin your image.
Avoid the Woods
When shooting on a cloudy day, avoid locations like thick woods, which will only add more shadows to your subjects. Instead, opt for open areas with plenty of sky to make the most of that soft, diffused light.
Shoot Earlier
Without the benefit of a true Golden Hour, it gets darker faster on cloudy days. So, be sure to start shooting earlier than you usually would. Depending on the heaviness of the overcast, you might need to start 30 minutes to two hours earlier.
Try Black and White
While you don't have to shoot the whole session in black and white, it's worth trying out a few shots. The soft, even light of a cloudy day often translates beautifully into stunning black and white images.
Adjust Your Settings
Keep in mind that you'll likely need to adjust your camera settings on a cloudy day. Bump up your ISO to 400-800, or even higher if needed. You may also need to open up your aperture or slow your shutter speed to ensure a proper exposure. Just be careful not to drop your shutter speed too low, or you'll risk blurry images.
Reviving Your Camera Battery: Charging from Zero
You may want to see also
![]()
Use manual focus
If you're looking to focus on close objects with your camera, you can use manual focus. Here's a step-by-step guide on how to do it:
Step 1: Switch to Manual Focus Mode
Locate the focus mode switch on your lens, which is usually labelled "AF-MF" or "A-M". Slide the switch to the "M" position to enable manual focus. This gives you full control over the focus ring.
Step 2: Look Through the Viewfinder
Look through the viewfinder and identify the object you want to focus on. Ensure that it is within the camera's minimum focusing distance, which varies depending on your lens. You can find this information in your lens's specifications.
Step 3: Adjust the Focus Ring
Turn the focus ring on your lens to adjust the focus. Keep turning the ring until the object appears sharp and clear in the viewfinder. You may need to move slightly forward or backward to achieve the perfect focus.
Step 4: Lock the Focus (Optional)
Some lenses have a focus lock mechanism, often activated by a button on the lens barrel. This prevents accidental changes to the focus setting. If your lens has this feature, engage the focus lock after achieving the desired focus.
Step 5: Take the Picture
With the object in focus, press the shutter button fully to capture the image. If you're using a tripod, consider using a remote shutter release or the camera's self-timer to avoid introducing camera shake during the exposure.
Using manual focus gives you precise control over the focus of your image. It is particularly useful when your camera struggles to autofocus on the desired subject or when you want to focus on objects at a specific distance. Remember to adjust your focus for each shot, as moving the camera or changing the lens' focal length can affect the focus distance.
Charging Kidamento Cameras: A Quick Guide
You may want to see also