Adobe Camera Raw is a free plug-in for Photoshop that simplifies image processing and development. It can also be used within Adobe Bridge, which offers the advantage of not having to switch between applications. To enable Camera Raw editing in Bridge, you need an active subscription to either Adobe Photoshop or Photoshop Lightroom Classic. Once enabled, you can open and edit images in Camera Raw directly from Bridge without launching Photoshop. This not only improves computer speed by reducing resource usage but also streamlines your workflow by allowing you to instantly return to Bridge after processing an image.
| Characteristics | Values |
|---|---|
| How to enable Camera Raw editing in Bridge | To enable Camera Raw editing in Bridge, you need an active subscription of Adobe Photoshop or Photoshop Lightroom Classic. Launch either of these apps, then relaunch Adobe Bridge. |
| How to open Camera Raw in Bridge | Go to File > Open in Camera Raw, or click on the Open in Camera Raw icon at the top of the Bridge interface. |
| How to return to Bridge after editing in Camera Raw | Click the "Done" button in the lower right corner of the Camera Raw dialog box. |
| How to edit white balance | Click on the White Balance tool at the top of the window, then click on different places on the image to see how the color balance changes. Adjust the Temperature and Tint sliders on the right to manually edit the white balance. |
| How to straighten images | Select the Straighten tool at the top of the window, then find a line in the image that should be perfectly vertical or horizontal and drag from the top to the bottom of the line. |
| How to remove a crop | Click and hold the Crop tool at the top of the Camera Raw dialog and choose Clear Crop. |
| How to copy Raw settings from one file to another | Ctrl–click (Mac) or Right–click (Windows) on the image and choose Develop Settings > Copy Settings, or use the keyboard shortcut Cmd–Opt–C (Mac) or Ctrl–Alt–C (Windows). |
| How to paste Raw settings to another file | Ctrl–click (Mac) or Right–click (Windows) on the image and choose Develop Settings > Paste Settings, or use the keyboard shortcut Cmd–Opt–V (Mac) or Ctrl–Alt–V (Windows). |
| How to batch process multiple Raw images | Select all the images you want to process, then go to the Tools menu and select Photoshop > Image Processor. Choose where the updated images will be saved and select the file type. |
What You'll Learn
![]()
How to open Camera Raw in Bridge
Opening Camera Raw in Bridge is a straightforward process, but there are a few things to keep in mind. First, make sure you have the necessary software installed and up to date. In this case, you'll need Adobe Bridge and Adobe Photoshop or Photoshop Lightroom Classic.
Once you have the required software, follow these steps:
Step 1: Launch Adobe Photoshop or Lightroom Classic
This step is necessary to enable Camera Raw editing in Bridge. Open either Photoshop or Lightroom Classic, and then you can proceed to the next step.
Step 2: Relaunch Adobe Bridge
After launching Photoshop or Lightroom Classic, close and reopen Adobe Bridge. Camera Raw editing should now be enabled.
Step 3: Navigate to Your Images in Bridge
In Adobe Bridge, navigate to the folder containing the images you want to edit in Camera Raw. Bridge will display your images as thumbnails in the Content panel.
Step 4: Select the Image(s) You Want to Edit
Click on the thumbnail of the image you want to edit. If you want to edit multiple images at once, hold down the "Shift" key and click on the thumbnails to select a range of images.
Step 5: Open the Images in Camera Raw
To open the selected image(s) in Camera Raw, go to the File menu and choose "Open in Camera Raw" or simply press "Ctrl+R" (Windows) or "Command+R" (macOS). This will launch the Camera Raw dialog box, where you can make adjustments to your images.
Step 6: Edit Your Images in Camera Raw
Camera Raw provides a range of editing tools and tabs, including Basic, Tone Curve, Detail, HSL/Grayscale, Split Toning, Lens Corrections, and more. Make the desired adjustments to your images using these tools.
Step 7: Save or Open Your Images
Once you're done editing, you have two options. You can click "Done" to accept the changes and close the Camera Raw dialog box, or you can click "Open Image" to open a copy of the adjusted image in Photoshop for further editing.
Activeon Action Camera: Swappable Batteries?
You may want to see also
![]()
How to copy Camera Raw settings from one file to another
To copy and paste Camera Raw settings from one file to another, follow these steps:
- Open the raw images you want to edit in Photoshop. When you click "Open" on your file window, the Camera Raw window will open automatically.
- Edit one of the images as you would like to copy and paste to the other images.
- Once you are satisfied with the edits, make sure the edited image is selected. With multiple photos open, the thumbnail of the selected photo will have a white border around it.
- Now, right-click or Command + click the selected image thumbnail and select "Copy Edit Settings" or use the keyboard shortcut Control + C (Win) or Command + C (Mac).
- Select the next image you want to paste the settings to by right-clicking or Command + clicking on its thumbnail. You can also use Control + V (Win) or Command + V (Mac) to paste the settings.
- Choose "Paste Edit Settings" from the menu. The image and its thumbnail will change to match the settings of the first image.
You can also select multiple images at once by holding Control (Win) or Command (Mac) while clicking the images you want to paste the settings to. Then, use Control + V (Win) or Command + V (Mac) to paste the settings to all selected images.
If you are working with multiple images simultaneously or with files from Adobe Bridge, you will have access to the filmstrip, which makes it easier to copy and paste settings between images.
Additionally, you can copy and paste the Camera Raw filter between layers by following these steps:
- Convert the image layers to Smart Objects by going to Layer > Smart Objects > Convert to Smart Object. Repeat this process for each layer or separate image.
- Open Camera Raw by going to Filter > Camera Raw Filter.
- Make any desired edits to the layer using the available adjustments in the Camera Raw window. When you are satisfied, click OK.
- Hold Alt/Option and drag the Smart Filter to the new layer in the Layers Panel. This will copy and paste the filter onto the new layer.
Leaving Batteries in Cameras: Good or Bad?
You may want to see also
![]()
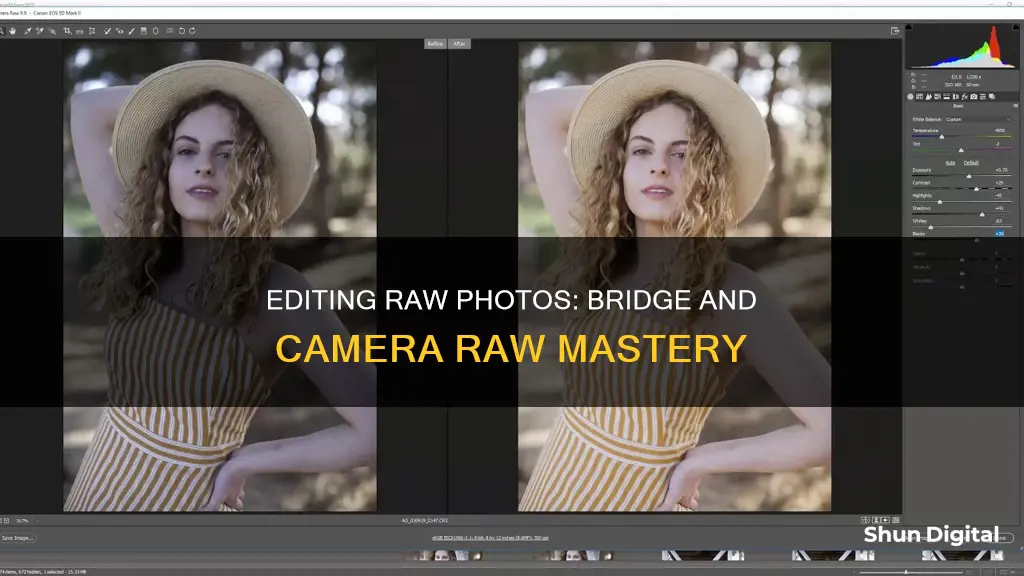
How to adjust white balance and straighten images
To adjust the white balance in Camera Raw, you can use the White Balance Tool button in the expanded Basic tab of the Edit Panel. First, click the Edit button in the toolbar of the Camera Raw dialog box to change your pointer into the White Balance Tool. Then, find a neutral grey area in the image and click it to automatically correct the image's white balance. If there is no neutral grey area, you can select a white area, but make sure it is not specular white. This means selecting a white object, rather than a source of white that is from light or a reflection of light.
Alternatively, you can use a preset to adjust the white balance. Select a preset white balance level from the White Balance drop-down menu in the expanded Basic tab of the Edit Panel. The default setting is 'As Shot', which uses the camera raw image's metadata to display white levels.
If the available presets do not correct the white balance, you can manually adjust it. Use the adjacent Temperature and Tint sliders on the Basic tab in the Edit Panel to adjust the temperature and tint of the image. The Temperature slider uses the Kelvin colour temperature scale. Moving the slider to the left will add more blue to an image, and to the right will add more yellow. The Tint slider adjusts the white balance to correct magenta or green colour casts. Move the slider to the left to add more green, and to the right to add more magenta.
To straighten images in Camera Raw, select the Straighten tool in the Camera Raw dialog box, or simply press the 'A' key. Drag the Straighten tool in the preview image to baseline horizontal and vertical. The Crop tool will automatically activate after using the Straighten tool.
You can also automatically straighten an image in one of three ways. First, by double-clicking the Straighten tool in the toolbar. Second, with the Straighten tool selected, double-click anywhere in the preview image. Third, with the Crop tool selected, press the Command key (Mac OS) or Ctrl key (Windows) to temporarily switch to the Straighten tool, then double-click anywhere within the preview image.
The Ultimate Battery Pack Guide for Photographers
You may want to see also
![]()
How to batch process multiple Raw images
Adobe Bridge is a media browsing application that allows you to view, manage, and organise your digital files, as well as edit your photos without having to import and file them in various catalogs.
To batch process multiple Raw images, follow these steps:
- Install Adobe Photoshop Bridge.
- Load your images into a new folder on your computer. It is recommended to download images directly from your memory card to your computer, using an external USB card reader if your computer doesn't have a built-in one.
- Open Bridge and navigate to your folder.
- Select your Raw files and open them by clicking on the Camera Raw plug-in icon.
- Adjust your images as needed. Note that batch processing is most effective when used on images photographed using similar light and settings.
- Save your images.
- Install Adobe Photoshop Bridge
Adobe Bridge is part of Adobe's Creative Suite and can be installed for free with the purchase of any Photoshop program.
Load your images into a new folder
It is important to keep your images organised and ensure they are stored safely. Consider backing up your images to external hard drives and cloud storage.
Open Bridge and navigate to your folder
You will need a subscription to Adobe CC to access Adobe Bridge. Once you have the program open, use the left-side navigation menu to find and select your folder.
Select your Raw files and open them in Camera Raw
Raw files will be displayed with different file extensions depending on the camera used (e.g., CR2 or CRW for Canon, NEF for Nikon).
To open the images in Camera Raw, you can either:
- Right-click (or Control-click on Mac) on any of the selected images and choose "Open in Camera Raw"
- Double-click on the image thumbnails in Bridge (you may need to adjust your settings to enable this)
Adjust your images
Once your images are open in Camera Raw, you can make adjustments to multiple images at once.
Select all the images you want to edit by pressing Ctrl + A (Command + A on Mac). Any adjustments made while the images are selected will be applied to all of them.
You can also copy and paste Camera Raw settings from one image to multiple others. First, make your desired adjustments to one image, then click "Done." Right-click on the image in Adobe Bridge and choose "Develop Settings > Copy Settings." Select the other images you want to apply these settings to, right-click, and choose "Develop Settings > Paste Settings."
Save your images
Once you have made your adjustments, go through each image to make any final tweaks. Then, select all the images and click the "Save Image" button. Specify where you want the images saved, the file format, and other options.
These steps should help you batch process multiple Raw images using Adobe Bridge and Camera Raw.
Camera Battery Drain: Quick Fix Tips
You may want to see also
![]()
How to enable Camera Raw editing in Bridge
To enable Camera Raw editing in Bridge, you need an active subscription to Adobe Photoshop or Photoshop Lightroom Classic. If you have an active subscription, follow the steps below:
- Launch either Adobe Photoshop or Photoshop Lightroom Classic.
- Relaunch Adobe Bridge.
- Camera Raw editing should now be enabled in Adobe Bridge.
If you are using CS6, follow these steps:
- Open Photoshop (with no image open).
- Choose "Open" from the menu.
- Select your JPG file, but don't open it.
- In the bottom left corner of the open dialog window, choose "format"/"camera raw".
- Click "Open".
If you are using Bridge CC, there are two ways to download and install it:
- The usual way is to go to Adobe's Bridge CC page and look for the "Download" button at the top right. This will download the main Creative Cloud Desktop App. After installing and running this app, you will see Bridge CC listed. Click "Install".
- Alternatively, you can use the CC direct download links, which only require you to log in with your Adobe ID. Follow the download instructions given on that page before clicking on the Bridge 32-bit or 64-bit Windows or Mac links. This will directly download the Bridge CC installer to your computer.
Either way will give you the full and free version of Bridge CC. Once installed, you can get updates to the latest release (including the latest version of ACR used by Bridge) by selecting Help > Updates from the menu.
Correcting White Balance: Camera Raw Tips and Tricks
You may want to see also
Frequently asked questions
To enable Camera Raw editing in Bridge, you need an active subscription to either Adobe Photoshop or Photoshop Lightroom Classic. Launch one of these apps, then relaunch Adobe Bridge.
Running Camera Raw in Bridge can improve the speed of your computer and your workflow. Photoshop uses up computer resources while it's open, even in the background, which can slow down your computer. Running Camera Raw in Bridge means you don't need Photoshop open in the background. Plus, when you finish processing an image in Camera Raw in Bridge, you're instantly returned to Bridge, ready to select and open the next image.
First, select the image by single-clicking on its thumbnail. Then, click on the "Open in Camera Raw" icon at the top of the Bridge interface, or go to "File" > "Open in Camera Raw" in the Menu Bar. You can then begin processing the image in the Camera Raw dialog box.
In the bottom right corner of the ACR window, click "Done" to save your changes to an xmp file or contain them within the image file. Then click "Open" to open the image in Photoshop.