Converting an arcade monitor to an LCD screen is a complex process that requires careful consideration and technical expertise. While some people opt for this modification to revive their old arcade cabinets, others debate the authenticity of such practices, preferring the traditional CRT monitors. The process involves addressing the incompatibility between the classic arcade board and the modern LCD monitor, which have different video connectors and resolutions. To bridge this gap, a converter is required, specifically a CGA to VGA converter, which enables the arcade board to communicate with the LCD monitor. This converter must be powered, and adjustments may be needed to centre and optimise the monitor image. While this modification may breathe new life into classic arcade games, it is important to consider the potential drawbacks, such as increased lag and a distorted image.
What You'll Learn

Using a CGA to VGA converter
Choosing the Right Converter
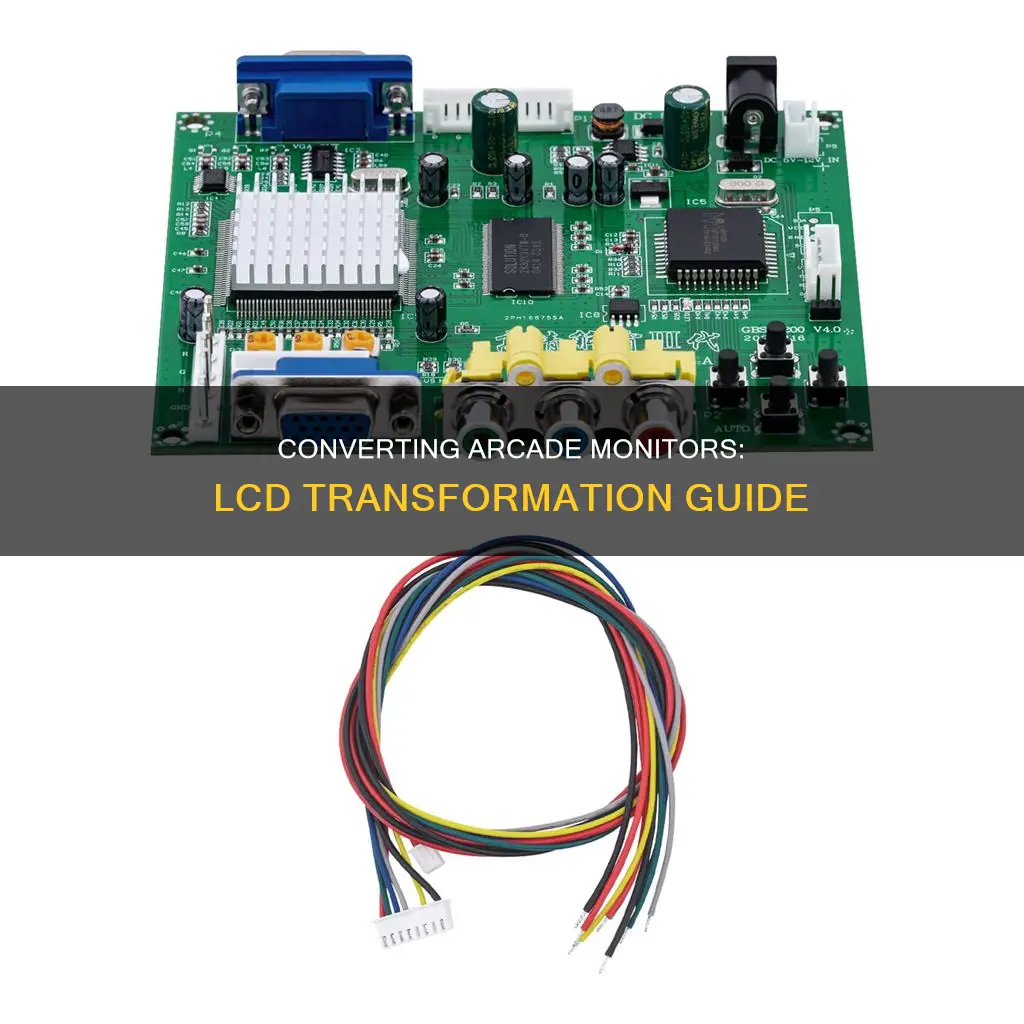
Select a CGA to VGA converter that suits your specific arcade game and LCD monitor. Examples include the GBS 8200 V4.0, CGA/EGA/YUV to VGA converter or similar products offered by brands like Mcbazel, BLEE, and Gonbes.
Powering the Converter
The CGA to VGA converter typically comes with a VDC power cable, which needs to be connected to a suitable power source. For most classic arcade games, you can tap into the +5 VDC terminal of the arcade's switching power supply. However, for games like Ms. Pac-Man, where finding +5 VDC is more challenging, installing an additional switching power supply may be necessary.
Connecting the Video Input
The original video input connector from the arcade's circuit board will need to be replaced with a new connector that matches the converter's input specification. This new connector is usually included with a new JAMMA wiring harness and is sometimes called the RGB video cable. Ensure that the wires are spliced in the correct order, typically matching the top wire of one connector to the top wire of the other.
VGA Video Output
Connect the LCD monitor to the converter using a VGA video cable. The cable should attach to the VGA port on both the monitor and the converter.
Making Adjustments
The converter may have adjustment buttons or keys that allow you to center, increase, or reduce the monitor image. Additionally, there may be options to switch video input signals and access an on-screen display (OSD) menu for further adjustments.
Mounting and Troubleshooting
Securely mount the converter to the arcade cabinet and use cable supports and ties to prevent loose connections. Ensure the screen image is correctly oriented before securing the LCD monitor. If issues arise, such as a "No Signal" message or a shaking image, refer to the converter's documentation for troubleshooting steps.
By following these steps and considerations, you can successfully use a CGA to VGA converter to bridge the gap between classic arcade game boards and modern LCD monitors, breathing new life into your arcade machines.
Monitoring Memory Usage: CloudWatch Strategies and Insights
You may want to see also

Powering the CGA to VGA converter
The CGA to VGA converter will come with a VDC power cable that has a small 2-pin connector with two wires—one red and one black. The red wire is to be connected to a +5 VDC power source, and the black wire is to be connected to the VDC Common (not the same as VAC Field Ground).
For most classic arcade games, finding the +5 VDC is simple. If the game uses an arcade switching power supply, tap into the +5 VDC terminal of the power supply. For the black wire, tap into one of the Common (aka Ground) terminals, which are usually two adjacent terminals next to the +5 VDC terminal.
However, for certain arcade games like Ms. Pac-Man, finding the +5 VDC is more challenging since the +5 VDC is generated on the game's circuit board. In this case, it is recommended to install an arcade switching power supply to power the converter separately.
When connecting the VDC power cable to the converter, ensure that the top wire is black. The connection point is typically marked as "Power Supply Input" or "DC 5V-12V IN" on the converter board.
It is important to note that using +12 VDC instead of +5 VDC is not recommended and may void your warranty if it damages the board.
Monitoring Data Usage: Tips for Managing Home Internet Plans
You may want to see also

Replacing the video input connector
When removing the old CRT monitor from the classic cabinet, the video input connector will need to be disconnected from the CRT monitor's deflection board. The connector will look like a port with several pins inside. You will need to replace this connector with a new one, which is usually included with a new JAMMA wiring harness. This new connector is also referred to as the RGB video cable.
The original connector wires, which lead from the game's circuit board, must be spliced to the new connector in the same order as they appear. It is important to splice the wires in the same top-to-bottom order, rather than trying to match wire colours. The top wire of one connector will splice to the top wire of the other, and so on.
The correct order of wiring, from top to bottom, and the corresponding wire colours are as follows:
- RGB-Red, wire colour red
- RGB-Green, wire colour green
- RGB-Blue, wire colour blue
- Common, wire colour black
- Composite horizontal and vertical sync, wire colour white
One or two wires will need to be spliced to the white wire.
The new connector then attaches to the converter, with the white connection point located at the left bottom corner, marked P3 on the converter. When the RGB video cable is connected properly, the top wire will be red.
Nevada Power Co: Monitoring Customer Usage and Bills?
You may want to see also

Connecting the VGA video output
Step 1: Get the Right Converter
Firstly, you will need to acquire a CGA-to-VGA converter, which enables the arcade's classic game board to communicate with an LCD monitor. There are various converters available on the market, such as the GBS 8200 V4.0, which supports CGA, EGA, and YUV to VGA conversion.
Step 2: Power the Converter
The CGA-to-VGA converter will come with a power cable that needs to be connected to a suitable power source. The cable usually has a small 2-pin connector with one red and one black wire. The red wire should be connected to a +5 VDC power source, while the black wire is connected to the VDC Common, not the VAC Field Ground.
For most classic arcade games, you can find the +5 VDC power source by tapping into the +5 VDC terminal of the arcade's switching power supply. However, for certain games like Ms. Pac-Man, finding the +5 VDC can be more challenging, as it is generated on the game's circuit board. In such cases, it is recommended to install an arcade switching power supply to power the converter separately.
Step 3: Connect the Video Input
When removing the old CRT monitor, you would have disconnected the video input connector from the CRT monitor's deflection board. Now, you need to replace this original connector with a new one that matches the output of your CGA-to-VGA converter. This new connector is usually included with a new JAMMA wiring harness.
Splice the wires from the game's circuit board to the new connector, ensuring that you maintain the same top-to-bottom order of the wires. The correct order of wiring, from top to bottom, is as follows:
- RGB-Red (wire color: red)
- RGB-Green (wire color: green)
- RGB-Blue (wire color: blue)
- Common (wire color: black)
- Composite horizontal and vertical sync (wire color: white) - you will splice one or two wires to this white wire.
Step 4: Connect the VGA Video Cable
Now, you will need to connect the VGA video cable. One end of this cable will attach to the LCD monitor at the VGA port, and the other end will connect to the VGA port on the CGA-to-VGA converter. Ensure that the connections are secure and firm.
Step 5: Make Adjustments
Your CGA-to-VGA converter may have a set of buttons or keys for making adjustments to the display. These buttons can be used for functions like centering, increasing, or reducing the monitor image. For example, pressing the "Down/Auto" button for a few seconds can self-adjust and lock in the monitor image.
Additionally, there may be variable resistors for adjusting the red, green, and blue color gain. These adjustments will fine-tune the display to ensure optimal picture quality.
Step 6: Mounting and Orientation
Before securing the LCD monitor to the arcade cabinet, double-check that the screen image is correctly oriented. In some cases, you may need to rotate the monitor to achieve the correct orientation, as flipping the image may not be possible.
Use cable supports and cable ties to neatly organize and secure all the connections you have made to prevent any loose cables.
By following these steps, you should be able to successfully connect the VGA video output during your arcade monitor-to-LCD conversion project.
Monitoring Facetime Usage: A Guide for Parents
You may want to see also

Making converter adjustments
There are a few adjustments you can make to the converter to ensure the LCD monitor is functioning correctly. Firstly, there are four small black buttons on the converter that can be used for adjustments. They are labelled Up, Down/Auto, SW, and Menu. The Up and Down/Auto buttons can be used for centring, increasing, and reducing the monitor image. To self-adjust and lock in the monitor image, press the Down/Auto button for five seconds after powering up the machine.
The SW and Menu buttons are unlikely to be needed for this project. The SW button is for switching the video input signal between CGA, EGA, or YUV, while the Menu button opens the OSD (On-screen display) menu.
Additionally, there are three small white round variable resistors (VR) located near the bottom left corner of the converter. These resistors are used to adjust the red, green, and blue colour gain, allowing you to fine-tune the image quality.
LCD Monitors: Radiation Emission and You
You may want to see also
Frequently asked questions
The cheapest way to convert an arcade monitor to an LCD is to use a converter board, which can cost under $25. However, this may not be the most effective method as it can cause issues with the refresh rate and screen interpretation.
The best way to convert an arcade monitor to an LCD is to use a CGA to VGA converter. This will enable the arcade board to communicate with the LCD monitor. This method will also require a power cable and a new connector.
Converting an arcade monitor to an LCD will breathe new life into an old arcade game. It is also a cost-effective solution as arcade monitors can cost upwards of $150, whereas an LCD conversion can be achieved for around $30.
Some people believe that LCD monitors do not produce as good an image as CRT monitors, especially for older games. There are also potential issues with the screen orientation, which may require the monitor to be rotated.


