Learning how to focus the camera on an object in Blender can be challenging, especially for beginners. The process involves selecting the object and adjusting the camera's view to focus on the object. This can be done by using the numeric keypad or by going to the “View” menu and selecting the “Frame Selected” option. Additionally, the “Camera to View” checkbox in the “View” tab allows users to control the position and orientation of the rendering camera. The “Focus Object” setting in the camera settings can also be used to specify the point of focus. These techniques enable users to centre their camera on a chosen object or area in their scene.
| Characteristics | Values |
|---|---|
| To focus on a selected object | Press . on the numeric keypad (Numpad .) or select the object, click on "View" and choose the "Frame Selected" option |
| To focus on all objects | Press A twice, then Numpad . or use Shift+C to reset the view and recenter the cursor |
| Alternative method to focus on a selected object | Hold the Alt button and click with the middle mouse button to change the centre of focus |
| Alternative method to focus on all objects | Press Home |
| To focus the camera on an object | Go to the "View" tab and activate the "Camera to View" checkbox, then select the object and press the dot on the numeric keypad |
| To focus on a certain area | Use the Zoom Border tool (Shift+B, then LMB) to specify a 'rectangular area' of the 3D View and zoom in so that the region fills the viewport |
| To set the camera's focus | Add an Empty to the scene, then specify that the Empty is to be used to set the point of focus |
What You'll Learn
- Use the dot key on the numeric keypad (Numpad .) to focus the view on an object
- Use the View menu and select 'Frame Selected' to focus the view on an object
- Use the zero key on the numeric keypad (Numpad 0) to focus on the camera perspective
- Use the View tab and activate the 'Camera to View' checkbox to control the position and orientation of the rendering camera
- Use the F-Stop setting to control the amount of blur
![]()
Use the dot key on the numeric keypad (Numpad .) to focus the view on an object
Focusing the view on an object in Blender can be done in a few simple steps. Firstly, select the object in question. Then, press the dot key on the numeric keypad (Numpad .) to centre the view on the origin of the selected object. This method is demonstrated in Figures 1 and 2 below.
! [Figure 1: Selected object not centred in the view]('https://gamedevtraum.com/wp-content/uploads/2022/01/Captura-de-pantalla-2022-01-11-162305.jpg')
! [Figure 2: Pressing the dot on the numeric keypad centres the view on the selected object]('https://gamedevtraum.com/wp-content/uploads/2022/01/Captura-de-pantalla-2022-01-11-162310.jpg')
If you don't have a numeric keypad, there are alternative methods to achieve the same result. One way is to select the object, click on 'View', and then choose the 'Frame Selected' option. Alternatively, you can use the Zoom Border tool (Shift+B, then LMB) to specify a 'rectangular area' of the 3D View and zoom in so that the selected object fills the viewport.
Loading Camera Raw Presets: XMP Files Explained
You may want to see also
![]()
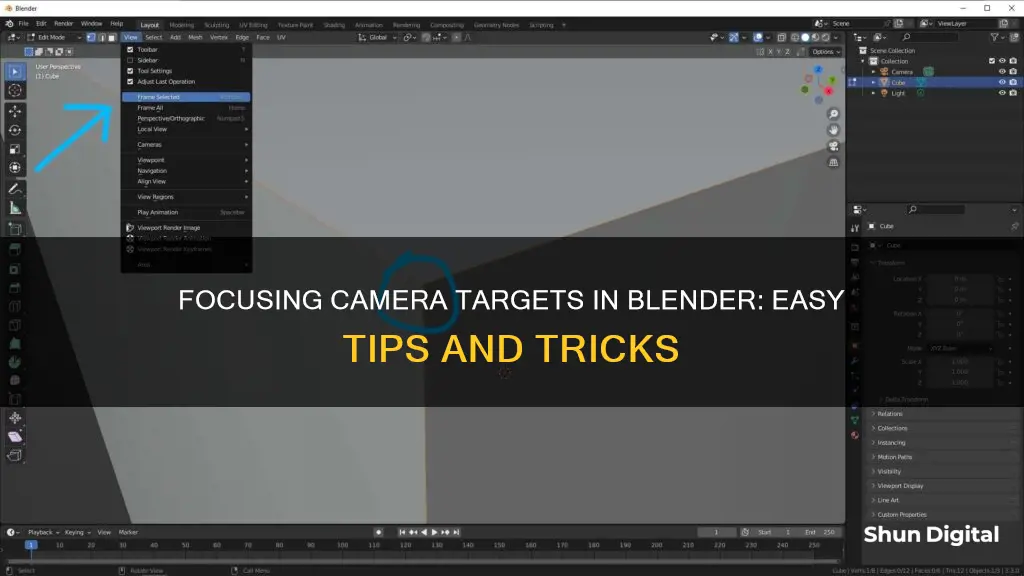
Use the View menu and select 'Frame Selected' to focus the view on an object
Focusing the camera on an object in Blender can be challenging, especially for beginners. Here's a detailed guide on using the View menu and selecting "Frame Selected" to achieve this:
Understanding the Need for Focus
Before diving into the steps, let's understand why focusing the camera on an object is essential. When working on a scene in Blender, you might encounter situations where the camera moves too fast, making it challenging to see the object clearly. By focusing the camera on a specific object, you can ensure that it remains visible and in focus during camera movements. This technique is crucial for creating smooth animations and ensuring the desired objects remain in the frame.
Selecting "Frame Selected" from the View Menu
Now, let's explore the steps to focus the view on an object using the View menu:
- Select the Object: Begin by selecting the object you want to focus on. You can do this by clicking on it in the 3D Viewport. The selected object will be highlighted with an orange or yellow outline.
- Open the View Menu: Once you have selected the object, locate the View menu. It is usually found in the 3D Viewport's header or at the top of the screen.
- Choose "Frame Selected": In the View menu, look for the option labeled "Frame Selected." This option may also be worded as "View Selected" or "Align View > View Selected." Selecting this option will focus the view on the chosen object.
Additional Tips and Alternatives
- Numeric Keypad Shortcut: If you have a numeric keypad on your keyboard, you can simply press the dot key (.) on the numeric keypad to focus the view on the selected object. This is a quicker alternative to using the View menu.
- Emulate Numpad: If you're using a laptop or a keyboard without a numeric keypad, you can enable the ""Emulate Numpad" option in Blender's preferences. Go to "Edit > Preferences > Input" and check the "Emulate Numpad" box. This will allow you to use the period key on your regular keyboard as a substitute for the numeric keypad.
- Lock Camera to View: Another technique is to lock the camera to the view. You can find this option on the right side of the 3D viewport in the side panel. Enabling "Lock Camera to View" will allow you to move the camera around the selected object.
- Hide Other Objects: For a clearer view, you can hide other objects in the scene. This helps you focus solely on the selected object without distractions.
- Toggle Local View: You can also use the "Toggle Local View" option in the View menu. This will hide all other objects and focus solely on the selected object.
By following these steps and utilizing the "Frame Selected" option in the View menu, you can easily focus the camera on a specific object in Blender. This technique will enhance your precision, improve your workflow, and make navigating complex scenes much more manageable.
Understanding Your Camera's DPI and RAW Settings
You may want to see also
![]()
Use the zero key on the numeric keypad (Numpad 0) to focus on the camera perspective
To focus on the camera perspective in Blender, you need to start by activating the camera view. This can be done by pressing the zero key on the numeric keypad (Numpad 0). Once you have activated the camera view, you can adjust your viewing angle and perspective using the numeric keypad.
The numeric keypad is a powerful tool for navigating 3D space in Blender. Each key on the numeric keypad corresponds to a specific viewing angle or function. For example, Numpad 7 corresponds to the top view, Numpad 1 to the front view, and Numpad 3 to the right side view. By pressing Ctrl in combination with any of the Numpad keys, you can easily view the opposite angle, such as the bottom, back, or left side view.
In addition to viewing angles, the numeric keypad also allows you to navigate your scene. The 8, 4, 6, and 2 keys on the numeric keypad can be used to orbit and pan the view. You can also zoom in and out using the plus (+) and minus (-) keys, respectively.
When working with the camera perspective in Blender, it is important to note that the active camera is the most important and is assigned the largest key, Numpad 0. This key allows you to quickly toggle between orthographic and perspective views. Additionally, you can use the Ctrl+Alt+Numpad 0 hotkey to snap the camera to your user view, which can be useful when you want to see how your 3D model will look from a specific angle in a render.
By utilizing the numeric keypad and its various functions, you can efficiently navigate and focus on the camera perspective in Blender, making it easier to work with objects and scenes in 3D space.
Quick-Charging Camera Batteries: Efficient Methods to Try
You may want to see also
![]()
Use the View tab and activate the 'Camera to View' checkbox to control the position and orientation of the rendering camera
To focus the camera on an object in Blender, you need to move the render camera so that it is centred on the selected object. This can be done by following the steps below:
First, ensure that you are viewing the camera perspective by pressing the zero key on the numeric keypad (Numpad 0). Then, go to the View tab and activate the "Camera to View" checkbox. This will allow you to control the position and orientation of the rendering camera by zooming, panning and rotating the view.
If you cannot see the View panel, it may be hidden. You can display it by pressing the N key or by clicking on the arrow icon in the upper right corner of the screen (slightly above and to the right of the green circle with the letter Y).
Once the "Camera to View" checkbox is activated, you can centre the camera on the object by selecting the object and pressing the dot key on the numeric keypad (Numpad .). This will move the view so that it is centred on the origin of the selected object.
By following these steps, you can control the position and orientation of the rendering camera in Blender and focus it on a specific object or target.
Simplisafe Camera Costs: When Do You Get Charged?
You may want to see also
![]()
Use the F-Stop setting to control the amount of blur
To control the amount of blur in Blender, you can use the F-Stop setting. This setting is crucial in achieving the desired depth of field in your scene. A smaller F-stop number will result in a more critical focus, with objects closer to or further away from the camera appearing blurrier. Conversely, a larger F-stop number will keep objects in front of or away from the focus point sharper.
For example, if you are working with a huge scene, you might encounter issues with the default F-stop settings. In this case, you can adjust the scale of your objects and scene. By scaling all objects to a 1000th of their original size and then resetting the scene scale to 1, you can achieve the desired depth of field effect.
Additionally, you can use an Empty object as a focus point to have better control over the depth of field. This allows you to place a sharp spot in your scene while keeping the rest blurred.
When matching your Viewport Preview with the final render, ensure you use F-stop values for both Aperture and Viewport. Also, make sure to check the "High Quality" option. To see the depth of field effect in your viewport, enable it under the Shading tab (press "N" to access it).
Finally, pay attention to your Focal Length and F-stop values as they significantly impact the depth of field. Lower F-stop values will give you a shallower depth of field, resulting in more blur, while higher Focal Lengths will also increase blur but distort the perspective.
Privacy Mode on D-Link Cameras: What You Need to Know
You may want to see also
Frequently asked questions
You can select the object and press the dot key on the numeric keypad (Numpad .) to focus the view on the object. If you don't have a numeric keypad, you can select the object, click on "View", and then choose the "Frame Selected" option.
Start by activating the camera view with the zero key on the numeric keypad (Numpad 0). Go to the view tab and activate the "Camera to View" checkbox. This will allow you to control the position and orientation of the rendering camera. Select the object and press the dot key on the numeric keypad to focus the camera on the object.
The Focal Length controls the amount of zoom and the portion of the scene which is visible. Longer focal lengths result in a smaller field of view and more zoom. You can adjust the focal length in terms of millimeters or the actual field of view as an angle.
To achieve a depth of field effect, you can adjust the F-Stop ratio. Lower values will create a stronger depth of field effect, blurring the background while keeping the selected object in focus.
You can add a Damped Track Constraint to the camera. Set the Target as the object you want the camera to follow and set the axis to -Z. This will make the camera follow the object's movement.