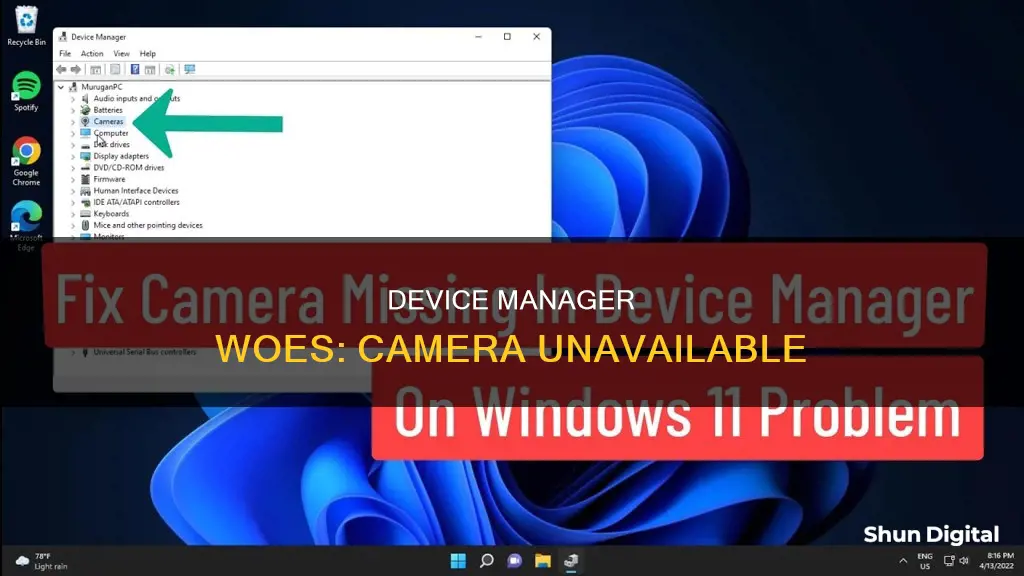
If your camera is not working on your Windows computer, you may need to reinstall or update the webcam driver. Usually, you can find the webcam driver under Imaging devices in Device Manager. However, if the webcam is not showing up in Device Manager, there are several fixes you can try. Firstly, check if your camera is turned on in your device's settings. You can also try running the Hardware and Devices troubleshooter, updating your Windows operating system, scanning for hardware changes, manually adding the webcam driver, or installing a webcam app.
| Characteristics | Values |
|---|---|
| Problem | Camera not showing in Device Manager |
| Possible causes | Missing drivers, antivirus software, system glitch, hardware issue, disabled camera, uninstalled camera driver, corrupt system files, incompatible camera driver |
| Fixes | Run hardware and devices troubleshooter, update webcam driver, manually add webcam to Device Manager, check camera switch/button, give apps permission, check antivirus software, check hardware drivers, roll back camera driver, uninstall camera driver and scan for hardware changes, switch to UVC driver |
What You'll Learn

Check if your device's camera driver has been uninstalled
If your device's camera driver has been uninstalled, you won't be able to find your camera in the Device Manager. To check if your camera driver has been uninstalled, follow these steps:
- Open Device Manager.
- Look for your camera under "Cameras", "Imaging devices", or "Sound, video and game controllers".
- If you can't find your camera in any of these groups, try the following fixes:
Fix 1: Allow your device to access your camera
- Press the Windows logo key on your keyboard and type "camera privacy settings".
- Select "Camera privacy settings" and ensure the "Camera access" option is turned on. If it's not, click the "Change" button to turn it on.
Fix 2: Scan for hardware changes
- Open Device Manager.
- Select "Cameras" (or "Imaging devices"/"USB devices") and click "Action" > "Scan for hardware changes".
- If your webcam shows up, this means the driver has been successfully detected. Restart your computer for the changes to take effect.
Fix 3: Update your device drivers
- Visit the manufacturer's website and install the latest webcam drivers.
- For example, if you have a Dell computer, go to the Dell Support page and enter your product model to get all the related drivers in "Drivers & Downloads".
- Download the driver you need and follow the on-screen instructions to complete the installation.
Fix 4: Add a legacy camera driver
- Open Device Manager.
- Click "Action" > "Add legacy hardware".
- Click "Next" on the pop-up window.
- Select "Install the hardware that I manually select from a list (Advanced)".
- Choose "Cameras" and click "Next".
- If a webcam driver is listed, select the device and click "Next".
Fix 5: Run the hardware troubleshooter
- Press the Windows logo key and "R" at the same time to open the Run box. Type "cmd" and press Enter to run the Command Prompt.
- Type and copy this command "msdt.exe -id DeviceDiagnostic" and press Enter.
- Click "Next" to run the tool and then click "Apply this fix" when the troubleshooter finds a solution.
Fix 6: Run the System File Checker
- Use a repair tool to check various areas of your computer to determine the cause of the camera missing in Device Manager.
- Alternatively, use the System File Checker (SFC), a built-in tool to identify and repair corrupted system files.
- Press the Windows logo key and "R" at the same time to open the Run box. Type "cmd" and press Ctrl+Shift+Enter to run Command Prompt as administrator.
- Click "Yes" when prompted for permission to make changes to your device.
- In the Command Prompt, type the following command and hit Enter: "sfc /scannow".
- System File Check will scan all system files and repair any corrupted or missing ones it detects.
If you have accidentally uninstalled your camera driver, you can also try reinstalling it.
The Camera in Your TV: Where is it?
You may want to see also

Check your privacy settings to ensure your apps have permission to access your camera
If you're using a Windows 10 computer, go to Start > Settings > Privacy > Camera. In the "Allow access to the camera on this device" section, select "Change" and make sure "Camera access for this device" is turned on. This setting lets any user on the device choose whether they want apps to be able to access the camera.
If you're using Windows 11, go to Start > Settings > Privacy & Security > Camera, then make sure "Camera access" is turned on. This setting lets any user on the device decide whether they want apps to access the camera.
If you're using an Android phone, open the Settings app. Tap "Security & Privacy", "Privacy", and then "Permission Manager". Tap "Camera", and then you can choose from the following options:
- All the time: For location only. The app can use the permission at any time, even when you’re not using the app.
- Allow only while using the app: The app can use the permission only when you're using that app.
- Ask every time: Every time you open the app, it'll ask to use the permission. It can use the permission until you’re done with the app.
- Don't allow: The app cannot use the permission, even when you’re using the app.
If you're using a Dell computer and the webcam is not in Device Manager, you can manually install the Dell Webcam App. Go to the Dell drivers' page and search for the webcam driver according to your system model or service tag. Then, download and install the driver on your computer. Finally, restart your computer.
Neighborhood Watch: Cameras Keep a Close Eye
You may want to see also

Run the Hardware and Devices Troubleshooter
If your camera is not showing up in Device Manager, you can try running the Hardware and Devices Troubleshooter. This can help fix issues with your camera.
Step 1:
Open the Run box by pressing the Windows logo key and R at the same time on your keyboard.
Step 2:
Type "cmd" and press Enter to run the Command Prompt.
Step 3:
Once the Command Prompt is open, type and copy this command: "msdt.exe -id DeviceDiagnostic" and press Enter.
Step 4:
The Hardware and Devices Troubleshooter will now open. Click "Next" to run the tool.
Step 5:
If the troubleshooter finds a fix, click "Apply this fix".
Step 6:
Restart your computer for the changes to take full effect.
If the Hardware and Devices Troubleshooter did not solve the problem, there are still several other fixes you can try. These include allowing your device to access your camera, scanning for hardware changes, updating your device drivers, and adding a legacy camera driver.
If none of these solutions work, there may be a hardware issue with your device's camera, or your camera driver may have been uninstalled or hidden in Device Manager. In this case, you may need to take your device for inspection or try resetting your computer.
Cameras 13 and 14: Watch Order and Why It Matters
You may want to see also

Update your device drivers
If your camera is not showing up in Device Manager, one of the fixes you can try is to update your device drivers. Here's how you can do it:
Option 1: Manually
First, go to your computer manufacturer's support page. For example, if you have a Dell computer, go to the Dell Support page. Then, enter your product model to get all the related drivers in the Drivers & Downloads section. Download the driver you need and follow the on-screen instructions to complete the installation.
Option 2: Automatically
If you don't have the time or patience to update your drivers manually, you can use a third-party tool such as Driver Easy. Driver Easy will automatically recognize your system and find the correct drivers for it. You can update your drivers automatically with either the 7-day free trial or the Pro version of Driver Easy.
Here's how to do it:
- Download and install Driver Easy.
- Run Driver Easy and click the "Scan Now" button. Driver Easy will then scan your computer and detect any problem drivers.
- Click the "Activate & Update" button next to the flagged device to automatically download and install the correct version of this driver. Or click "Update All" to automatically download and install all the drivers that are missing or out of date on your system. (Note: You'll need the Pro version for this. If you're not ready to purchase it yet, Driver Easy provides a 7-day trial at no cost.)
- Restart your computer for the changes to take effect.
Walgreens Surveillance: Are Shoppers Being Watched?
You may want to see also

Check your antivirus software settings to ensure they are not blocking your camera
If your camera is not showing up in Device Manager, it could be because your antivirus software is blocking it. Antivirus software often blocks camera access to protect your privacy by stopping apps and services that might not have permission to use your camera. However, it can sometimes accidentally block safe apps too. Here's how to check if your antivirus software is blocking your camera, and how to fix it.
Check Your Antivirus Software Settings
First, you need to identify which antivirus software you are using. Common antivirus software includes ESET HOME Security Essential, Bitdefender Internet Security, Kaspersky Internet Security, Avast Free Antivirus, and Windows Defender. Once you have identified your antivirus software, you can check its settings to see if your camera is blocked.
Unblock Your Camera in ESET HOME Security Essential
If you are using ESET HOME Security Essential, launch the program and click on "Setup". Select "Select Network protection", then click on the slider bar next to "Firewall". Select "Pause until reboot" and click "Apply". This will pause the ESET firewall until you restart your PC.
Unblock Your Camera in Bitdefender Internet Security
For Bitdefender Internet Security, open the main user interface and click on the "Privacy" icon on the left side of the main window. Under the "Video & Audio Protection" option, click on "Settings" and toggle off "Webcam protection".
Unblock Your Camera in Kaspersky Internet Security
To unblock your camera in Kaspersky Internet Security, open the user interface and click on the "Additional" section. Then, select "Threats and exclusions" and click on "Specify trusted applications". Finally, add your camera to this list.
Unblock Your Camera in Avast Free Antivirus
To unblock your camera in Avast Free Antivirus, open the program and click on the menu in the top right corner. Select "Exceptions" and then click on the "ADD EXCEPTIONS" button. Input the computer's IP address with the camera.
Unblock Your Camera in Windows Defender
If you are using Windows Defender, open the settings and select "Virus & threat protection". Go to "Virus & threat protection settings" and click on "Add or remove exclusions". Complete the required forms, add your camera path, and save your changes.
Update Your Camera Drivers
If you have checked your antivirus software settings and your camera is still not showing up in Device Manager, try updating your camera drivers. Type "device manager" in the Start bar and open it. Locate the "Cameras" section and expand it by clicking on the little arrow. Right-click on your camera and select "Update driver". Select "Search automatically for camera drivers" and follow the on-screen prompts to complete the installation.
View Reolink Cameras on Desktop: A Step-by-Step Guide
You may want to see also
Frequently asked questions
First, check that your device's camera is turned on. If it is, try running the Hardware and Devices Troubleshooter. If that doesn't work, you may need to update your webcam driver or manually add the webcam to the Device Manager.
Press the Windows logo key and R at the same time to open the Run box. Type "cmd" and press Enter to run the Command Prompt. Type "msdt.exe -id DeviceDiagnostic" and press Enter.
You can update your webcam driver by visiting your device manufacturer's website and installing the latest webcam drivers.
First, open the Run window using the Windows key + R shortcut. Type "devmgmt.msc" and click OK. Click "View", then "Show hidden devices". Click "Action" and select "Add legacy hardware". Select "Install the hardware that I manually select from a list (Advanced)" and click "Next". Choose "Cameras" and click "Next" again.


