Clipping is when there are areas of a photo that have no information, resulting in either pure white (clipped highlights) or pure black (clipped shadows) areas. Photographers refer to these as blown out areas. Shadow clipping specifically refers to when the shadow areas of a photo are so dark that they are solid black with no pixels or detail. While some shadow clipping is acceptable, it is generally undesirable to have large areas of your image with clipped shadows.
| Characteristics | Values |
|---|---|
| What is shadow clipping | When an area of a photo has no information, it is pure black (clipped shadows) |
| How to identify shadow clipping | Areas of clipped shadows are filled in with bright blue |
| How to fix shadow clipping | Use the Shadows slider in the Basic Panel. Moving the Shadows slider to the right will bring back information in the Shadow areas of your photo |
| How to hide shadow clipping indicators | Click on the little arrow on the top left of the histogram display or use the keyboard "U" to toggle the shadow warning |
What You'll Learn
![]()
Clipping warnings in Lightroom
Clipping occurs when there are areas of a photo that have no information. When an area has no information, it is either pure white (clipped highlights) or pure black (clipped shadows). Photographers refer to these areas as "blown out".
Having large areas of your image with highlight or shadow clipping is generally undesirable. Luckily, this can be corrected in Lightroom quite easily.
Lightroom uses added colours to warn you of areas that have highlight or shadow clipping. When this is turned on, you will see:
- Areas of clipped highlights filled in with bright red.
- Areas with clipped shadows filled in with bright blue.
If you don't want to see these coloured warnings in Lightroom, you can turn them on or off in a couple of different ways:
- Use a Lightroom keyboard shortcut to turn both the highlight and shadow clipping warnings on or off by tapping the "J" key.
- Turn these clipping warnings on and off individually by clicking the little arrows on the top left and right of the histogram in Lightroom. The right arrow will toggle the highlight clipping warning on or off, and the left arrow will toggle the shadow clipping warning.
How to Fix Clipping in Lightroom
Like most editing programs, there are several options for fixing image clipping in Lightroom:
- Use Highlights & Shadows Sliders: The most obvious choices are to use the Highlights and Shadows sliders located in the Basic Panel. Moving the Highlights slider to the left will decrease the highlights, and moving the Shadows slider to the right will bring back information in the shadow areas of your photo. You can also further adjust the highlights and shadows by using the curve in the Tone Curve Panel.
- Use Masking Tools to Target Clipping in Specific Areas: The only way to target clipping in specific areas of an image is by using the Masking tools. These tools (brush, linear gradient, select sky, etc.) allow you to reduce clipping in a much more targeted way than the adjustments in the basic panel. To do this, start by selecting the Masking Tool. You will find it in the tool panel on the right side of the Develop Module between the Histogram and the Basic Panel. Once you have selected the Masking Tool, choose one of the masking options. For this type of work, the Brush tool is usually the best option as it allows you to brush the adjustment exactly where you want it. Next, load the tool by adjusting the sliders that opened when you chose the Brush tool. For recovering clipping, try moving the Highlights slider to the left, slightly reducing the Exposure slider, and play around with reducing the Whites and Blacks sliders. Finally, brush over the areas of the image where the clipping is happening.
- Use Lightroom Presets & Brushes: The Lightroom Presets and Brushes included in a few Pretty Presets for Lightroom collections can be used to fix highlight and shadow clipping. The Clean Edit Portrait Workflow Collection has presets for recovering your image's highlight and shadow areas ("Highlight Recovery" and "Tone Highlights Soft"). The Perfect Portrait Retouch Brush Collection also includes a brush for clipping recovery called "Recover Clipping".
A little bit of shadow or highlight clipping isn't a big deal, especially if it doesn't appear in critical areas of your photo. If there are small areas where the highlight or shadow clipping cannot be recovered, and it isn't distracting to your image, don't stress over it too much!
Blackmagic Pocket Cinema Camera: Powering Your Creative Vision
You may want to see also
![]()
How to fix clipping in Lightroom
Clipping is when there are areas of a photo that have no information, resulting in either pure white (clipped highlights) or pure black (clipped shadows) areas. Photographers refer to these as "blown out" areas.
Lightroom uses added colours to warn you of areas that have highlight or shadow clipping. Areas of clipped highlights are filled in with bright red, while areas with clipped shadows are filled in with bright blue. You can turn these warnings on or off by tapping the "J" key or by clicking the little arrows on the top left and right of the histogram.
Use Highlights and Shadows Sliders:
The most obvious choices are to use the Highlights and Shadows sliders located in the Basic Panel. Move the Highlights slider to the left to decrease the highlights, and move the Shadows slider to the right to bring back information in the shadow areas of your photo. You can also adjust the highlights and shadows by using the curve in the Tone Curve Panel.
## 2. Use Masking Tools to Target Clipping in Specific Areas:
The Masking tools (brush, linear gradient, select sky, etc.) allow you to reduce clipping in a targeted way. First, select the Masking Tool from the tool panel on the right side of the Develop Module between the Histogram and the Basic Panel. Then, choose one of the masking options. For this type of work, the Brush tool is usually the best option as it allows you to brush the adjustment exactly where you want it. Next, load the tool by adjusting the sliders that opened when you chose the Brush tool. For recovering clipping, try moving the Highlights slider to the left, slightly reducing the Exposure slider, and play around with reducing the Whites and Blacks sliders. Finally, brush over the areas of the image where the clipping is happening.
## 3. Use Lightroom Presets and Brushes:
Pretty Presets for Lightroom collections include Lightroom Presets and Brushes that can be used to fix highlight and shadow clipping. For example, the Clean Edit Portrait Workflow Collection has presets for recovering your image's highlight and shadow areas ("Highlight Recovery" and "Tone Highlights Soft"). The Perfect Portrait Retouch Brush Collection also includes a brush for clipping recovery called "Recover Clipping".
## 4. Adjust the Exposure, Highlights, or Whites Sliders:
When there is highlight clipping, you can adjust the exposure, highlights, or whites sliders to fix it. Lowering these sliders will lower the brightness of the highlight areas of the image, reducing the clipping.
## 5. Adjust the Shadow, Blacks, Exposure, or Contrast Sliders:
When there is shadow clipping, you can adjust the shadow, blacks, exposure, or contrast sliders to fix it. Raising these sliders will add brightness to the dark areas, bringing back detail into the shadow areas.
Unleash Special Effects: Camera Raw Power
You may want to see also
![]()
Using the Adjustment Brush
Shadow clipping refers to areas of a photo that have no information, appearing as pure black. Photographers often refer to these as "blown-out" areas.
Clipping warnings in Lightroom alert you to areas of your photo that are so dark that they will be solid black with no pixels or detail.
Clipping can be corrected in Lightroom by using the Masking Tools, which allow you to target and reduce clipping in specific areas of an image. The Adjustment Brush is one such tool.
- After making adjustments in the Basic and Tone Curve tabs, click the Adjustment Brush tool (K). The sliders for the tool will appear, some of which are similar to the sliders in the Basic tab.
- Click the + or – button for any slider to “zero out” all the sliders except the one you want to use.
- For the brush settings, try a Feather value of 50–95 (to allow the edits to fade into surrounding areas), a Flow value of 60 (for the amount of adjustment produced by each stroke), and a Density value of 60 (for the level of transparency in the stroke).
- Check Show Mask (Y) or Mask (Y). If you don't see this option, scroll down in the settings area. Adjust the brush size by pressing [ or].
- Draw strokes over areas of the photo that need the same adjustment. A tint will cover the areas where you apply strokes, and a pin will appear where you started dragging. The brush size is represented by the solid circle in the pointer, and the feather value is represented by the black-and-white dashed circle.
- To apply different adjustment settings to another area of the photo, click New, then repeat the previous steps.
- To show or hide all the pins, press V or check or uncheck Show Pins. To temporarily display the mask for an existing pin, hover your mouse or stylus over the pin.
- To edit an adjustment, click a pin (a black dot will appear in the centre of the pin), then add to the mask and/or move the sliders.
- To remove adjustments locally, click a pin, click the Erase button, or hold down Alt/Option, then apply strokes where you want to erase the mask.
- To remove a pin and its adjustments, click the pin, then press Backspace/Delete.
Kodak Camera Not Charging: Troubleshooting Guide
You may want to see also
![]()
The Exposure Compensation control
Exposure compensation is a feature on your camera that allows you to override the camera's exposure choices and brighten or darken an image. It gives you full control over the exposure and the resulting image. It is typically provided either as a dedicated button on a camera or as a dial that can be moved from positive to negative exposure compensation.
To use exposure compensation, you must be in one of the camera modes that use the camera meter, such as aperture priority, shutter priority, program mode, or any other "scene" mode that performs automatic exposure adjustments. You can't use exposure compensation if you're shooting in Auto mode, nor can you use it when shooting in Manual mode.
When shooting in aperture priority mode, exposure compensation adjusts the shutter speed. You set the aperture and the ISO, while the camera automatically sets the corresponding shutter speed. If you then dial in positive exposure compensation, your camera will choose a slower shutter speed, and if you dial in negative exposure compensation, your camera will choose a faster shutter speed.
In shutter priority mode, exposure compensation changes the size of your camera's aperture. You set the shutter speed and ISO, while the camera sets the corresponding aperture. If you dial in positive exposure compensation, your camera will choose a larger aperture, and if you dial in negative exposure compensation, your camera will choose a narrower aperture.
In program mode, exposure compensation changes the shutter speed. You set the ISO, and your camera will set the aperture and shutter speed. Then, when you dial in positive exposure compensation, the shutter speed lengthens, and if you dial in negative exposure compensation, the shutter speed is reduced.
Charging Camera Batteries: How to Maintain Optimal Performance
You may want to see also
![]()
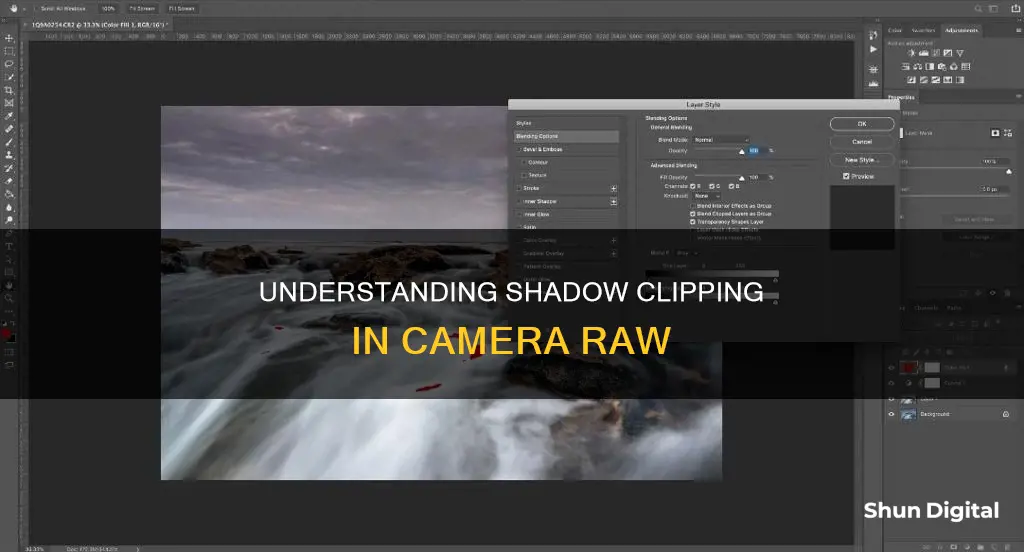
Clipping in the histogram
A histogram is a graphical representation of the tonal values of your image. It shows the amount of tones of particular brightness found in your photograph ranging from black (0% brightness) to white (100% brightness).
Clipping occurs when there are areas of a photo that have no information. When an area has no information, it is either pure white (clipped highlights) or pure black (clipped shadows). Photographers often refer to these as "blown-out" areas.
Clipping is difficult to spot without a histogram, but with a histogram, it’s very easy. You’ll see a large spike on the histogram graph right up against the left or right side of the graph. No detail about your photo is captured beyond these extremes. Therefore, clipping is undesirable, and no amount of post-editing can recover detail that simply wasn’t captured by the camera.
In Lightroom, you can reveal pure black or white areas by clicking on the arrows in the histogram’s upper left or right corner. In this case, we click on the upper left arrow to reveal the shadow clipping. These underexposed areas are shown with a bright blue colour. The clipped area is shown by a bright red overlay, which, in this case, is more or less the entire sky.
The best way to avoid clipping is by increasing the exposure before taking the shot. Do this by lengthening the shutter speed, increasing the ISO, or opening your aperture.
A quick way to brighten the image is to use your camera’s exposure compensation dial. This allows you to increase or decrease the exposure in small increments. Turn the dial to a positive number (e.g. +1/3, +1/5, +1 or +2) and take a test shot. Then check the histogram for the photo you just took. If the histogram is stacked hard up against the right-hand side of the graph, reduce the exposure compensation, and take another test shot.
Camera Battery Draining Fast? Here's Why and How to Fix It
You may want to see also
Frequently asked questions
Shadow clipping occurs when there are no pixels, no detail, and no information in an area of a photo, making it pure black.
On your camera, turn on the shadow warning and after you take the shot, look at the image on the LCD. Any areas in your photos that are clipping will flash on and off at you like a slow strobe light.
You can fix shadow clipping by using the Shadows slider in the Basic Panel of Lightroom. Moving the Shadows slider to the right will bring back information in the Shadow areas of your photo.