Long shutter mode, also known as slow shutter speed, is a setting on your camera that allows you to leave the shutter open for a longer period of time than usual. This technique is used to capture motion blur in moving subjects, such as blurring the wheels of a car to imply speed and motion. It is also used to photograph the Milky Way or other objects at night, as it allows more light to hit the camera sensor, brightening the photo. When using a long shutter speed, it is important to use a tripod to stabilise the camera and prevent motion blur from handholding the camera.
| Characteristics | Values |
|---|---|
| Shutter Speed | 1/15 - 30 seconds |
| Camera Mode | Manual or Bulb Mode |
| Aperture | f/8 - f/11 |
| ISO | 100 - 6400 |
| Filter | Neutral Density Filter |
What You'll Learn
![]()
Long shutter mode and shutter speed
Shutter speed is one of the most important settings in photography, along with aperture and ISO. It refers to the length of time the camera shutter is open, exposing light onto the camera sensor. Essentially, it's how long your camera spends taking a photo.
Shutter speed has a significant impact on how your images will appear. A long shutter speed, also known as a slow shutter speed, involves exposing the camera sensor to light for a more extended period. This can result in motion blur, where moving subjects in your photo appear blurred along the direction of motion. This technique is often used in advertisements for cars and motorbikes to convey a sense of speed and motion. Long shutter speeds are also useful for night photography or capturing the Milky Way, as well as creating a sense of motion in rivers and waterfalls while keeping other elements sharp.
On the other hand, a fast shutter speed allows you to freeze motion, capturing sharp and crisp images of fast-moving objects like birds in flight or cars. It also reduces the amount of light entering the lens, which can be advantageous in well-lit scenes to avoid overexposure.
The choice between long and fast shutter speeds depends on the desired effect and the type of photo you want to capture. A longer shutter speed introduces motion blur, which can be used creatively, while a faster shutter speed freezes motion, capturing crisp and clear images.
When using long shutter speeds, it's important to consider camera shake, which can result in blurry images. To avoid this, photographers often use a tripod to stabilise the camera. Additionally, remote shutter releases or bulb mode can be used to trigger the shutter without physically touching the camera, reducing the risk of blur caused by camera shake.
In summary, shutter speed is a crucial setting in photography that allows you to control the brightness of your images and create various creative effects by manipulating the duration of the shutter being open. By understanding and experimenting with different shutter speeds, photographers can capture a wide range of scenes and achieve their desired outcomes.
Charging SimpliSafe Camera Batteries: A Step-by-Step Guide
You may want to see also
![]()
Daytime long exposure photography
Long exposure photography is a technique that involves keeping the shutter on your camera open for an extended period of time to capture more light. While long exposure photography is typically associated with night-time shoots, it can also be used during the day to create unique and visually striking images.
Equipment
To get started with daytime long exposure photography, you will need the following equipment:
- A camera with manual mode or shutter priority mode
- A tripod to stabilise the camera
- A neutral density (ND) filter to reduce the amount of light entering the camera
- A remote shutter release (optional)
Composition
When composing your image, look for elements that will create interesting motion blur effects, such as moving water (like waterfalls, streams, or waves), clouds, cars, or even crowds of people. It's important to observe the movement of these elements and predict how they will appear in the photo.
Camera Settings
Once you have your composition, it's time to adjust your camera settings. Here are the recommended settings for daytime long exposure photography:
- ISO: Use the native ISO of your camera, typically ISO 100 or 200, to get the best image quality and dynamic range.
- Aperture: Choose an aperture between f/8 and f/13 to achieve the sharpest photos. Avoid using apertures over f/16 to prevent optical diffraction.
- Shutter Speed: This will depend on the shooting conditions, the speed of motion in your composition, and the ND filter you are using. For very long exposures, you may need to use Bulb mode and a shutter release.
Tips
- Scout and analyse your surroundings before setting up your equipment to find the best composition.
- Use a sturdy tripod to keep your camera stable during the long exposure.
- Shoot in RAW to get the best quality files with more data to work with in post-processing.
- Turn off image stabilisation to avoid adding blur to your photos.
- Cover your camera's viewfinder to avoid any light leaks.
- Focus your camera before attaching any filters, as it will be more difficult to focus once the filters are in place.
Eufy Camera Battery Life: Replace or Recharge?
You may want to see also
![]()
Long exposure at night
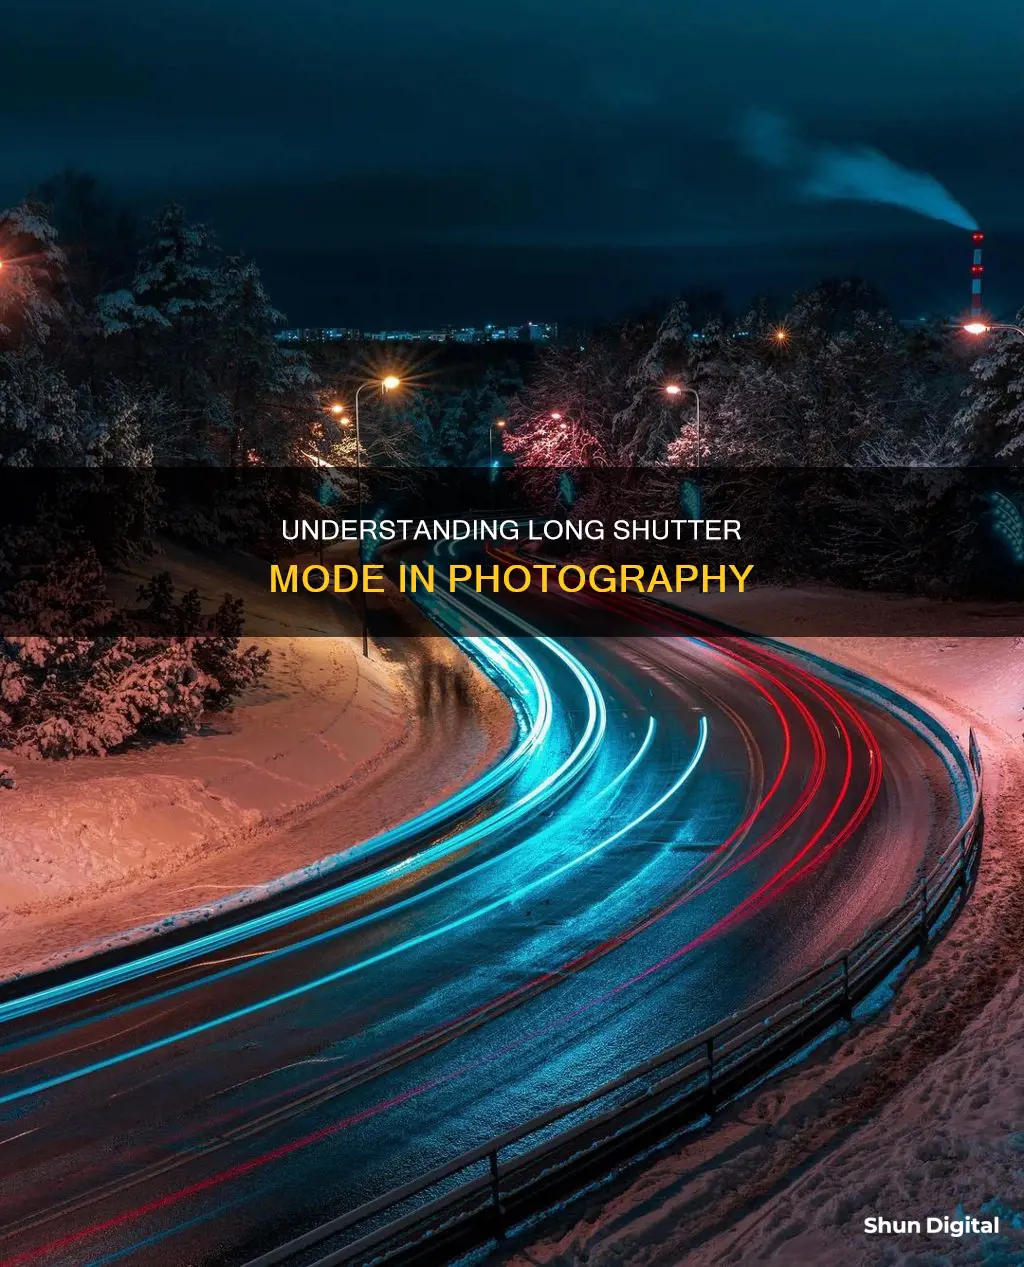
Long exposure photography is a technique often used to capture stunning landscape shots and light trails. It involves using a slow shutter speed, which is usually between 1/15 and 30 seconds, to create a blurring effect on moving objects while keeping the rest of the image sharp. This technique is particularly effective for night photography, as it allows you to capture the ethereal beauty of a cityscape or landscape, bathed in the soft light of the moon and stars.
To achieve long exposure at night, there are several steps you can take:
- Find a suitable location: Look for a spot that offers interesting subjects, such as a Ferris wheel, starry night, or a busy road with lots of traffic, and good lighting conditions.
- Set up your equipment: Use a sturdy tripod to stabilise your camera and avoid blurriness in your photos. If you're photographing the night sky, make sure to set up before it gets dark to ensure you have the best possible composition.
- Adjust your camera settings: Set your camera to Manual or Shutter Priority mode. Choose a small aperture between f/11 and f/32 to ensure all elements are in focus. For night sky photography, set your aperture between f/2.8 and f/4 for optimal results.
- Use a remote shutter release: To eliminate camera shake, use a remote shutter release or your camera's self-timer to take the photo without touching the camera. This is especially important for long exposures, as any movement can ruin your image.
- Experiment with shutter speed: Depending on the effect you want to achieve, adjust your shutter speed. For light trails, a shutter speed of at least 1/15th of a second is needed. For star trails, you might need exposures of 15 minutes to several hours.
- Consider the lighting conditions: The ambient light will affect your shutter speed. In well-lit areas, a shorter shutter speed will be sufficient, while darker locations will require a longer shutter speed.
- Use bulb mode: If you want to experiment with ultra-long exposures, try bulb mode. This allows you to keep the shutter open for as long as you hold down the shutter release button or use an external remote trigger.
- Avoid image noise: Long exposures can cause image noise due to sensor heat. To minimise this, keep your ISO low, around 100, and consider using Long Exposure Noise Reduction or taking a series of shorter exposures instead.
Long exposure night photography takes practice, but with these tips, you'll be well on your way to capturing stunning images that showcase the unique beauty of the night.
Understanding DVR Mode on Trail Cameras
You may want to see also
![]()
How to take long exposure shots
Long exposure shots are a powerful and timeless technique that can produce breathtaking images. Here is a step-by-step guide on how to take long exposure shots:
Step 1: Choose the Right Location and Conditions
Long exposure photography often involves capturing moving elements like clouds, water, or traffic trails. Therefore, it is important to choose a location that provides these moving elements. For example, a river, the coast, or a busy road can be great locations for long exposure shots. In addition, the weather conditions play a crucial role. Partly cloudy skies or moody, overcast horizons can create dramatic effects in your photos. Flat, white skies or cloudless skies are best avoided as they may result in dull or overexposed shots.
Step 2: Gather the Right Equipment
Long exposure photography requires specific gear to achieve the best results:
- Interchangeable-lens camera: A DSLR or mirrorless camera with interchangeable lenses will give you more control and flexibility over your shots.
- Wide-angle lens: This type of lens provides a broad perspective, allowing you to capture multiple layers and create a sense of depth in your images.
- Tripod: A sturdy tripod is essential to keep your camera steady during long exposures. Look for a tripod that balances durability and portability.
- Neutral density (ND) filter: ND filters reduce the amount of light entering your camera, allowing you to lengthen your shutter speed without overexposing the image. They are especially useful when shooting during the day or in bright conditions.
- Remote shutter release: A remote shutter release allows you to trigger the shutter without touching the camera, reducing the risk of camera shake and blurry photos.
Step 3: Set Up Your Gear
Mount your camera on the tripod and set up your accessories, such as the filter holder and remote shutter release. If you don't have a remote shutter release, you can use your camera's self-timer to reduce camera shake.
Step 4: Compose and Focus
Refine your composition and set the focus. Keep the entire shot sharp from the foreground to the background by focusing at the hyperfocal distance, which is about a third of the way into the scene. If using manual focus, adjust the lens's focus ring accordingly. If using autofocus, position the active autofocus point over your main subject, half-press the shutter button to engage the focus, and then switch to manual focus to lock it.
Step 5: Set the Exposure
Set your camera to Manual (M) mode or Aperture Priority (A/Av) mode. Set the ISO to the lowest native value, typically ISO 50, ISO 100, or ISO 200. Choose an appropriate aperture for the scene—for landscapes, between f/8 and f/11 is recommended. Pick the shutter speed based on your camera's recommendation and take a test shot. Check the histogram to evaluate the exposure—if it is skewed too far to the right or left, adjust the shutter speed or exposure compensation accordingly.
Step 6: Add Your ND Filter
If you are shooting during the day or in bright conditions, attach your ND filter to reduce the amount of light entering the lens. This will allow you to lengthen your shutter speed without overexposing the image.
Step 7: Switch to Bulb Mode
If your camera has a bulb mode, use it to discard the 30-second shutter speed limit. Bulb mode keeps the shutter open for as long as you hold down the shutter release button, allowing for ultra-long exposures.
Step 8: Calculate and Set the Right Shutter Speed
Adjust the shutter speed from your test shot to compensate for the number of stops introduced by the ND filter. For example, if your test shot was 1/15s and you're using a 10-stop filter, decrease the shutter speed by 10 stops, resulting in a shutter speed of approximately 60 seconds.
Step 9: Take Your Long Exposure Shot
Once you have the right settings and composition, it's time to capture your long exposure photo! Remember to keep your camera steady and avoid touching it during the exposure to minimize the risk of camera shake.
Activating NMS Camera Mode: A Step-by-Step Guide
You may want to see also
![]()
Long exposure cameras, lenses, and accessories
Long exposure photography is a fascinating genre that can be challenging to master. The right equipment is essential to achieving the desired effects. Here are some recommendations for cameras, lenses, and accessories to enhance your long exposure photography:
Cameras for Long Exposure Photography:
- Manual or Bulb Mode: Look for a camera that allows you to manually adjust the ISO, aperture, and shutter speed. Bulb mode is beneficial for taking exposures longer than 30 seconds.
- Digital Noise Control: Consider a camera that can keep digital noise under control, such as a full-frame camera, to reduce noise and increase image quality.
- RAW Shooting: Choose a camera that can shoot in RAW format to collect more data and achieve better final image quality.
Lenses for Long Exposure Photography:
- Wide-angle lenses: Ideal for landscape and astrophotography, as well as architectural and cityscape photos.
- Mid-range lenses: Suitable for light painting and focusing on specific details in your subject.
- Telephoto lenses: Perfect for capturing distant details like mountain peaks and rocks.
When choosing a lens, consider its optical quality, focal length, aperture range, and compatibility with your camera system.
Accessories for Long Exposure Photography:
- Tripod: Invest in a sturdy tripod to ensure sharp long exposure photos. Look for one that is strong enough to support your camera and lens setup and is suitable for outdoor use.
- Shutter Release: Use a remote shutter release to trigger your camera remotely and avoid any vibrations caused by touching the camera. An intervalometer is an advanced version that also allows you to set the shutter speed and other settings.
- Neutral Density (ND) Filters: ND filters are essential for long exposure photography, especially during the day. They block light without affecting colours or details, allowing you to use slower shutter speeds without overexposing your image.
- Polarizing Filter: This filter reduces light reflections, improving light transmission and resulting in sharper details and more saturated colours.
Creating Cameras in Garry's Mod Hammer: A Step-by-Step Guide
You may want to see also
Frequently asked questions
Long shutter mode, also known as slow shutter speed, is a setting on your camera that allows you to keep the shutter open for a longer period of time, usually more than 1/60th of a second. This technique is used to capture motion blur in moving subjects or to gather more light in low-light conditions.
When you use long shutter mode, the camera's shutter stays open for an extended duration, exposing the camera sensor to light for a longer period. This results in motion blur for moving objects and a brighter image due to the increased light exposure.
Long shutter mode is useful in low-light conditions, such as night photography or indoor shots, to gather more light and create a brighter image. It is also used to capture motion blur in moving subjects, such as blurring the wheels of a car in motion or creating a silky smooth effect for flowing water.
One challenge of using long shutter mode is camera shake or blur caused by holding the camera in your hands. To avoid this, it is recommended to use a tripod to keep the camera steady during the long exposure. Additionally, very long exposures can result in image noise due to sensor heat, so it is important to monitor the duration and adjust settings accordingly.
To set up your camera for long shutter mode, first ensure that it has a manual mode or bulb mode (B mode) option. Then, mount your camera on a sturdy tripod to minimize shake. Adjust your settings to manual focus, set the aperture to the desired value, and use a long shutter speed (usually over 1 second). You may also need to use a remote shutter release to avoid touching the camera during the exposure.