Adobe's Camera Raw plug-in is a must-have tool for professional photographers, allowing them to work with digital negatives and achieve their desired results with greater artistic control and flexibility while maintaining the original files. The plug-in is available as part of Adobe Photoshop and is also built into Adobe Lightroom. While updates to the plug-in frequently add support for more cameras and include more features, users of older versions of Lightroom and Photoshop may find that their software no longer supports their camera's RAW format. In such cases, a workaround is to use the free Adobe DNG Converter to convert RAW images to DNG format before importing them into Lightroom or Photoshop.
What You'll Learn
![]()
Download the DNG converter to convert RAW images to DNG
The Adobe DNG Converter is a free tool that allows you to convert camera-specific raw files to a more universal DNG raw file format. DNG, or Digital Negative, is a publicly available archival format for raw files that are generated by various digital cameras.
The DNG format has several benefits. Firstly, it has universal support, meaning you can use your DNG images in programs that do not support your non-DNG raw format. Secondly, DNG is not a dead format – it is constantly maintained and updated by Adobe. Additionally, DNG files are often smaller than your original raw files due to better lossless compression. Finally, DNG files include colour matrices and white levels, which are usually not present in non-DNG files, leading to more accurate colours and reducing the chance of colour casts in clipped areas.
To download the DNG Converter, follow these steps:
- Visit the Adobe website.
- Navigate to the DNG Converter download page.
- Select the appropriate download option for your operating system: Windows or macOS.
- Download the installer file and save it to your computer.
- Once the download is complete, locate the downloaded file and double-click on it to run the installer.
- Follow the on-screen instructions to install the DNG Converter.
After installing the DNG Converter, you can launch the application and start converting your raw files to DNG. Simply drag and drop your raw images or folders onto the DNG Converter icon, or launch the application and select the files you want to convert.
Charging Your Spy Gear Camera: How Long is Enough?
You may want to see also
![]()
Use the free converter to DNG to avoid losing the original RAW file
DNG stands for Digital Negative and is a generic raw file format developed by Adobe. It is a lossless raw image format that is open-source and free to use by anyone.
The Adobe DNG Converter is a free tool that enables you to convert camera-specific raw files to a more universal DNG raw file. This converter is useful if you don't own Lightroom or if your camera is new and its raw files are not supported by Lightroom.
The benefit of using the DNG Converter is backward compatibility. Adobe provides backward compatibility for the latest cameras for use in older versions of Photoshop, Lightroom, Bridge, After Effects, and Photoshop Elements through the DNG Converter.
To use the DNG Converter, simply download the latest version for your operating system (macOS or Windows) and double-click the executable file to launch the installation. Once installed, you can launch the converter by double-clicking its icon or by dragging and dropping individual images or folders of images directly onto the Adobe DNG Converter icon.
When converting your raw files to DNG, you will have several options to choose from:
- Only convert raw files: With this option selected, Lightroom will only convert native camera raw files to DNG. If left unchecked, Lightroom will also convert other file formats such as TIFF, PNG, and JPEG, which is not beneficial as they will not benefit from being converted to DNG.
- Delete originals after successful conversion: It is recommended to check this box to let Lightroom delete the original raw files and save storage space. If you decide to delete the raw files later, it will be a tedious task to locate them along with their sidecar XMP files.
- File extension: You can choose between uppercase or lowercase for the file extension, but it is purely cosmetic and irrelevant which one you pick.
- Compatibility: Choose the latest version unless you have old legacy software that requires an earlier version.
- JPEG Preview: This determines the size of the embedded preview file. If you choose full-sized, the conversion process will take longer.
- Embed Fast Load Data: This option allows images to load faster in the Develop module but slightly increases the file size.
- Use Lossy Compression: This option significantly reduces the file size but results in a slight loss in quality. Choose this option if you don't plan on editing the image in the near future or if you are archiving it.
- Embed Original Raw File: This option is not recommended as it adds to the storage load instead of reducing it.
By using the free Adobe DNG Converter, you can easily convert your camera-specific raw files to DNG without losing the original raw file. This ensures that you have a universal DNG file that is compatible with various software while still retaining the original raw data for future use or editing.
Dodge Charger GT: Reverse Camera Availability
You may want to see also
![]()
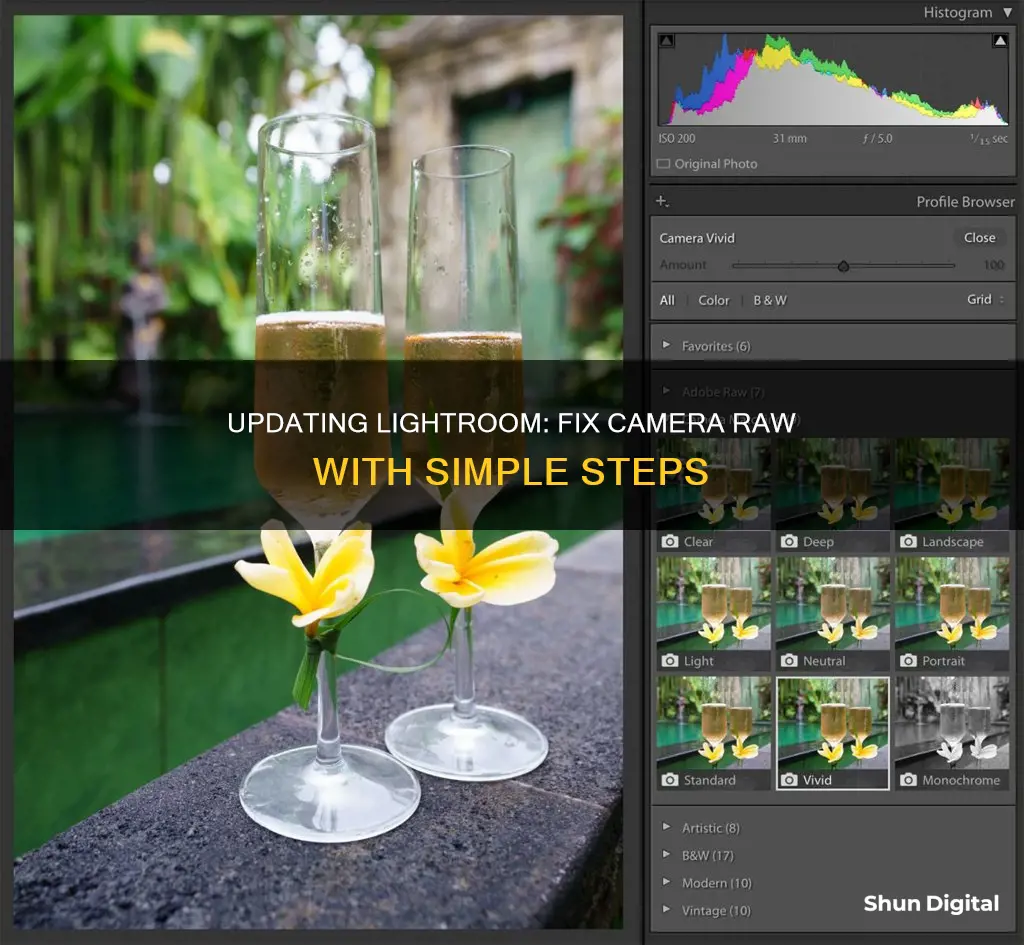
Use the Adobe Camera Raw plug-in to access RAW image formats
The Adobe Camera Raw plug-in lets you import and enhance raw images and has been a go-to tool for professional photographers since its release in 2003. The plug-in is compatible with several Adobe applications, including Photoshop, Lightroom Classic, Lightroom, Photoshop Elements, After Effects, and Bridge. Adobe Lightroom, in particular, is built on the same raw image processing technology as Adobe Camera Raw.
Adobe Camera Raw supports images with a maximum size of 65,000 pixels in length or width and up to 512 megapixels. It can also convert CMYK images to RGB. To use the plug-in, you must have Photoshop or After Effects installed to open files in the Camera Raw dialog box from Adobe Bridge. However, even without these programs, you can still preview images and view their metadata in Adobe Bridge.
The plug-in allows you to modify default settings for specific camera models, ISO settings, or individual cameras by serial number. These modified settings can be saved as presets for future use. Additionally, you can apply the same adjustments to multiple images by saving them as the new Camera Raw defaults.
When you open a camera raw file in Photoshop using the plug-in, you have the option to save the image in various formats, including PSD, JPEG, Large Document Format (PSB), TIFF, Cineon, Photoshop Raw, PNG, or PBM. While the Adobe Camera Raw software can open and edit camera raw image files, it cannot save images in camera raw format.
To ensure you have the latest camera support, it is recommended to update the plug-in when new versions become available. You can check for updates by selecting "Help" and then "Updates" within the software.
Charging the Panasonic Leica Dicomar Camera: A Step-by-Step Guide
You may want to see also
![]()
Use Photoshop CS6 to open new files
If you are using Photoshop CS6, you may encounter issues with opening or creating new files. This could be due to a variety of reasons, including permission problems, outdated software, or corrupted preference files. Here are some potential solutions to fix the issue:
- Ensure that both Photoshop and your operating system are up to date.
- Try resetting Photoshop's preferences by starting the program and immediately holding down Ctrl + Alt + Shift (on Windows) or Cmd + Option + Shift (on Mac). If prompted, confirm that you want to delete the settings file.
- If you have any third-party plugins installed, try disabling them temporarily to see if they are causing the issue.
- Reinstall Photoshop CS6. This can be done by first uninstalling the program and then downloading and installing the latest version from the Adobe website.
- Check your permissions in the OS. For Windows, this can be done by opening msconfig and disabling all services in the Startup Tab. For Mac, try running Photoshop as an Administrator.
- If you are using a mouse, try switching to a different mouse or updating your mouse drivers.
- If you are using a graphics tablet, try updating the drivers for your tablet.
- If you are still encountering issues, try opening Photoshop CS6 in Compatibility Mode for Windows 7.
- If you have multiple graphics cards, try disabling one of them temporarily to see if that resolves the issue.
- If all else fails, try performing a clean reinstall of your operating system and then reinstall Photoshop CS6.
By following these steps, you should be able to resolve the issue and successfully open and create new files in Photoshop CS6.
Charging Your Ricoh Camera: A Step-by-Step Guide
You may want to see also
![]()
Use Lightroom Classic to edit photos on your desktop
Adobe Lightroom Classic is a photo editing app optimised for desktop. It has all the tools you need to enhance your photos, from adjusting colours and removing distractions to straightening skewed shots.
Importing and Organising Photos
Firstly, you'll need to import and organise your photos. In Lightroom Classic, you can either select 'Cloud' or 'Local' to bring up your photos. 'Cloud' will bring up photos that are synced and stored in the Lightroom cloud, while 'Local' will bring up photos stored on your device.
Selecting Photos to Edit
Once you've imported your photos, you can select the photo you want to edit. If you're in ''Photo Grid' or 'Square Grid' view, select the photo and then click the icon in the toolbar at the bottom to switch to 'Detail' view. If you're already in 'Detail' view, select the photo from the filmstrip at the bottom of the screen.
Editing Photos
To start editing, bring up the 'Edit' panel by selecting the icon in the upper-right corner. Here, you'll find various tools and features to refine your photos. You can make precise adjustments to your photos, including adjusting the exposure, highlights, shadows, and temperature.
Basic Adjustments
The majority of the editing features in Lightroom Classic can be found in the right-hand sidebar of the 'Develop' module. Within the ''Basic' menu, you can adjust the white balance, tone, and presence to improve the lighting and colours of your photo.
Advanced Adjustments
For more advanced adjustments, you can use the ''Tone Curve' tool to make precise changes to the tonal range and contrast. The 'HSL/Colour' panel allows you to target specific colour ranges in your photo, while the ''Split Toning' feature lets you add different shades to the highlights and shadows.
Removing Distractions
The 'Content-Aware Remove' tool lets you erase any distractions or blemishes from your photo. Simply select the object or blemish, and Lightroom Classic will automatically sample nearby areas to blend it away.
Applying Presets
You can also apply presets to your photos to create a specific look. Presets can be applied to the entire photo or specific parts, allowing you to enhance certain elements, such as making the sky more dramatic or your subject stand out.
Exporting and Sharing Photos
Once you're happy with your edits, you can export and share your photos in a variety of ways. Lightroom Classic allows you to easily organise and share your photos, ensuring they look their best wherever you choose to display them.
Setting Up Your Dodge Charger: Rear Camera Installation Guide
You may want to see also
Frequently asked questions
You can't update your cracked Lightroom Camera Raw. You will need to purchase the latest version of Lightroom to access the latest Camera Raw updates.
You can't update your cracked Lightroom Camera Raw for free. You will need to purchase the latest version of Lightroom to access the latest Camera Raw updates.
You can't update your cracked Lightroom Camera Raw to the latest version. You will need to purchase the latest version of Lightroom to access the latest updates.
You can't update your cracked Lightroom Camera Raw without paying. You will need to purchase the latest version of Lightroom to access the latest updates.