The Dodge Charger is a popular muscle car that has been around since 1965, with a break in production before its return in 2005. A rear-view or backup camera is an essential safety feature for any modern vehicle, and the Charger is no exception. This guide will cover the process of configuring a rear camera for your Dodge Charger, including the necessary equipment, installation process, and potential challenges. Whether you're a technician or a DIY enthusiast, this article will provide valuable insights for enhancing your driving experience with a rear-view camera.
What You'll Learn
![]()
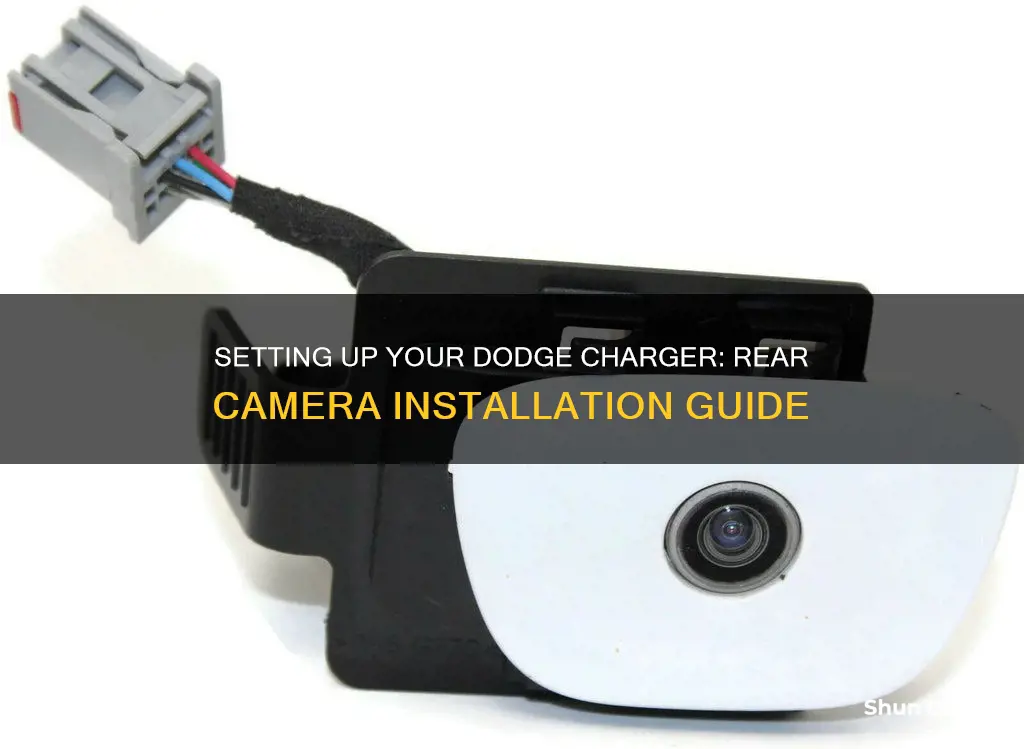
Camera kit installation
This installation guide will cover the process of installing and configuring a rear-view camera kit in a Dodge Charger. This will include information on the required tools and materials, step-by-step instructions for the installation process, and any necessary configuration or activation steps.
Tools and Materials:
- Rear-view camera kit (compatible with your Dodge Charger model and year)
- Basic hand tools (screwdrivers, wrenches, etc.)
- Drill and hole saw (if needed for camera mounting)
- Electrical connectors and wire splicers
- Multimeter (for testing electrical connections)
- Dealer activation code or a third-party activation tool (such as LockPick or Tazer)
Installation Process:
- Prepare the Vehicle: Park your vehicle in a safe and well-lit area. Turn off the engine and engage the parking brake. Remove any necessary trim pieces or panels to access the installation area, such as the trunk liner or rear light assemblies.
- Mount the Camera: Determine the desired mounting location for the camera, typically near the license plate or trunk area. If using the third brake light mounting location, you may need to drill a hole to accommodate the camera. Ensure the camera is securely mounted and adjust the angle as needed.
- Connect the Camera Wiring: Locate the reverse light wiring and splice into the positive wire to provide power to the camera. Connect the ground wire to an appropriate grounding point, such as an existing screw on the trunk lid. Route the camera wiring discreetly along predefined pathways, if available, to the vehicle's main system.
- Test the Camera: Connect the camera to the vehicle's display or infotainment system using the appropriate connectors. Test the camera by shifting the vehicle into reverse and observing the display. Ensure the camera provides a clear and properly oriented view of the rear area.
- Secure Wiring: Once you've confirmed the camera is functioning properly, carefully secure all wiring to prevent damage or interference with other vehicle components. Use cable ties or approved fasteners to keep the wiring in place.
- Reassemble Vehicle Trim: Reinstall any trim pieces or panels that were removed during the installation process. Ensure that all components are properly aligned and secured.
Configuration and Activation:
- Dealer Activation: If your vehicle requires dealer activation, take your Dodge Charger to an authorized dealership. Provide them with the activation code or instructions included with your camera kit. They will use a diagnostic tool to enable the rear-view camera functionality.
- Third-Party Activation: Alternatively, if you are using a third-party activation tool, such as LockPick or Tazer, follow the instructions provided with the tool to enable the camera. This may involve connecting the tool to the vehicle's ODBII port and selecting the appropriate options.
By following these steps, you should now have a fully functional rear-view camera system in your Dodge Charger. This will enhance your driving experience and provide added safety and convenience when reversing or parking your vehicle.
SpyPoint Camera Plans: What's the Cost of Each Camera?
You may want to see also
![]()
Wiring the camera
Firstly, ensure you have the necessary tools and equipment. This includes a Phillips head screwdriver, a power drill with a high-speed twist drill bit, wire strippers or pliers, electrical tape, and a trim removal tool. You will also need to purchase a mountable backup camera specifically designed for your Dodge Charger, as well as an external or internal monitor if your vehicle doesn't have one.
Next, remove the rear license plate using the Phillips head screwdriver. Set the screws aside in a safe place. Then, open the trunk and remove the interior panel to access the rear wiring chambers. Drill a small hole in the license plate mounting area, ensuring there are no obstructions, and place a rubber grommet around the camera cable to keep it in place and prevent leaks.
Run the camera cable into the trunk through the drilled hole. Locate the reverse light wires, which connect the tail lights to the dashboard. Strip and separate these wires, and then fuse your camera wires with the reverse light wires. Attach the bare wire cables to the camera cord's power connector and twist them together, ensuring you wrap the connection with electrical tape for safety.
If your camera has a separate video cable, connect it to the camera cord's video connector. Route this cable to the front of the car, typically by peeling back the headlining panel and pulling the cable through the exposed chamber.
Finally, connect the monitor's splitter cable to the RCA cable. Attach the monitor's power cable to a fuse tap and crimp the cables together. Locate the fuse box and plug the fuse tap into an open fuse cell. Reattach the license plate and interior panels, and test the camera to ensure it is functioning correctly.
It is important to note that the wiring process may vary slightly depending on the specific model of your Dodge Charger and the type of camera and monitor you are installing. Always refer to the manufacturer's instructions and consult a professional if you are unsure about any part of the installation process.
Charging Your Alto Camera: A Quick Guide
You may want to see also
![]()
Adjusting the camera
Camera Angle and Alignment:
Firstly, it's important to note that the rearview camera on the Dodge Charger is not designed to be adjustable. Some owners have observed that the camera angle can appear skewed or crooked, but this is due to the lens warping associated with the wide-angle lens, and it is intended to help with object avoidance rather than precise parking alignment. However, if you believe your camera is misaligned, you can try adjusting the mounting screws that hold the camera in place. This can involve playing with the torque bits or security screws to adjust the camera's position up and down or side to side.
Brightness and Contrast:
If you're experiencing issues with the brightness or contrast of your backup camera, there are a few potential solutions. Firstly, check if the lens is dirty as this can impact the image quality. Additionally, the placement of the camera in relation to the spoiler may be causing back shading, resulting in a darker image. You can also try adjusting the brightness settings on your Uconnect display, as this may improve the visibility of the camera feed.
Wiring and Installation:
For those installing a standalone backup camera system or integrating an aftermarket camera, proper wiring is crucial. Ensure that you have tapped into the correct wires, such as the reverse light positive wire, and that your ground connection is secure. The wiring location is typically near the license plate or trunk area, and precision in routing and securing the wires is essential to prevent damage and ensure longevity.
Camera Activation:
If you have installed a backup camera and need to activate it, you may need to purchase a one-time-use programmer or visit your local dealership. Some models may require a dealer activation code, which can be found in the installation guide.
Camera Selection:
When choosing a backup camera for your Dodge Charger, consider the camera's resolution, waterproof rating, low-light performance, and temperature performance rating. High-definition cameras with a wide viewing angle and optimal low-light performance will provide the best visibility.
Remember to consult your owner's manual or seek professional assistance if you're unsure about any aspect of adjusting or installing your rear camera.
Charging the Black Magic Camera: A Step-by-Step Guide
You may want to see also
![]()
Camera activation
Understanding the Process:
Before beginning the activation process, it's important to understand the components involved. The rear-view camera system typically consists of the camera itself, mounted near the license plate or trunk area, and the wiring that connects it to the vehicle's main system. The wiring should be discreetly routed and securely connected to ensure optimal functionality and prevent damage.
Installation:
If you haven't already installed a rear-view camera, you can choose to install an OEM Integrated Backup Camera System specifically designed for the Dodge Charger. This system includes a factory harness that connects to the vehicle's screen and a seamless rear-view camera. The kit is designed for plug-and-play installation, making it a relatively straightforward process.
Dealer Activation:
Once the camera is installed, the next step is activation. All Chrysler, Jeep, Dodge, and Ram harness systems require dealer activation. You have two options: purchase a one-time-use programmer or visit your local dealership. The dealership will use a laptop connected to the ODBII port to enable the camera by checking a box in the diagnostic software. This process typically incurs a fee, which can vary depending on the dealership.
DIY Activation:
Alternatively, you can activate the camera yourself using a device like a LockPick or Tazer. These devices allow you to enable additional native video inputs in the back of the radio, providing a more automatic and seamless activation process without the need for a dealership visit.
Testing and Adjustment:
After activation, it's important to test the camera to ensure it's functioning correctly. Check the video cable for any damage or pinching during installation, as this could result in a lack of video signal. You can also adjust the camera angle to ensure optimal visibility. The camera itself may have mounting screws that allow you to adjust its position slightly.
Recall Considerations:
In some cases, you may need to have your vehicle serviced for a recall, such as the R35 recall, which involves reprogramming the Occupant Restraint Control module. During this process, the dealership can also enable your rear-view camera if you provide them with the sales code for your vehicle.
Wireless Security Cameras: How Long Do They Last?
You may want to see also
![]()
Camera maintenance
Cleaning the Camera Lens
- It is recommended to clean your rear-view camera lens every month to ensure clear visibility.
- Use a soft, lint-free cloth, such as a microfiber cloth, to gently wipe the lens.
- Avoid using rough or abrasive materials like paper towels, rough cloths, or harsh chemicals, as they can scratch the lens.
- You can dampen the cloth with a small amount of cleaning solution, specifically designed for electronic devices, or use isopropyl alcohol on a soft cloth.
- Ensure you regularly check for any signs of damage or malfunction after cleaning, such as cracks, corrosion, or signs of wear.
Protecting the Camera
- When washing your vehicle, take care to prevent water or cleaning agents from directly hitting the camera lens. Shield it with your hand or use a gentle spray.
- Park your vehicle in sheltered areas, such as covered or shaded areas, to protect the camera from extreme weather conditions and direct exposure to sunlight.
- Consider using a protective cover or housing for the camera to provide an added layer of protection from harsh weather conditions.
Troubleshooting
- A blurry camera display may be due to a dirty lens or an issue with the system's wires and connections.
- Check the wires for any signs of damage, such as splits or disconnections, and use a splicing tool and electrical tape to fix them if needed.
- If the wires look fine, check your vehicle's fuse box to rule out the possibility of a blown fuse.
- If you have a wireless backup camera system, consult the owner's manual to see how to do a factory reset.
Maintenance Tips
- Regularly check for firmware or software updates from the camera's manufacturer to improve functionality and performance.
- Inspect and clean the connectors and wires for any signs of corrosion, rust, loose connections, or physical damage. Use a wire brush or a soft cloth to gently clean the connectors if necessary.
- If you encounter persistent issues with your camera, such as distorted images or complete malfunction, seek professional assistance from a technician or the camera's manufacturer.
Charging Your Sanyo E1090: Quick and Easy Guide
You may want to see also
Frequently asked questions
You can install a rear camera on your Dodge Charger by purchasing a backup camera kit and connecting it to the factory harness behind the screen. You may need to drill a hole in the third brake light to fit the camera. After installation, take your car to a dealership to get the camera activated.
The cost of getting a rear camera activated at a dealership ranges from $30 to $75.
Alternative ways to activate a rear camera on your Dodge Charger include using a Lockpick, Tazer, or #CarConnect.
There are various rear camera options available for your Dodge Charger, including the Mopar Rear Camera Kit, the Dodge Charger OEM Integrated Backup Camera System, and aftermarket CMOS cameras.
When installing a rear camera on your Dodge Charger, consider the wiring location, power source, and ground connection. Predefined pathways for wiring may be available, and splicing into existing wires can be an option.