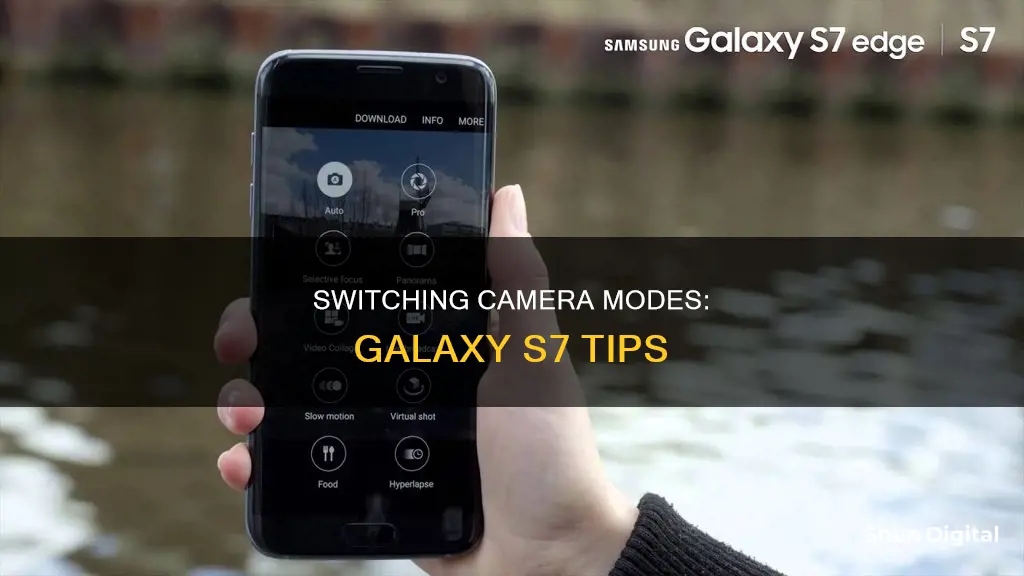
The Samsung Galaxy S7 has a variety of camera modes to help you capture unforgettable moments. The default mode for the rear camera is Auto mode, while the front-facing camera's default mode is Selfie mode. However, there are times when you may want to explore other camera modes to get the desired photos. To switch between camera modes, simply tap the Mode button on the camera preview screen and select your preferred mode. It's important to note that your previous selection for the camera mode won't be saved, and the default mode will be used again the next time you launch the camera. Additionally, you can add a camera mode shortcut to your home screen for quicker access.
| Characteristics | Values |
|---|---|
| Default mode for the rear camera | Auto mode |
| Default mode for the front-facing camera | Selfie mode |
| Pre-installed camera modes for the rear camera | Selective focus mode, Auto mode |
| Pre-installed camera modes for the front-facing camera | Selfie mode |
| Method to change camera modes | Tap the Mode button on the camera preview screen |
| Camera mode selection consistency | Inconsistent |
| Camera mode selection memory | Not saved after exiting the camera app |
| Camera mode shortcut | Can be added to the home screen |
| Additional camera modes | Can be downloaded from the Galaxy Store |
What You'll Learn
![]()
How to use Pro mode on the Galaxy S7
Pro mode on the Samsung Galaxy S7 gives you manual control over your camera settings, allowing you to take pictures exactly as you want them. You can adjust settings such as ISO, shutter speed, exposure, filters, focus, and white balance. The adjustments you make will appear on the screen in real time, so you can preview the shot and make changes as needed.
To access Pro mode, open the camera app on your Galaxy S7. Along the top of the viewfinder area, you will see several presets: Food, Panorama, Selective Focus, and more. Slide over to the "Pro" preset to enable it. If you don't see these settings, you may be using an older model of the Galaxy S7. In that case, slide to the leftmost panel in the viewfinder and click the "Pro" preset there.
Once you have enabled Pro mode, you can start adjusting the various settings. Here is a breakdown of the different options:
- ISO: Adjusts the light sensitivity of the image sensor. A lower setting makes the sensor less sensitive to light, while a higher one makes it more sensitive.
- Aperture: Changes the size of the hole in the lens that lets in light. This setting is used to achieve a shallow depth of field, as seen in portrait photography.
- Filter: Preset filters that can be applied to your photos before taking them.
- Focus Mode: Allows you to choose between Auto Focus and Manual Focus.
- White Balance: Adjusts the lighting in your photo based on the available presets, such as Daylight, Cloudy, or Fluorescent.
- Exposure: Controls the brightness and darkness of your photo.
Below this first row of options, you will find a second row of settings:
- Settings: Access basic camera settings.
- View Mode: Toggles full view mode, which uses the entire screen and overlays the controls.
- Flash: Turn the flash on or off, or set it to automatic.
- Metering: Measures the amount of light in the shot. You can choose between Spot, Center, and Center-weighted modes.
- AutoFocus Area: Tells the camera to focus on the entire shot or just the center.
- Camera Select: Switches between the front- and rear-facing cameras.
Most of these settings have an Auto mode, so you only need to adjust the ones that are important to you. This allows you to leave settings like White Balance on automatic while manually tweaking settings like ISO and Aperture.
By using Pro mode, you can take more creative control over your photos and improve your photography skills. Play around with the different settings and see how they impact your images. As you get more comfortable with Pro mode, you will be able to take your phone photography to the next level!
Mastering Manual Focus with Fuji Cameras
You may want to see also
![]()
How to use Selective Focus mode on the Galaxy S7
The Selective Focus mode on the Galaxy S7 allows you to make specific objects or areas stand out in your photo and tweak the focus to your liking. The mode works by taking multiple photos of your subject at varying focus levels, then letting you change the focus of your photo after it’s been saved to your gallery.
- From the front screen, choose "Apps".
- In the Galaxy S7 camera preview screen, choose "MODE".
- Choose "Selective focus".
- Select a location on the screen where you would like your camera to focus.
- Once the image has been taken, choose "Preview".
- Select the picture to change which focus you would like. You will have three options: "Near focus", which focuses on things in the foreground; "Far focus", which focuses on things in the background; and "Pan focus", which makes the entire picture in focus.
- Once you are happy with your photo, choose "Save" or "Save As" to keep your work.
The Selective Focus mode is a great way to avoid blurry images and have more control over the focus of your photos. With just a few taps, you can easily switch between different focus options and choose the one that best suits your image.
Discovering Your Adobe Camera Raw Version
You may want to see also
![]()
How to use Panorama mode on the Galaxy S7
Panorama mode on the Galaxy S7 allows you to capture more of a scene by combining multiple images to create a panoramic photo. Here is a step-by-step guide on how to use Panorama mode on your Galaxy S7:
- From the home screen, open your list of apps or swipe up to access them.
- Depending on your device, you may need to tap "Mode" or swipe across the screen to select Panorama mode.
- Press the capture button to start taking your panoramic photo.
- An alignment box will appear on the screen to help you keep the scene aligned as you move.
- Slowly move the device in one direction.
- When you touch the stop button or reach the maximum range, your device will make the necessary adjustments and stitch the images together to form one complete panoramic photo.
- To view the captured Panorama, select the preview thumbnail.
In addition to the standard Panorama mode, the Galaxy S7 also offers Motion Panorama. This feature lets you capture videos in the Panorama format. Here's how you can use Motion Panorama:
- From the home screen, open your list of apps or swipe up to access them.
- Depending on your device, tap "Mode" or swipe to select Panorama mode.
- Choose the motion icon to activate Motion Panorama.
- Press the capture button to start taking your panoramic video.
- Slowly move the device in one direction. When finished, tap the stop icon.
- To view the captured Motion Panorama, select the preview thumbnail.
- Tilt the device or swipe on the screen to rotate the captured Motion Panorama.
- To save the Motion Panorama as a video file, select "Save Video".
Understanding Program Mode: Camera's Auto-Adjusting Setting
You may want to see also
![]()
How to use wide-selfie mode on the Galaxy S7
The wide-selfie mode on the Galaxy S7 allows you to take wide-angle selfies to fit more people into your pictures. Here is a step-by-step guide on how to use this mode:
- On the preview screen, tap the icon to switch to the front camera.
- Tap the Mode icon to display the different camera modes.
- Select the Wide Selfie mode.
- To take a photo, you can either tap the sensor on the back of your device or tap the screen. Alternatively, you can enable gesture control by going to Settings and tapping the Gesture control switch. Show your palm to the front camera, and the device will recognise your palm and take a photo after two seconds.
- Slowly swivel the device left and then right (or vice versa) to take a wide self-portrait. The device will capture additional photos when the white frame moves to each end of the viewfinder window.
Note: Keep the white frame inside the viewfinder window while taking the photo. Ensure that the subjects remain still during the photo. The resolution of the photo may be affected by lighting conditions. Depending on the shooting conditions, the top and bottom parts of the image displayed on the preview screen may be cut out of the final image.
Charging the Fujifilm XP80: A Step-by-Step Guide
You may want to see also
![]()
How to use Live Focus mode on the Galaxy S7
Live Focus mode on the Galaxy S7 gives you direct control over the bokeh effect, allowing you to adjust the level of background blur in real time. You can even adjust the blur after taking the photo, ensuring you always get the perfect shot.
To use Live Focus mode, follow these steps:
- Open your camera app.
- Depending on your device, you may need to tap "Mode" or swipe the screen to select Live Focus.
- Tap an effect to select it. There are various effects to choose from, including:
- Blur: Blurs the background around the subject.
- Studio: Brightens the subject without brightening the background.
- High-key mono: Creates a monochromatic effect with high brightness, turning the entire image black and white.
- Low-key mono: Similar to High-key mono, but with low brightness.
- Backdrop: Grays out the background with a gradient effect while keeping the subject in colour.
- Colour point: Changes the sharpness of the colours around the subject, making everything else appear darker.
- Adjust the blur level by dragging the slider left or right.
- Tap the capture button to take the photo.
If you're not happy with the blur effect after capturing the image, you can adjust it:
- Open the Gallery app and select the image taken with Live Focus.
- Tap "Change background effect".
- Select a different blur effect and adjust its intensity using the slider.
- Tap "Apply" to save your changes.
Charging 1080p Camera Batteries: A Step-by-Step Guide
You may want to see also
Frequently asked questions
To change camera modes, tap the "Mode" button on the camera preview screen and select the mode you want from the Galaxy S7 camera modes screen.
You can add a shortcut to individual camera modes on your home screen. This allows you to launch the camera app directly in the specific mode you want.
Yes, you can download additional camera modes from the Galaxy Store.