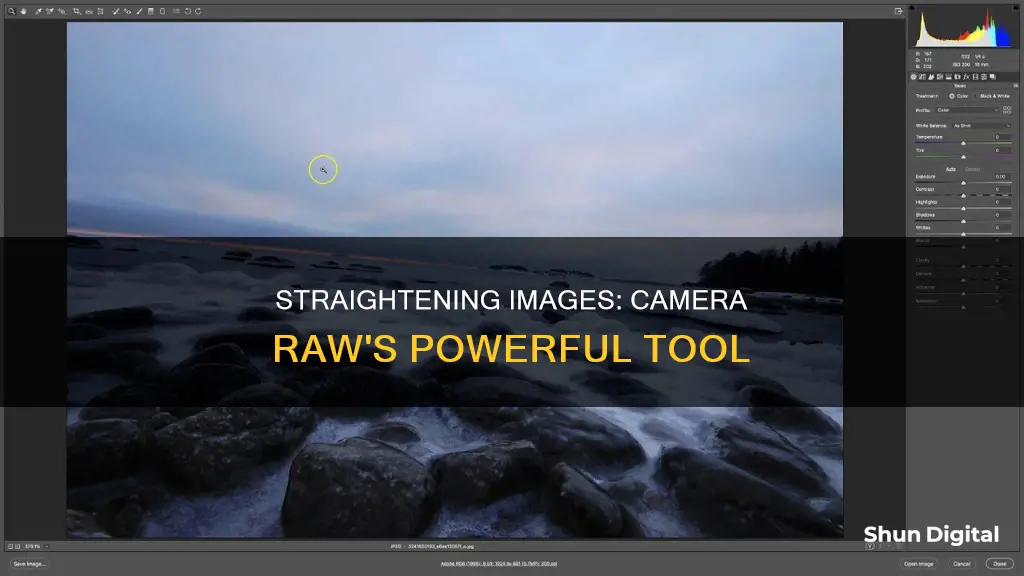
Straightening an image in Camera Raw is a quick adjustment that can make a big difference to your photos. To straighten an image with a crooked horizon, you can use the Straighten Tool, which can be found along the top panel in ACR. Simply drag this tool across the horizon line you wish to straighten, or double-click this tool to allow ACR to automatically straighten your image. Once you've double-clicked the Straighten Tool, a bounding box will appear on your image, which you can adjust as needed. If you're happy with the straightening, double-click inside the bounding box to accept the change, and your image will now straighten and fill the Preview Window.
| Characteristics | Values |
|---|---|
| Software | Adobe Camera Raw (ACR) |
| Image Format | RAW, JPEG |
| Photoshop Version | Photoshop CC, Earlier versions of Photoshop |
| Tools | Straighten Tool, Crop Tool |
| Steps | Select the Straighten Tool, Adjust as Needed, Double-Click to Accept, Make Tweaks |
What You'll Learn
![]()
Select the Straighten Tool
To straighten an image in Adobe Camera Raw, you'll need to select the Straighten Tool. This can be done by either clicking on the Straighten Tool icon in the toolbar or by pressing the letter "A" on your keyboard. The Straighten Tool icon is located in the toolbar along the top left of the Camera Raw dialog box, directly to the right of the Crop Tool.
Once the Straighten Tool is selected, you can then look for something in your image that should be straight, either horizontally or vertically. This could be a horizon line or the edge of a building, for example. After you have identified the line you want to straighten, simply click on one end of it, keep your mouse button held down, and drag your cursor to the other end of the line.
As you drag, you will see a dashed line appearing, which helps you ensure that you are lining things up correctly. If you need to zoom in on the image to get a better view, you can temporarily access the Camera Raw Zoom Tool by pressing and holding Ctrl+Spacebar (Win) / Command+Spacebar (Mac) on your keyboard. This will change your mouse cursor to a magnifying glass with a plus sign in the middle, allowing you to click and zoom in on the desired area.
After you have released your mouse button, Camera Raw will automatically switch from the Straighten Tool to the Crop Tool. The Crop Tool will draw a crop box around your image, which will be rotated to the same angle you dragged with the Straighten Tool. If you need to, you can zoom out to see the entire crop box by pressing Ctrl+0 (Win) / Command+0 (Mac) on your keyboard to jump to the Fit on Screen view mode.
To accept the crop and straighten your image, press Enter (Win) / Return (Mac) on your keyboard. Your image will now be straightened, although you may notice that a portion of the image around the edges may have been cropped away in the process.
If you are not satisfied with the straightening or need to make adjustments, you can select the Crop Tool by pressing the letter "C" on your keyboard. This will allow you to adjust the crop box by dragging the handles to resize or reposition it. Once you are happy with the adjustments, press Enter (Win) / Return (Mac) to crop and straighten the image.
Cleaning Camera Batteries: A Step-by-Step Guide
You may want to see also
![]()
Drag the tool across the horizon line
To straighten an image in Camera Raw, you can use the Straighten Tool. This can be found along the top panel in the Camera Raw toolbar. To use it, simply drag the tool across the horizon line you wish to straighten.
If you want to straighten your image manually, you can click on one end of the horizon line, hold down your mouse button, drag over to the other end, then release your mouse. You can also zoom in on the image to get a closer look at the horizon line by pressing and holding Ctrl+Spacebar (Win) / Command+Spacebar (Mac) on your keyboard. This will change your mouse cursor to a magnifying glass with a plus sign in the middle.
If you want to allow Camera Raw to automatically straighten your image, you can double-click the Straighten Tool. After doing so, a bounding box will appear on your image. You can drag the edges or turn this box to suit your preferences. If you are happy with the automatic straightening, you can accept the change by double-clicking inside the bounding box. Your image will then straighten and fill the Preview Window.
If you are unsatisfied with the automatic straightening, you can always go back and change it. To do so, click the Straighten Tool in the top panel once more. The bounding box will reappear, and your image will return to its original position. You can then adjust the box manually or drag the tool along the line you wish to straighten. Once you are happy with the straightening, double-click inside the bounding box again to approve it.
Camera Battery Lifespan: How Long Does It Last?
You may want to see also
![]()
Adjust the bounding box
Once you've opened your image in Camera Raw, you can straighten it using the Straighten Tool. This can be found along the top panel in ACR. To activate it, drag the tool across the horizon line you want to straighten, or simply double-click the tool to allow ACR to automatically straighten your image.
After you've double-clicked the Straighten Tool, a bounding box will appear on your image. This is the area you keep within the image when you crop. You can adjust the bounding box by dragging its edges or turning the box to suit your preferences. If you want to accept the new change, simply double-click inside the bounding box.
If you are not satisfied with the automatic straightening, you can go back and change it. Click the Straighten Tool in the top panel again, and the bounding box will reappear with your image returning to its original tilt. You can either adjust the box manually or use your mouse to drag the tool along the line you wish to straighten.
Once you've gotten the image to your liking, simply double-click inside the bounding box again to approve it. You can repeat these steps as needed until you are satisfied with the straightening.
Simplisafe Outdoor Camera: Charging Frequency Explained
You may want to see also
![]()
Double-click to accept
Once you are happy with the straightening of your image, you can double-click inside the bounding box to accept the changes. This will cause your image to straighten and fill the Preview Window.
If you are satisfied with the straightening, you are done with this step and can move on to editing your image in ACR. However, if you are not quite happy with the result, you can always go back and make some tweaks.
To do this, simply click the Straighten Tool in the top panel again. The bounding box will reappear, and your image will return to its original position. You can then either manually adjust the box or use your mouse to drag the tool along the line you wish to straighten.
Once you have made your adjustments, simply double-click inside the bounding box again to approve the changes. You can repeat these steps as many times as necessary until you are happy with the result.
Remember, you can always preview the results of your straightening before accepting the changes by pressing Enter/Return or clicking any tool except the Crop or Straighten tool.
Long Exposures: How They Affect Your Camera's Battery Life
You may want to see also
![]()
Make tweaks
If you're unhappy with the automatic straightening, you can go back and change it. Simply click the Straighten Tool in the top panel once more. The bounding box will reappear and your image will return to its original "tilt".
You can either adjust the box manually until you're happy, or use your mouse to drag the tool along the line you wish to straighten. There may be several lines in an image, and they may not all appear straight. You can choose which line you want to base the straightening on, and feel free to choose different lines and experiment with which you like best.
Once you've got it the way you want it, simply double-click inside the bounding box again to approve it. You can repeat these steps as needed until you are satisfied with the straightening.
If you're using Photoshop, depending on the version, you may be able to find this straightening tool inside Photoshop under Filter > Lens Correction.
Lightroom and Camera Raw: What's the Deal?
You may want to see also
Frequently asked questions
First, open your image in Camera Raw. Then, select the Straighten tool from the top panel and drag this tool across the horizon line you wish to straighten.
Yes, simply double-click the Straighten tool in the toolbar or with the Straighten tool selected, double-click anywhere in the preview image.
Press the 'A' key to select the Straighten tool.
Once you've straightened the image, a bounding box will appear on your image. You can drag the edges or turn this box as needed to suit your preferences.
To accept the changes, double-click inside the bounding box. Your image will now straighten and fill the Preview Window.