OBS, or Open Broadcaster Software, is a free and open-source video production technology that is widely used for screen sharing and live streaming. It is compatible with Windows, Mac, and Linux systems and offers a range of customisation options. To show your camera screen on a computer using OBS, you will need to add your webcam as a source. Here's a step-by-step guide:
1. Download and install OBS Studio on your device.
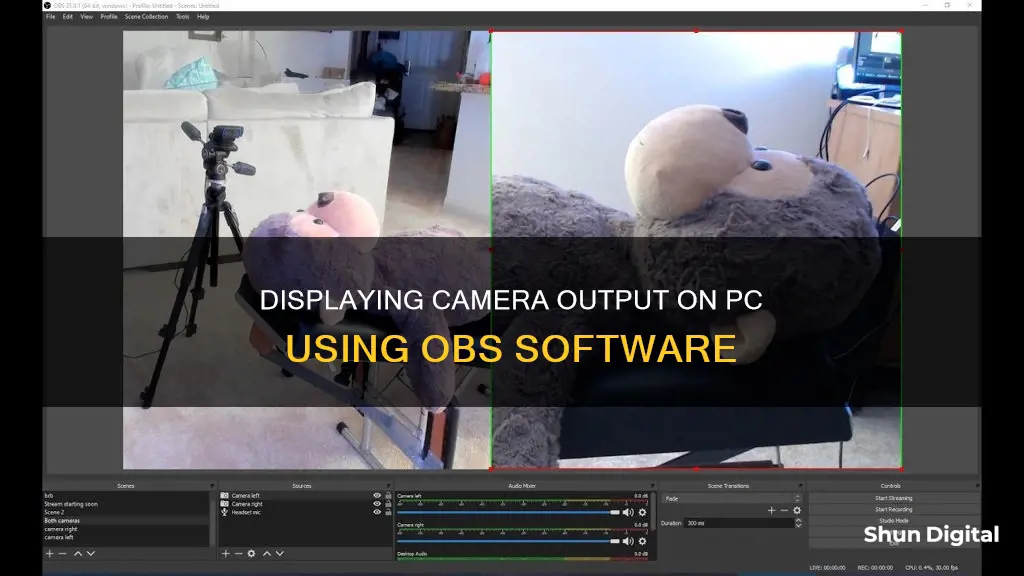
2. Launch OBS and go to the Sources box, usually found at the bottom of the screen.
3. Click the + or Plus sign in the Sources box to add a new source.
4. Select Video Capture Device or Display Capture from the list of options.
5. Create a new source and give it a name, such as Webcam.
6. Choose your webcam from the list of devices.
7. Specify the desired resolution and other advanced settings if needed.
8. Click OK to confirm the source addition.
9. Adjust audio settings if required by going to Settings and selecting the Audio tab.
10. Under the Mic/Auxiliary Audio Device dropdown, select your webcam to enable audio capture.
11. Click Start Recording or Start Virtual Camera to begin capturing your camera screen along with audio.
| Characteristics | Values |
|---|---|
| Software | OBS Studio |
| Type | Open-source live video production technology |
| Supported OS | Windows, Mac, Linux |
| Cost | Free |
| Use case | Screen-sharing, live-streaming, screen recording, video calling, online meetings, conferences |
| Sources | Display Capture, Media Source, Window Capture, Game Capture, Video Capture Device, Audio Output Capture, etc. |
| Settings | Resolution, frame rate, focus, brightness, exposure, zoom, audio inputs, output folder, etc. |
| Advanced features | Virtual camera, picture-in-picture effect, audio delay, hardware encoding, colour correction, LUT to colour grade, image mask |
What You'll Learn
![]()
Download and launch OBS
To download and launch OBS, follow these steps:
First, go to the official OBS website and select your operating system from the three options: Windows, macOS, or Linux. Download the installer file for your system. Once the installer file has been downloaded, open it and follow the prompts to install OBS Studio on your computer. During the installation process, you will be given options to add plugins. Only install the plugins that are necessary for running OBS on your computer.
OBS Studio has a steep learning curve and may not be the most user-friendly platform, especially for those new to screen recording and video editing. However, if you know the basics, getting started is straightforward. Here are the six basic parts of the software that you should familiarise yourself with:
- Video and audio sources: This is where you set your audio and video sources, such as system audio, microphone, screen capture, or webcam footage.
- Scenes: This section displays your "scenes," which are the video and audio coming from your chosen sources, such as livestream, images, or screen recording.
- Audio mixer: This is where you adjust the audio in your recording, including volume, trimming, voice-over, and other settings.
- Scene transitions: This feature allows you to seamlessly transition between video clips with animations like fades or dissolves.
- Controls: In this section, you can start and stop your screen recording, make adjustments to recording settings, and control other aspects of your recording.
- Preview window: After you finish recording but before you export your file, you can preview what your recording will look and sound like in this window.
Now that you have downloaded and installed OBS, you can move on to the next steps of setting up your camera screen and starting your recording.
Fight Speeding Tickets: Mesa, Maricopa Camera Fines Overturned
You may want to see also
![]()
Go to the Sources box and click the + symbol
To add a source to OBS, go to the Sources box and click the + symbol. This will allow you to choose a source to add to your scene. You can add images, videos, webcams, games, and much more.
When adding a source, you will be prompted to create a new one or use an existing one. Using an existing one will be useful for things like webcams or game captures that will be shown in different scenes. Give your source a name and hit okay. You can then browse and find the image you want to add in.
If you are adding a webcam, you will need to add your webcam as a source. Go to the Sources section and click on the + button to add a source. Select Video Capture Device. Give your webcam a nickname and click OK. Then, from the dropdown menu, choose your webcam.
If you are adding a browser source, you can leave the Local File box unchecked. The URL will tell OBS what web page you want to open. The width and height will determine the size of the source, and the FPS will be the frames per second this source runs at.
If you are adding a media source, you will likely be adding a movie file or a GIF. Check the Local File box, as most files will be stored on your computer. If you want this file to loop, check the loop box.
If you are adding a text source, you can select a specific font to use, choose the style, and adjust the size. You can also add underlines or strikethroughs in this panel. Enter the text you want to display in the text box.
If you are adding a display capture source, you can select which monitor you would like to capture. If you have multiple monitors, be sure to select the appropriate display from the drop-down menu.
If you are adding a window capture source, you can capture anything that happens inside one of your windows or tabs. Select what you would like to capture in the Window dropdown.
If you are adding a game capture source, the first option will automatically capture any game that you have loaded in full-screen mode. If you play your games in borderless windowed mode, you may want to uncheck this option and select the window instead.
Adding a video capture device will allow you to add things like webcams, capture cards, or any type of video device connected to your PC.
Adding an audio input or output device will allow you to add individual audio devices to separate scenes.
Mastering Manual Focus Photography in Low-Light Conditions
You may want to see also
![]()
Select Display Capture
To use Display Capture, first, download and launch the OBS application. Then, go to the Sources box and click the + symbol, before selecting the Display Capture option.
In the pop-up window, create a title and click OK. You will then be able to select your display method and capture method, as well as choosing whether or not to show your cursor on the recording. If you are using multiple monitors, be sure to select the appropriate display from the drop-down menu.
Display Capture is used to capture your entire monitor. You can only add one Display Capture source per display. If you need your display in multiple scenes, be sure to add references to the existing Display Capture Source rather than creating a new source.
The Evolution of Fujifilm Cameras: A Manufacturing Journey
You may want to see also
![]()
Click Start Recording
Once you've downloaded and installed OBS, you can launch the application.
To begin capturing, click the 'Start Recording' button. This button can be found on the lower right side of the OBS Studio record screen, below 'Start Streaming'.
If you want to automate the recording process, you can set a time limit for how long you want to record for by going to 'Tools' and then 'Output Timer'. You can also set a time for the recording to start. However, as OBS doesn't run as a background process, you'll need to create a Windows Task to do this.
To create a Windows Task, click on the Windows icon and type "Task Scheduler". Double click on "Task Schedule Library" in the left pane, then click on "Action" and "Create Basic Task" to set the trigger. You can then tell it to open OBS and start the recording.
Fight Millbrae Camera Tickets: Your Complete Guide
You may want to see also
![]()
Save your recording
To save your recording, first, open OBS and click on the "Settings" tab on the left-hand side of the window. This will bring you to the main settings window, where you can edit various settings.
Next, click on "Broadcast Settings" in the left-side column, and then select "Save to File" in the centre window. This is where you will set the file path for your saved streams. You can name your recordings, and they will be labelled as "Recording Name (03)" and so on.
OBS offers two file types to save as, the most common being .
When you hit "Start Streaming", you will notice that the "Start Recording" option will also be activated. You can view the status of your recording at the bottom of the OBS window.
Your recordings will be saved in your default Video folder on Windows or Mac. To reveal the location, simply click "File" and then "Show Recordings" from the menu. However, you can also choose a custom location for your recordings. To do this, click on the Settings icon at the bottom right of the interface, choose the Output tab on the sidebar, and then type or paste your desired file destination under "Recording Path". Once your recording is complete, the files will be routed to that folder.
Focusing on the Small: DVX200's Minimum Focus Range
You may want to see also
Frequently asked questions
To set up OBS to record your screen, you will need to:
- Download and install OBS Studio on your device.
- Open the program and add your desired sources by clicking the "+" symbol in the "Sources" section.
- Click "Start Recording" in the "Controls" section.
To record your webcam and screen simultaneously with OBS, follow these steps:
- Download and install OBS, ensuring your camera is connected to your system and recognised correctly.
- Open OBS and click the "+" symbol in the "Sources" section to add a new source.
- Select "Video Capture Device" and name it, then click "OK".
- Check that the correct device is selected, especially if you have multiple webcams.
- Adjust any video/audio settings and resize the captured window as needed.
- Click "Start Recording" in the "Controls" section to begin recording your webcam and screen.
If OBS is not capturing your full screen, try the following solutions:
- Set the correct canvas resolution by going to "Settings" > "Video" and adjusting the "Canvas (Base) Resolution" option.
- Ensure OBS has the necessary administrative privileges by right-clicking the OBS icon, selecting "Properties", choosing the "Compatibility" tab, and selecting the option to "Run this program as an administrator".
- Use "Display Capture" as a source for screencasting multiple windows.