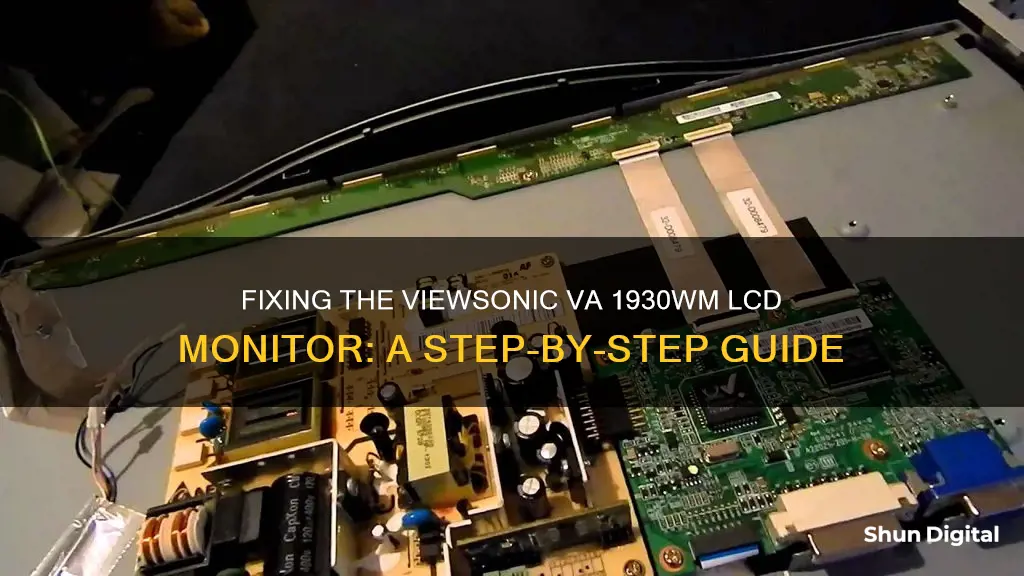
The Viewsonic VA1930wm is a 19-inch widescreen LCD monitor from Viewsonic's Graphic Series. It features a resolution of 1440 x 900 pixels and includes both DVI and VGA connectors for configuration flexibility. While the monitor has received positive reviews for its reliability and price, some users have reported issues with colour reproduction and sound quality. One common issue with this monitor is the display failing to turn on, which can be caused by a faulty power board or a problem with the LCD panel or power inverter section. To repair this monitor, you may need to replace the capacitors on the power board or take other diagnostic and repair steps, which are outlined in online guides and repair kits.
What You'll Learn

Inspecting the monitor for faults
Step 1: Check the Power and Cables
Firstly, check if your monitor is receiving power. Ensure that the power cable is securely connected to both the monitor and the power outlet. If the LED power indicator light is not on, try plugging the monitor into a different power source. If the light still doesn't turn on, the power supply or adapter may be faulty and need replacement.
Additionally, check if the LED light is green. If it is green but the monitor is not displaying anything, this indicates an internal problem with the monitor, and it may need to be returned for repair.
Step 2: Check for a Display Issue
If your monitor turns on but displays a black screen, try shining a flashlight on it. If you can see the image when you point a light at the screen, it suggests that the monitor's backlight is faulty and needs to be replaced.
Step 3: Inspect for Physical Damage
Examine the monitor for any physical damage, such as cracks, spots, or blotches on the screen. If there is visible damage, the LCD panel is likely damaged and might need to be replaced. Running a soft cloth over the screen can help you detect any broken glass or scratches.
Step 4: Check for Stuck or Dead Pixels
If your monitor displays an image but has a few pixels stuck at one colour, you can try to fix them. Keep the monitor on and gently rub a damp, non-abrasive cloth wrapped around a pencil tip over the affected area. You can also search for stuck pixel repair software or purchase hardware designed to repair dead pixels.
Step 5: Inspect the Circuit Boards
If your monitor is not turning on, you may need to inspect the internal circuit boards for faults. Before proceeding, ensure you are honest about your abilities and experience. Working with electronics carries a risk of electric shock, so consider hiring a professional if you are uncomfortable with the task.
To inspect the circuit boards:
- Disconnect the power by unplugging the monitor and removing the battery if it is a laptop.
- Open the monitor case by unscrewing the corners and carefully prying it apart with a plastic tool.
- Locate the power supply board, which is usually near the power socket.
- Inspect the board for any signs of burning or charring, or bulging capacitors.
- If you suspect a faulty capacitor, discharge it using a resistor and then test it with a multimeter.
- If the capacitor is faulty, desolder it and replace it with an identical one of the same size, voltage, and capacitance.
Step 6: Check the Inverter and LCD Panel
If the previous steps do not identify any issues, the problem may lie with the power inverter section or the LCD panel itself. You may need to open the monitor for a visual inspection of these components. If you detect any burning marks or other damage, these components may need to be replaced.
Monitoring Data Usage: DD-WRT for Device Control
You may want to see also

Disassembling the monitor
To disassemble the Viewsonic VG1930wm monitor, start by popping off the cover on the stand using a flat-tip screwdriver or a similar tool. Remove the four Phillips screws that hold the stand to the monitor. Next, remove the two Phillips screws from the back cover.
There are two tabs on the bottom of the monitor where you can insert a plastic opening tool—one on the left and one on the right. Insert the tool and slide it towards the outside while applying some side pressure to loosen the bezel from the case. Continue moving the tool along the opening, starting at the split bottom and working your way up the sides. Removing the bezel will reveal the front panel of the monitor.
Carefully lift the front panel and disconnect the three cables at the back. Remove the LVDS cable by pulling the cable upward, and then disconnect the cable from the power button board with a gentle pull.
With the cables removed, lift the panel away from the chassis and metal case. Remove the seven Phillips screws (all 1/2" except for the center screw, which is 1/4") to access the cage for the electronics. Remove the three 1/4" Phillips screws from the bottom sheet metal.
With these screws removed, you can open the top of the cage and separate it into two halves. This will expose the electronics, with the power board on the left and the video board on the right. The power board is fastened with four 1/4" Phillips screws; remove these to lift the board out of the cage for inspection.
Asus Monitor Power Cord Length Options Explored
You may want to see also

Replacing capacitors
To replace the capacitors on your ViewSonic VA1930wm LCD monitor, you will need to first purchase a repair kit that includes the appropriate capacitors. Ensure that the capacitors are of high quality, such as those manufactured by Panasonic, Nichicon, or Rubycon.
Once you have the necessary capacitors, follow these steps:
- Disassemble the monitor: Remove the cover on the stand using a flat-tip screwdriver or a similar tool. Remove the screws holding the stand to the monitor. Detach the cables from the power button board and the LVDS cable.
- Inspect the power board: Look for any blown or faulty capacitors. Check for bulges on the tops of the capacitors, as well as any charring on the board. Identify the capacitors that need to be replaced.
- Desolder the old capacitors: Use a solder wick or a solder sucker to remove the old capacitors from the power board.
- Replace with new capacitors: Insert the new capacitors into the vacant spots on the power board, ensuring that you match the polarity correctly. Bend the leads of the capacitors towards the logic board to ensure a tight fit.
- Solder the new capacitors: Use a soldering iron to solder the new capacitors into place.
- Reassemble the monitor: Put the monitor back together by following the disassembly steps in reverse.
Note: It is important to be cautious when performing these steps, as they involve working with electrical components. Always ensure that the power is disconnected before handling any internal components. If you are unsure about any part of the process, it is best to consult a professional or seek further guidance.
Choosing the Right-Sized Monitor for Your iMac Pro
You may want to see also

Fixing a no display problem
If your ViewSonic VA1930wm LCD monitor is not displaying anything, there are a few things you can try before contacting the ViewSonic service centre.
First, check that the monitor is powered on and that the power cable is properly seated in the port. The power LED indicator should light up when the monitor is powered on. If the power LED indicator is not lighting up, try plugging the monitor into a different power outlet.
If the monitor is powered on and the power cable is properly connected, the next step is to check your video cables. Make sure that the video cables are properly seated on the monitor and on the source. Test different cables and inputs (e.g. DisplayPort, HDMI, USB-C, VGA, DVI). For testing purposes, avoid using adapters, converters, or docking stations as these can affect the video signal.
If you are still experiencing issues, check the monitor's input. If your monitor has numbered buttons, press 2 to change to the active inputs. If your monitor has a joystick or unmarked buttons, press the joystick or one of the buttons to activate the quick menu, then tap the button corresponding to Input Select.
If the above steps do not resolve the issue, you may need to open the monitor for a visual diagnostic. This will require a flat-tip screwdriver or similar tool to remove the cover. Once inside, check for any burning marks on the PCB, particularly in the high voltage transformer area. If there are any issues, these components may need to be cleaned or replaced.
In some cases, the capacitors may need to be replaced. This can be done by purchasing a repair kit and following the included instructions.
If you are still experiencing issues after trying these steps, you may need to contact the ViewSonic service centre for further assistance.
Monitoring Web Usage: Strategies for Tracking Online Activity
You may want to see also

Soldering capacitors
Preparation and Safety:
Before you begin, ensure you have the necessary tools, including a soldering iron, solder wire, safety glasses, a fume extractor, and a circuit board vise or "helping hands" tool. It's crucial to work in a well-lit area away from flammable materials and to unplug and power off the device before soldering.
Inspecting the Monitor:
When repairing the ViewSonic VA1930wm LCD monitor, the first step is to inspect the monitor and identify the issue. Common problems include a "No Display" issue, a blue power light turning on without any other function working, or symptoms like the screen image disappearing after a few seconds, unusual colours and lines, etc. These issues often point towards a faulty power supply board, and specifically, faulty capacitors on that board.
Disassembling the Monitor:
To access the power supply board, carefully disassemble the monitor. Use a flat-tip screwdriver to pop off the cover on the stand, then remove the screws holding the stand to the monitor. Remove the back cover and use a plastic opening tool to loosen the bezel from the case. Carefully lift the front panel, disconnect the necessary cables, and remove the chassis. This will grant access to the power supply board.
Identifying and Soldering the Capacitors:
Inspect the power supply board for any signs of damage, such as bulging capacitors, burning marks, or charring on the board. Identify the capacitors that need to be replaced. When soldering, it's important to consider the hole position and ensure the circuit board is designed to allow the correct space for capacitor leads. This ensures that mounting does not apply undue stress on the leads, which could lead to short circuits or broken circuits.
When soldering, be mindful of the following:
- Do not use excessive force on the terminals and leads, as this can cause separation and internal contact failure.
- Keep the soldering iron away from the capacitor's vinyl-insulated sleeves.
- Solder temperature and exposure time are crucial; keep the temperature below 200°C and the exposure time to less than 10 seconds to avoid damaging the capacitor.
- Clean the circuit board after soldering to remove excess flux. Do not use solvents like xylene, acetone, or trichlorethylene to clean the capacitors, as they may damage the markings and seals.
Soldering Technique:
Now, let's focus on the soldering technique itself:
- Thread the capacitor leads through the circuit board holes, ensuring the capacitors lie flat and are oriented correctly. Electrolytic capacitors, for example, have a negative lead identified by a "-" or a stripe.
- Bend the leads slightly to keep the capacitors in place.
- Clean the tip of your soldering iron using a wet sponge or brass wire.
- Melt a small amount of solder onto the tip of the iron (tinning the tip) to improve heat transfer.
- Heat the solder pad and the component lead simultaneously for about 2-3 seconds.
- Press the soldering iron tip against the solder pad and the component lead, ensuring maximum contact.
- Feed the solder wire into the heated area until a concave pool of solder forms around the lead.
- Remove the solder wire and the soldering iron, and inspect the joint. It should form a shiny, concave tent around the lead.
- If the solder doesn't adhere, reheat the joint and apply flux to the pad.
- Cut any excess lead using flush cutters, leaving a small amount of solder on the tip of the iron to protect it.
By following these steps, you can successfully solder capacitors when repairing the ViewSonic VA1930wm LCD monitor. Remember to take your time, practice your soldering skills, and always prioritise safety when working with electronics.
Monitoring Home Electricity Usage: Data Collection Methods
You may want to see also
Frequently asked questions
The monitor might be turning on but not displaying anything. This could be due to a faulty LCD panel or a problem with the power inverter section. Check the brightness settings and the OSD menu. If the power indicator light turns orange when the VGA cable is removed, this indicates that the monitor is in standby mode.
The issue could be related to the LCD panel or the power inverter section. Check for burning marks on the PCB, specifically in the high voltage transformer area. If there are any, clean it with a suitable solution and inspect the surrounding components. Also, check for any bulged capacitors in the power section and replace them if necessary.
The primary cause of LCD monitor failure is often faulty capacitors. Examine the capacitors in your monitor and look for any bulges on top, which would indicate that they need to be replaced. Replacing the capacitors will likely solve the issue and extend the life of your monitor.
To disassemble the monitor, start by popping off the cover on the stand using a flat-tip screwdriver or a similar tool. Remove the screws holding the stand to the monitor and the back cover. Use a plastic opening tool to insert into the tabs on the bottom left and right, and slide the tool outwards while applying side pressure to loosen the bezel from the case. Continue moving it along the opening and up the sides to separate the bezel. Carefully lift the front panel and disconnect the cables. You can then proceed to inspect and repair the internal components.


