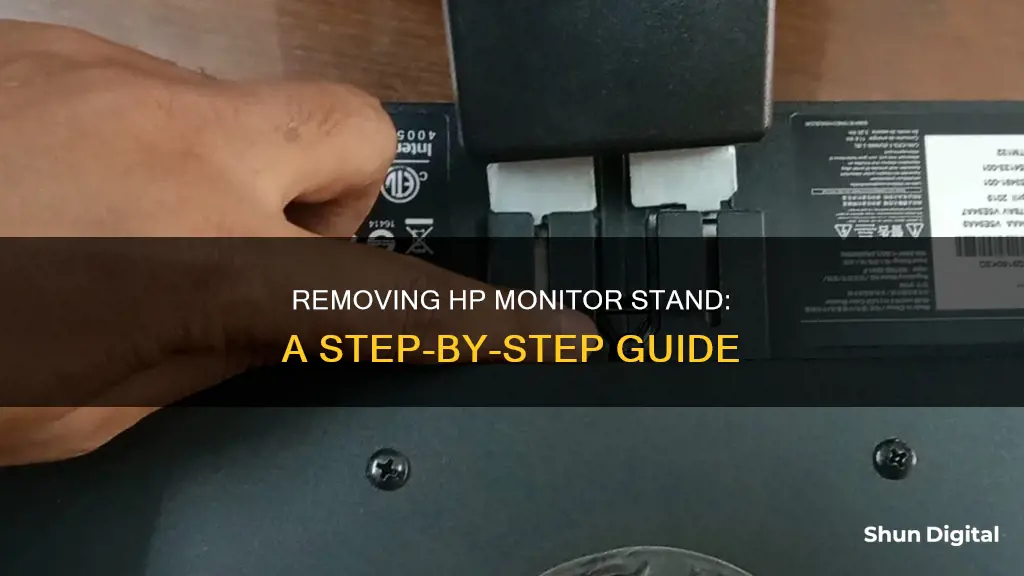
Removing the stand from an HP monitor is a simple process, but it's important to take precautions to avoid damaging your monitor. First, disconnect the monitor's power, signal, and USB cables. Next, lay the monitor face down on a flat surface covered with a protective sheet of foam or a non-abrasive cloth to prevent scratches. Then, depending on your model, you may need to pivot or turn the stand 45 degrees clockwise to remove the lower right mounting screw, and then repeat counter-clockwise to remove the lower left mounting screw. Finally, lift the stand off the monitor. Some models may have a quick-release button that you press while pulling the stand away from the monitor.
What You'll Learn

Disconnect power, signal and USB cables
To disconnect the power, signal, and USB cables from your HP monitor, start by placing the monitor face down on a flat surface. It is important to cover the surface with a protective sheet of foam, a non-abrasive cloth, or a soft microfiber cloth to prevent the screen from getting scratched or damaged.
Once the monitor is securely positioned, locate the power, signal, and USB cables connected to the monitor. Proceed to disconnect and remove each of these cables. Ensure that you handle the cables carefully and avoid any forceful tugging or bending that could damage the connectors or the ports on the monitor.
After disconnecting the cables, you can continue with the next steps of removing the monitor stand. This typically involves releasing a button or lever mechanism and lifting the monitor off the stand. However, the specific steps may vary depending on your HP monitor model.
Always refer to the user manual or seek guidance from official support channels if you are unsure about any part of the process.
Pixel Perfect: Consistent Measurements Across Monitors
You may want to see also

Lay monitor face down on a flat surface
To remove the stand from your HP monitor, you must first lay the monitor face down on a flat surface. This is an important step to ensure the screen doesn't get scratched, defaced, or broken, and to prevent damage to the control buttons. Cover the flat surface with a protective sheet of foam or a non-abrasive, soft, microfiber cloth.
Once the monitor is in position, you can begin the process of removing the stand. This will involve a series of steps that include releasing buttons, removing screws, and gently lifting the stand.
Firstly, you will need to locate and press the release button. This button should be easy to identify and will likely be labelled. Pressing this button will allow you to pull the stand away from the monitor.
In some cases, you may need to pivot the stand in a specific way to access and remove the mounting screws. For example, pivoting the stand 45 degrees clockwise to remove the lower right mounting screw, and then pivoting it 45 degrees counter-clockwise to remove the lower left mounting screw.
After removing all the necessary screws and releasing the button, you can carefully lift the stand away from the monitor. It should come off smoothly without forcing it.
By following these steps, you can safely remove the stand from your HP monitor, ensuring that your monitor remains in optimal condition.
Destroying an LCD Monitor: Step-by-Step Guide
You may want to see also

Pivot stand 45 degrees clockwise
To pivot your HP monitor stand 45 degrees clockwise, first ensure that the monitor is turned off and that all power, signal, and USB cables are disconnected. Next, lay the monitor face down on a flat surface covered by a clean, dry cloth. Now you can start to pivot the stand.
First, pivot the stand 45 degrees clockwise and remove the lower right mounting screw from the back of the monitor. Then, pivot the stand 45 degrees counter-clockwise and remove the lower left mounting screw. After that, remove the two upper mounting screws. Finally, lift the stand off the monitor.
If you want to pivot your monitor screen, rather than the stand, you can do so by raising the monitor to its maximum height and then adjusting the angle of the monitor in the direction of the arrow as indicated on the monitor. Then, carefully rotate the monitor clockwise 90 degrees.
Monitoring Children's Internet Usage: Parenting or Invasion?
You may want to see also

Remove lower right mounting screw
To remove the lower right mounting screw, first disconnect the monitor's signal, power, and USB cables. Then, lay the monitor face down on a flat surface covered by a clean, dry cloth. This will prevent scratches, defacement, and breakage of the screen, as well as damage to the control buttons.
Now, pivot the stand 45 degrees clockwise. You should now be able to remove the lower right mounting screw from the back of the monitor.
After this, you can pivot the stand 45 degrees counter-clockwise and remove the lower left mounting screw.
LCD Monitor Longevity: Dim or Vibrant Display?
You may want to see also

Pivot stand 45 degrees counter-clockwise
To pivot your HP monitor stand by 45 degrees counter-clockwise, you will first need to disconnect and remove the signal, power, and USB cables from the monitor. Then, lay the monitor face down on a flat surface covered by a clean, dry cloth.
Next, follow these steps:
- Pivot the stand 45 degrees clockwise and remove the lower right mounting screw from the back of the monitor.
- Pivot the stand 45 degrees counter-clockwise and remove the lower left mounting screw from the back of the monitor.
- Remove the two upper mounting screws.
- Lift the stand off the monitor.
Now that you have removed the stand, you can pivot the monitor stand by 45 degrees counter-clockwise.
Note that some HP monitors may have different procedures for removing the stand, and you should always refer to the user manual for specific instructions.
Energy Monitor Malfunction: How to Spot the Signs
You may want to see also
Frequently asked questions
Place the monitor face down on a flat surface covered with a protective sheet of foam or a non-abrasive cloth. This will prevent the screen from getting scratched or broken and protect the control buttons. Then, press the quick-release button and pull the stand away from the monitor.
Yes, before you begin to disassemble the monitor, ensure that it is turned off and that all power and signal cables, as well as any USB cables connected to the monitor, are disconnected.
Depending on your model, you may need to pivot or turn the stand 45 degrees clockwise to remove the lower right mounting screw from the back of the monitor. Then, pivot or turn the stand 45 degrees counter-clockwise and remove the lower left mounting screw.


