If you're experiencing issues with your camera's autofocus, you may need to recalibrate your camera's focus. This can be done using a sheet of paper, a ruler, and a flat surface. First, create a focus calibration test chart by drawing a thin line on a sheet of paper. Place the paper on a flat surface and position a ruler on either side of the line, ensuring that the rulers are at the same measurement point and do not move the paper. Take a picture of this setup and review the image – if the numbers on the ruler are sharper than the line, your camera's autofocus needs adjusting. You can then adjust your camera's autofocus settings until the line is in focus.
| Characteristics | Values |
|---|---|
| What is a focus chart? | A target for your camera to lock on to. |
| Why use a focus chart? | To get the best focus possible, especially when you have a shallow depth of field. |
| When to use a focus chart? | When you have a blurry image, or when you want to test your camera's autofocus or calibrate your lenses. |
| How to use a focus chart? | Place the focus chart in front of your camera, making sure it fills up the entire frame. |
| What to look for when using a focus chart? | Check whether your camera lens has a consistently sharp focus across the frame or if it becomes blurry in certain areas. |
| How to adjust the focus? | Go into your camera's menu and select "AF" and then "AF Micro Adjustment." Move down to "Adjust by Lens." A graph should appear, which you can use to pull the focus back or span it out. |
| What if the image is still blurry? | Continue adjusting the focus settings and taking photos until you achieve the desired sharpness. |
| Any tips for successful calibration? | Adjust your autofocus slowly, watch videos for help, and use the RAW files of your test images. |
What You'll Learn
![]()
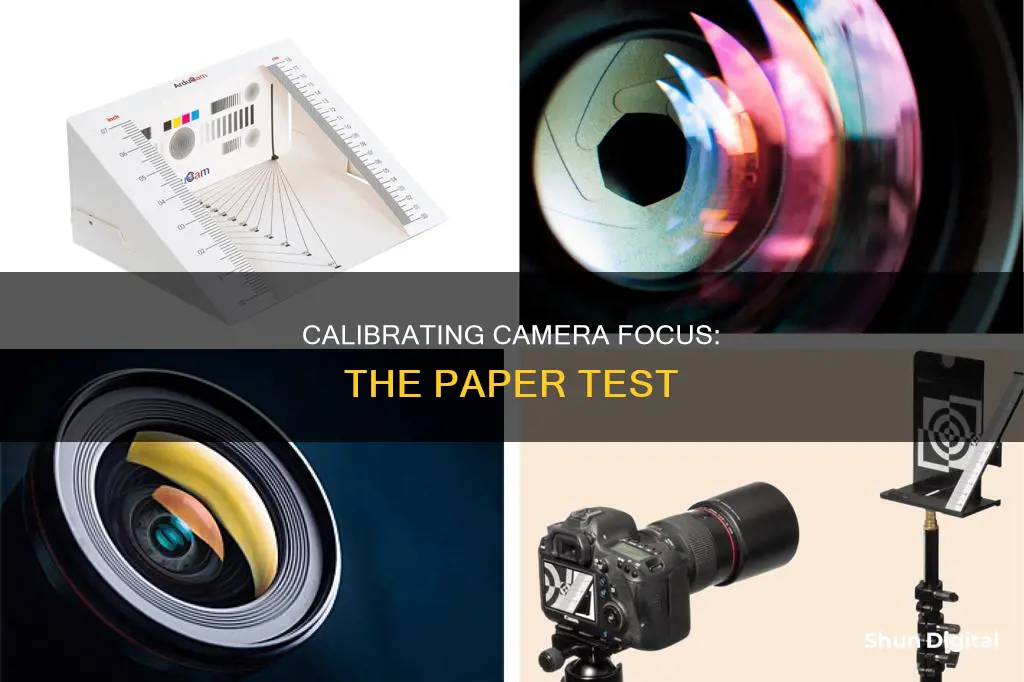
Set up a target area
To set up a target area for calibrating your camera's focus, you will need a few items. Firstly, you will need a DSLR camera with Live View mode capability. You will also need a lens, a stable tripod, and a flat vertical surface in a brightly lit area.
For the target itself, you can use a plain sheet of paper or print out a focus test chart on regular letter-sized paper. If you opt for a focus test chart, make sure to use regular paper, not glossy photo paper. Tape the paper to the wall, ensuring that the wall is straight and vertical. The focus chart should be placed at eye level, directly across from the camera.
The distance between the camera and the target depends on the focal length of the lens. For a 50mm f/1.4 lens, the distance should be approximately 5 to 7 feet (1.5-2 meters). If you are using a wide-angle lens, stand closer, and if you are using a telephoto lens, stand further away. The goal is to be close enough to achieve a shallow depth of field.
Once you have set up the target area, you can proceed to calibrate your camera's focus by taking a series of test photos.
Understanding Close-Up Mode: Getting Creative With Your Camera
You may want to see also
![]()
Place rulers next to the line
Once you have your camera focused on the line, it's time to set up your rulers. Place two rulers on either side of the line, being very careful not to disturb anything on the table as you do so. Ensure that the rulers are placed at the same point of measurement on the line. For example, you could set them up at the 15cm or 20cm point.
The purpose of this step is to provide a clear reference point for adjusting your camera's focus. By comparing the focus on the line with the focus on the rulers, you can determine if your camera's autofocus needs to be corrected. It is important to maintain a stable setup and avoid any movement during this process.
After placing the rulers, you can proceed to capture an image. Examine the resulting photograph, paying close attention to the focus on the line and the numbers on the rulers. If the numbers on the rulers appear sharper than the line, it indicates that your camera's autofocus is drawn too far away from the center. This observation will guide your adjustments in the camera's settings.
By following these steps and making the necessary adjustments, you can improve the accuracy of your camera's autofocus and ensure that your images are crisp and clear.
Eufy Camera Charging: Know When It's Fully Charged
You may want to see also
![]()
Take a picture
Now that you've set up your target area, it's time to take a picture. You want to photograph your rulers and lines until you're satisfied with the setup. It's important to keep the camera completely still while taking the picture, so consider using a tripod and a timer to avoid camera shake.
Make sure that the lighting is good and that your camera is not tilting to one side. You can use a level to check this.
Take your first shot with autofocus turned on so that the middle of your calibration chart or book cover is in focus. Then, compare this shot with how it looked in the viewfinder. If your final image is back-focused or front-focused, you'll be able to tell by seeing where on your calibration chart or ruler the focus is falling.
Take multiple shots at different angles of attack. A lower angle shows the depth of the in-field focus most clearly, but you need to be careful that the autofocus sensor does not see the top of the chart instead of the intended target.
Keep checking that you're square to the chart and that the camera is not moving between achieving focus lock and taking the picture.
Once you've taken your first shot, it's time to adjust your focus. Open your camera's autofocus settings and make the necessary adjustments. If your focus is falling slightly farther away from your centre (back focus), you'll want to add a positive correction. If your focus is falling in front of where you want it (front focus), add a negative correction.
Continue taking test shots and adjusting your correction amount until your centre focus point is crisp both in your viewfinder and in your final image.
Best Compact Cameras for RAW Photography Enthusiasts
You may want to see also
![]()
Go into your camera's menu
Once you have set up your target area, rulers, and taken a picture, you will need to go into your camera's menu to correct the focus.
To do this, select "AF" and then "AF Micro Adjustment". Move down to "Adjust by Lens". A graph should appear at this point. Using this graph, you can pull the focus back or zoom it out depending on how your initial image came out.
Different camera manufacturers have different names for this setting. In Nikon cameras, it is often called "AF fine-tune", while in Sony and Canon cameras, it is typically referred to as "AF micro-adjustment".
If your focus is falling slightly farther away from your centre (back focus), you will want to add a positive correction (+1-15). If your focus is falling in front of where you want it (front focus), add a negative correction (-1-15).
Continue to take test shots and adjust your correction amount until your centre focus point is crisp both in your viewfinder and in your final image.
Finding the Camera Raw Dialog Box
You may want to see also
![]()
Fine-tune your focus
To ensure your DSLR camera produces the sharpest autofocus photos possible, you must periodically fine-tune your lenses. This process involves taking a series of photos in a controlled way, so you can see exactly how your focus is off, and then correct it using your camera settings.
Step 1: Set up your target area
You can buy a focus chart, or make your own. To make your own, draw a thin line on a piece of card or paper. You can also add a small piece of paper with an "X" drawn on it to the centre of the line. Place your chart on a table or other flat surface. Ensure the chart is stationary as any movement will affect your results.
Step 2: Set up your rulers
Once your camera has focused on the line, place two rulers on either side of it. Be careful not to move anything on the table as you do this. The rulers should be placed at the same distance along the line, e.g. the 15cm point.
Step 3: Take a picture
Take a picture of your setup. If some of the numbers on your rulers are sharper than the line, this means your camera's autofocus is off-centre. You will need to adjust this in your camera settings.
Step 4: Adjust your camera settings
Go into your camera's settings and select "AF" and then "AF Micro Adjustment". Then select "Adjust by Lens". A graph should appear. Use this to pull the focus back or zoom out, depending on how your initial image came out.
Step 5: Take another picture and adjust as needed
Take another picture. If your line is now in focus, you're done. If not, go back into your camera settings and continue to adjust until you achieve the desired result.
Focusing Swann Cameras: Tips for Crisp, Clear Surveillance Footage
You may want to see also
Frequently asked questions
You can create your own camera focus calibration chart by drawing a thin line on a piece of paper or poster board. Place the paper on a table or another flat surface, ensuring that it doesn't move. You can also use a pre-made focus chart, such as the Siemens star or spoke target, which can be printed or purchased.
Once your camera is focused on the line, place two rulers on either side of the line, touching the same measurement point (e.g., 15cm or 20cm). This setup will help you determine if your camera's autofocus needs adjustment.
Go into your camera's menu and look for autofocus settings, often labelled as "AF Fine-Tune" or "AF Micro Adjustment." From there, you can make adjustments to pull the focus back or span it out, depending on your initial results. Take multiple test shots and adjust as needed until you achieve the desired focus.