Amcrest Surveillance Pro is a software that allows users to play back recordings from their Amcrest cameras. Users can set their devices to record on motion detection or continuous recording schedules. The software also allows users to set up recording schedules for specific days and times. The Amcrest View Pro app, on the other hand, allows users to play back motion detection, continuous recording, or smart events if they have an Amcrest AI camera connected. It's important to note that the app cannot play back recordings from PC-NVR, FTP/NAS devices, etc. To play back recordings stored on a Synology NAS Drive, users can connect their Amcrest camera to the drive using the Synology Surveillance Software.
| Characteristics | Values |
|---|---|
| Software | Amcrest Surveillance Pro |
| App | Amcrest View Pro |
| Recording Types | Motion detection, continuous recording, smart events |
| Recording Schedule Types | Regular, Motion Detection, Alarm, Motion Detection & Alarm |
| Recording Storage | MicroSD card, PC-NVR, NAS |
| Viewing Recordings | Navigate to Playback, select device, select recording type, select date |
| Playback Options | Slow Motion, Play/Pause, Fast Forward, Forward, Snapshot, Record, Audio, Close Window |
What You'll Learn
![]()
Using Amcrest Surveillance Pro
Amcrest Surveillance Pro is a free software provided by Amcrest that allows you to access all your devices in one central location without the use of a plugin or web browser. It is the most stable and recommended method of accessing your devices from your computer.
To playback recorded material in the Amcrest Surveillance Pro software, start by navigating to the Home Page and clicking on Playback in the Operation menu. Next, select the device you would like to view playback on from the Device menu, ensuring the checkbox next to the device name and group name are checked.
Now, locate the search menu on the bottom left side of the playback interface. Click on the device you would like to choose from in the Device menu, and then select the type of recording you would like to access from the Video Type dropdown menu. To view all recordings, simply select All Records from the dropdown list.
All recordings will be displayed in a 24-hour time frame format. To access recordings from a specific date, click on the calendar option in the Time field and select a start and end date. Once a proper date has been chosen, click on the Search button and the recordings will populate in the time bar. A record of each event will be displayed in the records field. Finally, select a recording from the records field and click the playback button to start viewing the footage.
The Amcrest View Pro app is also available for mobile devices, allowing you to playback motion detection, continuous recording, or smart events if you have an Amcrest AI camera connected. Please note that the app cannot view recordings from PC-NVR, FTP/NAS devices, etc. The playback option in the app is specifically for viewing NVR/DVR and MicroSD card recordings stored on the device.
Body-Cam Battery Life: How Long Does It Last?
You may want to see also
![]()
Using the Amcrest View Pro app
The Amcrest View Pro app allows you to play back recordings from your Amcrest IP Cameras, HDCVI DVRs, and NVRs. The app is available for both iOS and Android devices.
To use the playback feature on the Amcrest View Pro app, first, open the app and click on the menu icon. From the menu, click on 'Playback'. Next, tap on the (+) icon in the window that you wish to view, and then select the device you would like to access. The events stored on the device will now be displayed in the timeline. You can use the slider on the timeline to scroll through specific times when events have occurred.
If you are using the Amcrest View Pro on iOS, you can only search for recordings from the last 24 hours. To view recordings from other days or to filter between different recording types (continuous, alarm, motion, smart), tap on the calendar option. If a recording is available for a particular day, the day will be highlighted on the calendar. Tap on the day you wish to view and click 'OK' to load the recordings.
You can then play the recording, and use the playback menu options to play it in slow motion, pause, fast forward, or skip a recording block. You can also take a snapshot of the recording or record a video of the recording.
Pentax Raw Files: What's the Extension?
You may want to see also
![]()
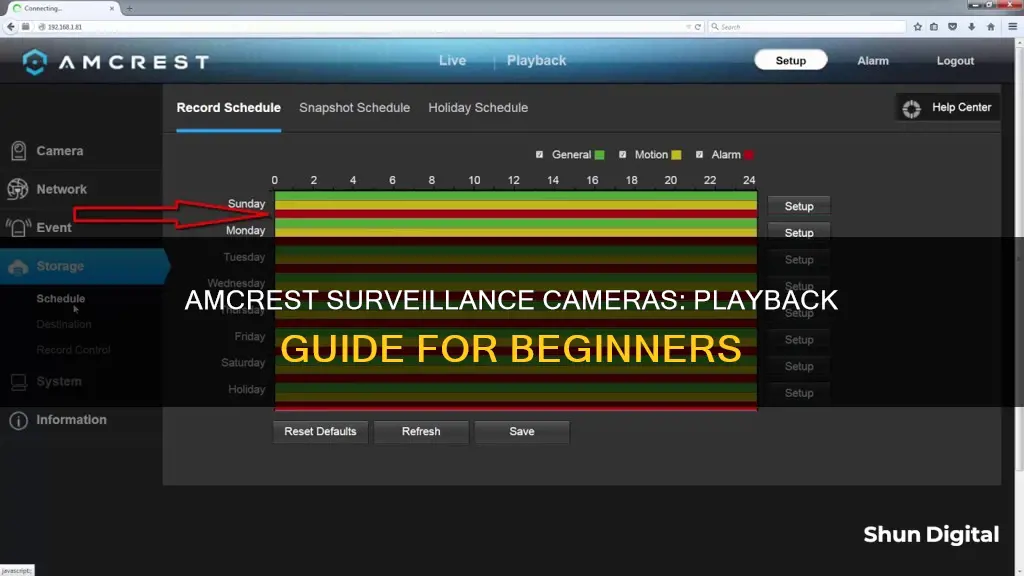
Setting up recording schedules
To set up recording schedules in Amcrest Surveillance Pro, you must first establish a microSD card or PC-NVR to store the recordings. Once you have set up a storage device, follow the steps below:
- Navigate to the Home Page and click on the Device CFG icon in the settings menu.
- Select the device you wish to configure.
- In the Storage field, click to set up your desired recording schedule.
- You will see several fields listed in this menu:
- Regular: Sets your device to continuously record, 24/7. This field is designated by a green color in the software.
- MD: Motion Detection recordings; the device will record when motion is detected. This field is yellow in the software.
- Alarm: The device will only record when a specific alarm is triggered. This field is red in the software.
- MD&Alarm: Combines both motion detection and alarm settings. This field is blue in the software.
- Click on the icon next to the day you want to schedule your recording.
- Set the recording periods for each day and each recording type. You can set up to six periods.
- Select the record type (Regular, Motion, Alarm, MD&Alarm, Smart) and the times for your schedule. If you want to record continuously, the period will be 00:00:00 – 23:59:59.
- Choose the days you want the schedule to apply to, then click Save. To apply the schedule to all days, click the "All" button.
- On the main record menu, click Apply and Save to save the schedule to the software.
US-Made Cameras: Which Brands Keep Production Stateside?
You may want to see also
![]()
Connecting to a NAS drive
To connect your Amcrest cameras to record onto your NAS Drive, follow these steps:
- Connect your camera either via an Ethernet cord or WiFi and log into the Amcrest Web UI with your usual credentials.
- Navigate to the "Setup" tab at the top right of the page.
- Click on "Storage", then "Destination" to view your "Path settings".
- Under "Path", change the record setting to "NAS" for both snapshot and record. Click "Save".
- In the same section, click on the "NAS" tab. Check the "Enable" box and input your NAS setup IP address in the "Server Address" field. Input the file path as seen in the NAS on the "Remote Directory" field. Click "Save".
- Log into your NAS using its IP address.
- Enter the "Package Center" and download "Surveillance Station". This web-based application manages IP cameras to safeguard your environment.
- After installing "Surveillance Station", click on the software to open it in a separate tab.
- Log into the Surveillance Station and navigate to "IP Camera".
- Click "Add" to add your camera to the software.
- Select "Quick Setup" and then "Next" to add your IP camera.
- Input the information required to run the camera on the software and click "Test Connection".
- Once it succeeds, click "Finished".
- After adding the camera, go to Recording to access all the recordings from the camera.
Please note, the Amcrest View Pro app cannot view recordings from FTP/NAS devices. The playback option in the app is only used for viewing NVR/DVR and MicroSD card recordings stored on the device.
The Raw Camera Filter: Where Did It Go?
You may want to see also
![]()
Multi-device viewing
Amcrest offers a few methods to view multiple cameras simultaneously, including Amcrest Surveillance Pro, Amcrest Cloud, and Blue Iris.
Amcrest Surveillance Pro
Amcrest Surveillance Pro is a free software used to manage a small number of security surveillance devices. It supports up to 50 devices and is compatible with Windows 7 or later, and Mac OS X version 10.7.5 (Lion) or later.
To playback recordings using Amcrest Surveillance Pro, follow these steps:
- Navigate to the Home Page and click on Playback in the Operation menu.
- In the Device menu, select the device you want to view and ensure the checkbox next to the device name and group name are checked.
- Locate the search menu on the bottom left of the playback interface and select your desired device.
- Choose the type of recording you want to access from the Video Type dropdown menu. To view all recordings, select "All Records."
- Recordings will be displayed in a 24-hour time frame format. Use the calendar option to select a specific date range for your desired recording.
- After choosing the correct date, click the Search button. The recordings will populate in the time bar, and each event will be listed in the records field.
- To playback a recording, simply select it from the records field and click the play button.
Amcrest Cloud
Amcrest Cloud stores your recordings in the cloud and allows you to view cameras live from any location with internet access. With a free account, you can connect your first camera and record up to 4 hours of rolling video on the server, with a limited live streaming rate of 2 hours per month. Other subscription plans offer unlimited live streaming and extended storage options of 7, 14, or 30 days.
Blue Iris
Blue Iris is a video security desktop application capable of connecting your Amcrest camera to your computer for capture and viewing. It offers a 15-day trial and is available for purchase.
For more information on multi-device viewing with Amcrest, refer to their official website for detailed guides and user forums.
GoPro's First Steps: The Original Camera's Story
You may want to see also
Frequently asked questions
To playback recordings in the Amcrest Surveillance Pro software, go to the Home Page and click on 'Playback' in the Operation menu. Select the device you would like to view in the Device menu and choose the type of recording you want to access from the Video Type dropdown menu. To view all recordings, select 'All Records'. Choose a start and end date for the recording you want to access and click 'Search'. The recordings will then appear in the time bar.
To set up recording schedules, first establish a microSD card or PC-NVR to store the recordings. Then, navigate to the Home Page and click on the Device CFG icon in the settings menu. Choose the device you wish to configure and select the storage field. You can now set up recording schedules for 'Regular' (continuous recording), 'MD' (motion detection), 'Alarm', or 'MD&Alarm'.
Open the app and click on the menu, then click on 'Playback'. Tap on the (+) icon in the window you wish to view and select the device you would like to access. The events stored on the device will be displayed in the timeline, where you can scroll through specific times. To view recordings from other days, tap on the calendar option.
First, connect your camera via an Ethernet cord or WiFi and log into the Amcrest Web UI. Navigate to 'Setup' and then 'Storage', and click on 'Destination' to view your 'Path' settings. Under 'Path', change the record setting to 'NAS' and click 'Save'. Log into your Synology NAS using its IP address and enter the 'Package Center' to download 'Surveillance Station'. After installing, navigate to 'IP Camera' and click 'Add' to add your camera to the software.