Performing a monitor self-test is a great way to diagnose and troubleshoot issues with your monitor. Most modern monitors come with a built-in self-test feature that can be accessed by pressing a few buttons on the monitor's control panel. This feature checks the monitor's display, colour, and clarity by displaying a series of solid colours, patterns, and texts. These tests help identify any issues with the monitor's hardware or software, such as damaged pixels, incorrect colour balance, or incorrect resolution settings.
| Characteristics | Values |
|---|---|
| When to perform a monitor self-test | When you notice a display issue, such as a blank screen, fuzzy or blurry image, flickering, distortion, horizontal or vertical lines, color banding, or bubbles on the screen. |
| Purpose of the monitor self-test | To help identify if the issue is due to an inherent problem with the monitor or the computer and video card. |
| Monitor brands with self-test feature | Dell, Sony |
| Steps to perform the self-test | 1. Turn off the monitor and computer. 2. Disconnect the video cable(s) from the back of the computer and/or monitor. 3. Turn on the monitor. 4. Perform specific actions, such as pressing and holding a certain button or buttons for a few seconds, depending on the monitor model. 5. Observe the screen for any abnormalities or error messages. |
What You'll Learn

Turn off your monitor and computer
Before performing a monitor self-test, it is important to turn off your monitor and computer. This is a crucial step to ensure the accuracy of the self-test results and to isolate any issues related to the monitor itself. Here are some detailed instructions and considerations for turning off your monitor and computer:
Firstly, locate the power buttons on both your monitor and computer tower. The power buttons are usually found on the front or back of the monitor's bezel and on the front or top of the computer tower. If you're using a laptop, the power button is typically on the keyboard deck or along one of the sides.
Once you've located the power buttons, press and hold them for a few seconds until the devices power down completely. On some monitors and computers, you might need to press and hold the power button for a few seconds to trigger the power-off process. Make sure you do this for both devices.
If your monitor or computer has a physical power switch, make sure to flip it to the "Off" position. This is usually located on the back of the device and ensures that the power is completely cut off.
After turning off the devices, wait for a few moments to ensure that any residual power is discharged. This is especially important for older CRT monitors, as they may take a few seconds to fully power down.
If your monitor has multiple power sources, such as a power button and a power switch, make sure to turn off both. Some monitors may also have a power brick or adapter with a power button or switch, so ensure that is turned off as well.
In the case of a laptop, make sure to close the lid after turning it off. This will ensure that the laptop doesn't accidentally turn on or enter a sleep state.
Additionally, unplug the power cables from the power outlets or power strips to ensure that no power is reaching the devices during the self-test. This step is especially important if you plan to open up your computer or monitor for further troubleshooting.
By following these steps, you will have successfully turned off your monitor and computer, which is the first crucial step in performing a monitor self-test. Remember to refer to your specific monitor and computer's user manuals for any additional instructions or precautions.
Ankle Monitor Buttons: What's Their Function?
You may want to see also

Unplug the video cable
Unplugging the video cable is a crucial step in performing a monitor self-test. This step helps isolate the issue and determine whether the problem lies with the monitor itself or the video signal transmission. Here's a detailed guide on unplugging the video cable during the self-test process:
- Power off your computer and the monitor: Before proceeding, ensure that both your computer and the monitor are turned off. This step is important as it allows for a clean reset of the devices.
- Locate the video cable: The video cable is the connection between your computer and the monitor. It is usually located at the back of your computer and monitor. The cable can be identified by its distinct connectors, which are typically white for digital and blue for analog.
- Unplug the video cable: Once you have located the video cable, carefully unplug it from the back of your computer. Ensure that you only unplug the cable from the computer end and not from the monitor end. This step is crucial as it triggers the monitor to enter a self-test mode, allowing it to diagnose any potential issues.
- Verify the disconnection: After unplugging the video cable, take a moment to verify that the connection is indeed broken. This can be done by gently tugging on the cable to ensure that it is not loosely connected. A complete disconnection is necessary for an accurate self-test.
- Prepare for the self-test: With the video cable unplugged, your monitor should now be in self-test mode. Depending on the monitor model, you may need to press and hold certain buttons on the front panel to initiate the self-test. Refer to your monitor's user manual for specific instructions.
- Observe the monitor's behaviour: Once the self-test is initiated, pay close attention to the monitor's behaviour. It may display coloured screens, patterns, or text. Look out for any abnormalities, such as a blank screen, flickering, or distorted colours.
- Interpret the results: If the self-test displays a message like "Self-Test OK" or similar, it indicates that your monitor is functioning properly. On the other hand, if the monitor displays an error message or continues to show abnormalities, it may suggest an issue with the monitor's hardware or software.
- Reconnect the video cable: After completing the self-test, turn off the monitor and reconnect the video cable to both the computer and the monitor. Ensure that the connection is secure and firm.
- Power on the devices: Finally, turn on both your computer and the monitor to resume normal usage. Observe if the previous issues persist or if there are any improvements.
Remember, unplugging the video cable is just one aspect of performing a monitor self-test. For comprehensive instructions on the entire process, refer to your monitor's user manual or seek guidance from the manufacturer's support resources.
Monitoring Supply Chain Performance: Strategies for Success
You may want to see also

Press and hold the monitor's menu button
To perform a monitor self-test, you will need to press and hold the monitor's menu button. This process will differ depending on the make and model of your monitor.
For example, for a Dell U2410 Flat Panel Monitor, you will need to:
- Ensure that the screen is clean and free of dust particles.
- Unplug the video cable(s) from the back of the computer or monitor.
- Then, press and hold the first and fourth buttons on the front panel simultaneously for 2 seconds. A grey screen will appear.
- Carefully inspect the screen for abnormalities.
- Press the fourth button on the front panel again. The colour of the screen will change to red.
- Inspect the display for any abnormalities.
- Repeat the previous two steps to inspect the display in green, blue, and white screens.
- The test is complete when a white screen appears. To exit, press the fourth button again.
For a Dell Monitor, the process is slightly different:
- Your monitor screen should be neat and clean.
- Unplug the video cables.
- Press and hold button 1 for 5 seconds until a grey screen appears.
- Press button 1 on the front panel again. The colour changes to red.
- Inspect the screen for any abnormalities.
- Repeat the previous two steps to inspect the screen.
- The test is complete when a white screen appears.
- To exit, press button 1.
It is important to consult your specific monitor's user manual for the correct process to perform a monitor self-test.
How to Identify Your Monitor: LCD or CRT?
You may want to see also

Observe the floating dialog box
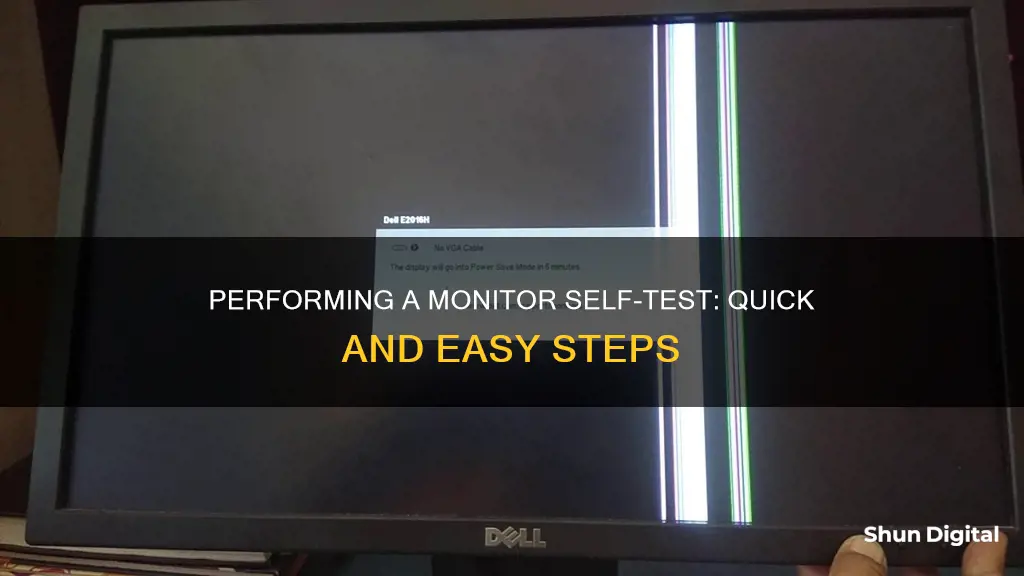
Once you have turned on the monitor, you should see a floating dialog box appear on the screen. This box will be displayed against a black background and will indicate that the monitor is working correctly. The power LED will remain blue while in self-test mode. Depending on the selected input, one of the dialogues will continuously scroll through the screen.
The floating dialog box will also appear during normal system operation if the video cable is disconnected or damaged. If you see this box during normal operation, it is an indication that your video cable may be damaged or disconnected.
If the floating dialog box does not appear, and your monitor screen remains blank, this may indicate that your monitor is not functioning properly. In this case, you should check your video controller and computer system.
Choosing the Right Monitor: Size Considerations
You may want to see also

Reset your monitor
Resetting your monitor to factory settings can be done through the on-screen display (OSD) menu. This can be useful if you are experiencing issues with your monitor's display, such as flickering, blurry images, or no display at all.
- Turn off both your computer and the monitor.
- Unplug the video cable from the back of your computer. For Dell monitors, it is recommended to remove both the Digital (white connector) and the Analog (blue connector) cables.
- Turn on your monitor.
- A floating dialog box should appear on the screen if the monitor is working correctly and cannot detect a video signal.
- Use the on-screen menu to reset the monitor to factory settings.
- Turn off the monitor and reconnect the video cable.
- Turn on both your computer and the monitor.
If you are still experiencing issues with your monitor, you may need to perform a self-test or contact customer support for further assistance.
It is important to refer to your specific monitor's user manual for detailed instructions on performing a factory reset, as the process may vary slightly between different models and brands.
LCD Monitors: Compatible with All RAM Modules?
You may want to see also
Frequently asked questions
Dell monitors have a self-test feature called STFC (Self-Test Feature Check) that allows you to check if your monitor is functioning properly. Here are the steps to perform a self-test:
- Turn off your computer and the monitor.
- Unplug the video cable from the back of your computer and monitor.
- Turn on your monitor.
- Press and hold the monitor's menu button for 10-15 seconds.
- Release the button and wait for the self-test to run.
If your monitor fails the self-test, it may indicate a problem with the hardware or software. Try the following troubleshooting steps:
- Check the monitor's power cable and ensure it is plugged in correctly.
- Check the video cable and ensure it is connected securely to both the monitor and computer.
- Update your graphics card drivers.
- Check the monitor's resolution settings.
- If none of these steps work, contact Dell customer support.
Dell monitors have a built-in diagnostic tool called BIST (Built-in Self-Test) that helps determine if any screen abnormalities are due to the monitor or the computer and video card. Here are the steps to perform a BIST:
- Ensure your monitor screen is clean and free of dust particles.
- Unplug the video cables from the back of the computer or monitor.
- Press and hold the first and fourth buttons on the front panel simultaneously for 2 seconds until a grey screen appears.
- Press the fourth button again to change the colour of the screen to red.
- Inspect the screen for any abnormalities.
- Repeat the previous step to inspect the screen in green, blue, and white.
- The test is complete when a white screen appears. Press the fourth button again to exit.
Here are the steps to perform a self-test on a Sony LCD monitor:
- Turn off the monitor.
- Disconnect the video cable that connects the monitor to the computer.
- Ensure the monitor is plugged into a working AC outlet.
- Turn on the monitor.
- The Power indicator light will turn on and green, and a "CABLE DISCONNECTED" box will appear with four colour bars (red, green, blue, and white). This indicates the LCD is functioning properly.
- Turn off the monitor, reconnect the video cable, then turn on and use the monitor as normal.


