When it comes to cropping images, Adobe Camera Raw offers a range of tools and options to help you achieve the desired result. One common requirement is to maintain the original aspect ratio of the image while cropping, and this can be achieved through a few simple steps. Firstly, by pressing Ctrl-A on Windows or Command-A on a Mac, you can select the entire photo and put a selection around it. This is an important initial step as it allows you to work on the image without altering the original pixels.
The next step is to go to the Select menu and choose Transform Selection. This feature enables you to resize the selection area without actually resizing the photo within, allowing you to maintain the original aspect ratio. By holding the Shift key while dragging a corner point, you can ensure that the aspect ratio remains unchanged. Once you're happy with the selection, simply press Return on a Mac or Enter on Windows to finalise the transformation.
With the selection now determining the crop area, you can proceed to the Image menu and select Crop to apply the changes. Finally, press Ctrl-D on Windows or Command-D on a Mac to deselect, and your cropped image will retain the same aspect ratio as the original photo.
| Characteristics | Values |
|---|---|
| Software | Adobe Camera Raw, Adobe Photoshop, Adobe Lightroom, Adobe Bridge |
| File types | Raw, JPEG, TIFF |
| Keyboard shortcut to select Crop tool | C |
| Keyboard shortcut to select Transform Selection | Shift |
| Keyboard shortcut to complete transformation | Return (Mac) / Enter (PC) |
| Keyboard shortcut to deselect | Command-D (Mac) / Ctrl-D (PC) |
| Keyboard shortcut to select Crop tool in Lightroom | R |
| Keyboard shortcut to apply crop and dismiss tool | Return (Mac) / Enter (PC) |
| Keyboard shortcut to dismiss crop tool without applying crop | Escape |
| Keyboard shortcut to reset crop | Command + Option + R (Mac) / Control + Alt + R (PC) |
| Keyboard shortcut to toggle crop orientation | X |
| Keyboard shortcut to toggle Constrain Aspect Ratio lock | A |
| Keyboard shortcut to apply aspect ratio while expanding crop to image bounds | Option (Mac) / Alt (PC) |
What You'll Learn
- Use the Crop tool in the Develop Module to choose between “As shot” and “Original”
- Use the Straighten tool to automatically straighten the image
- Use the Crop Tool in Camera Raw to select a specific aspect ratio
- Use the Custom Crop option to set a custom aspect ratio
- Use the Clear Crop option to cancel the crop and restore the original image
![]()
Use the Crop tool in the Develop Module to choose between “As shot” and “Original”
When using the Crop tool in the Develop Module, you have the option to choose between "As shot" and "Original". Selecting "As shot" will give you the in-camera cropped version of your image, whereas choosing "Original" will provide the full-frame version of your RAW file. This feature is available in Adobe Camera Raw and Lightroom Classic.
In Lightroom Classic, the Crop tool is represented by a rectangle icon and can be accessed by pressing the "R" key on your keyboard. When activated, you will see the adjustment panels for the tool, along with an outer frame surrounding your image that has handles on the corners and halfway along each side. By default, the aspect ratio is set to "Original" and locked, ensuring that any changes made during cropping or straightening maintain the original proportions of your photo.
If you wish to change the aspect ratio, click on the two arrows next to the word "Original" and select from the drop-down menu. You can choose from a list of preset aspect ratios or create your own custom ratio by selecting "Enter Custom". This allows you to input your desired values for a customised aspect ratio.
It is important to note that the Crop tool in Lightroom Classic only commits to a specific aspect ratio. The size of your image will be determined during the exporting process or when using the output modules. Additionally, Lightroom creates a new version of your photo, so you always have the original uncropped image as a reference.
Minolta X-700: What Battery Powers This Classic Camera?
You may want to see also
![]()
Use the Straighten tool to automatically straighten the image
To automatically straighten an image using the Straighten tool, follow these steps:
- In the Camera Raw dialog box, select the Straighten tool or simply press the 'A' key on your keyboard.
- Drag the Straighten tool in the preview image to baseline horizontal and vertical.
- Double-click the Straighten tool in the toolbar or, with the Straighten tool selected, double-click anywhere in the preview image. Alternatively, with the Crop tool selected, press the Command key (Mac OS) or Ctrl key (Windows) to temporarily switch to the Straighten tool, then double-click anywhere within the preview image.
The Straighten tool is a great way to quickly and easily adjust the orientation of your image, ensuring the scene's horizontal and vertical lines are straight and level. This is especially useful when your image has a slight tilt or crooked horizon due to the angle at which the photo was taken or a lack of proper alignment.
Additionally, there are online tools and editing software that can help you straighten images quickly and accurately. These tools often involve uploading your image, selecting a reference line or using guideline tools, and then allowing the software to adjust the image accordingly.
GoPro Charging Time: How Long Until Your Camera's Ready?
You may want to see also
![]()
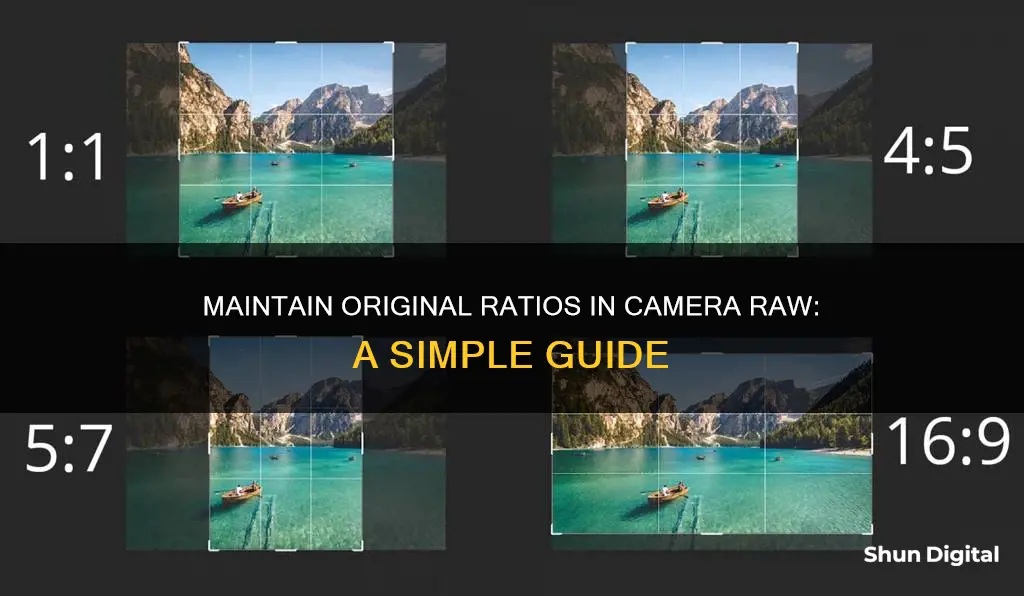
Use the Crop Tool in Camera Raw to select a specific aspect ratio
To use the Crop Tool in Camera Raw to select a specific aspect ratio, first, select the Crop tool by clicking the "Crop" button in the toolbar on the right side of the "Camera Raw" dialog box. This will automatically activate the Crop Tool.
Next, decide whether to draw a constrained or unconstrained bounding box for the area to be cropped. A bounding box is the area you want to keep within the image when you crop the image. Image areas outside the bounding box will be removed.
By default, the bounding box applied when you first activate the Crop Tool selects the entire image. You can adjust the size of the bounding box by hovering your mouse pointer over the bounding box resizing handle that corresponds to the direction in which you want to resize it. The mouse pointer icon will turn into a straight, double-pointed arrow. Then, click and drag inward or outward to change the size of the bounding box and release the mouse when it is at the desired location. Repeat this step as needed until you have a bounding box of the desired size.
To lock or unlock the aspect ratio when changing the size of the bounding box, click the "Constrain Aspect Ratio" button in the "Crop" tab in the panel to the left of the toolbar to toggle its lock icon on or off. If the icon looks locked, the selected aspect ratio will be applied to the bounding box when changing its size. If the icon looks unlocked, you can freely change the aspect ratio when adjusting the size of the bounding box.
To select a specific aspect ratio, choose a numeric ratio from the "Preset" drop-down menu. Alternatively, to specify a custom numeric ratio, select the "Custom Ratio..." command from the drop-down menu to open the "Custom Ratio" dialog box. Enter the height-to-width crop ratio in the two fields provided and click "OK".
Once you are satisfied with the crop, press "Enter" on Windows or "Return" on Mac to apply the crop. To cancel the crop, click the "Reset Crop" button in the upper-right corner of the "Crop" tab or press the "Esc" key on your keyboard.
In-Camera Noise Reduction: RAW Files Affected?
You may want to see also
![]()
Use the Custom Crop option to set a custom aspect ratio
To set a custom aspect ratio, you can use the Custom Crop feature in Adobe Lightroom. Here's a step-by-step guide:
Step 1: Open the Image
Begin by opening the image that requires a custom crop. Make all the necessary adjustments before you proceed to crop the image.
Step 2: Select Crop and Rotate Tool
On the right side of the application, select the Crop and Rotate tool. You can also use the keyboard shortcut "C" to access this tool.
Step 3: Aspect Ratio Settings
Under the Crop panel, you'll find the Aspect Ratio option. By default, the "Original" ratio is selected. Click on it to open a dropdown menu with multiple common ratios.
Step 4: Select "Enter Custom"
At the bottom of the dropdown menu, you'll find the "Enter Custom" option. Select this if you want to set your own aspect ratio.
Step 5: Enter Custom Ratio
A new dialog box will appear, allowing you to enter your desired aspect ratio. Click "OK" to enable your custom ratio. Your custom aspect ratio will be saved in the Aspect Ratio dropdown list for future use.
Additional Tips:
If you're using Adobe Photoshop, you can achieve a similar result by following these steps:
- Open the photo you want to crop.
- Press Command-A (Ctrl-A on PC) to select the entire photo.
- Go to the Select menu and choose "Transform Selection." This lets you resize the selection without altering the photo within.
- Hold the Shift key and drag a corner point inward to resize the selection while maintaining the original aspect ratio.
- Move the cursor inside the bounding box and click-and-drag to position your selection for cropping.
- Press Return (Enter on PC) to complete the transformation.
- Go to the Image menu and choose "Crop" to crop the image to fit your selection.
- Press Command-D (Ctrl-D on PC) to deselect the selection. Your cropped image will now have the same aspect ratio as the original photo.
Traveling with Camera Batteries: A Guide to Safe Packing
You may want to see also
![]()
Use the Clear Crop option to cancel the crop and restore the original image
If you want to cancel the crop operation and restore the original image in Adobe Camera Raw, you can do so by following these steps:
- Press the Escape Key: With the Crop tool active, simply press the "Esc" key on your keyboard. This will cancel the crop operation without making any changes to the image.
- Click and Hold the Crop Tool Button: Another method is to click and hold the Crop tool button in the Adobe Camera Raw interface. A menu will appear, and you should choose "Clear Crop" from the options.
- Cancel and Close without Processing: If you want to cancel the crop and close the Camera Raw dialog box without processing the image file, you can click the "Cancel" button or deselect the Crop tool and press "Esc".
Remember that pressing "Esc" or clicking "Cancel" will only cancel the current crop operation and will not affect any previous crops or edits made to the image. If you want to undo multiple steps or restore the image to its original state, you may need to explore other options, such as using the Undo command or reverting to a previously saved version of the image.
Is Your ADT Doorbell Camera Charging?
You may want to see also
Frequently asked questions
Press 'C' on your keyboard to select the Crop Tool. Drag out an initial crop box, then resize and reshape it as needed. To cancel the crop, press Esc with the Crop Tool active. To accept the crop, press Enter (Windows) or Return (Mac).
When you first open the Crop Tool, click and hold your mouse button for a second or so. This will open a menu displaying various options for the Crop Tool, including some handy preset aspect ratios at the top that you can choose from. If you've already drawn your crop box, it will instantly snap to the newly chosen aspect ratio.
Click and hold on the Crop Tool icon, then choose a preset from the menu. If none of the preset aspect ratios are what you need, choose Custom from the menu and enter your own.