Connecting a surveillance camera to a computer can be a great way to enhance security and monitor your property in real-time. The process may vary depending on the type of camera and computer you have, but here's a general guide to help you get started.
First, ensure that your camera and computer are compatible. Check the camera specifications and look for features like HDMI or VGA output, which indicate compatibility with computer monitors. Similarly, review the input ports on your computer monitor to ensure they match the camera's output. If they aren't directly compatible, you may need additional hardware such as an HDMI-to-VGA converter.
Once you've confirmed compatibility, locate a suitable spot for your camera, ensuring it has a clear view of the area you want to monitor. Connect the camera to a power source using the provided adapter or any compatible power supply.
Now, it's time to establish the connection between the camera and the computer. Use an appropriate cable, such as HDMI or VGA, to connect the two devices. If your camera uses HDMI and your monitor has a VGA port, for example, use an HDMI-to-VGA cable.
After making the physical connection, you may need to install and configure software provided by the camera manufacturer. This software will allow you to view and control the camera feed, adjust settings, and enable features like motion detection.
By following these steps, you'll be able to effectively connect your surveillance camera to your computer, providing you with a powerful tool for monitoring and securing your premises.
| Characteristics | Values |
|---|---|
| Camera Type | Wireless or wired security camera |
| Connection Type | USB, HDMI, VGA, RCA, BNC, coaxial cable, CAT5e cable, wireless |
| Power Source | Power adapter, power outlet, USB cabling |
| Equipment | Security camera, DVR/NVR, monitor, cables, router, CCTV software |
| Steps | Connect camera to power source, connect camera to monitor using appropriate cable, install and configure CCTV software, adjust display layout and settings |
What You'll Learn
![]()
Check camera and computer compatibility
When connecting a surveillance camera to a computer, it is essential to ensure that your devices are compatible. Here are some detailed instructions to guide you through the process:
Check Your Computer's Specifications:
Firstly, verify that your computer has the necessary graphics capacity and is compatible with CCTV. If your computer lacks these functions, don't worry; devices with these specifications are readily available in the market.
Examine Camera Requirements:
Different surveillance cameras have unique requirements for establishing a connection with a computer. Some cameras may need a direct connection to the computer's USB port, while others may utilise a coaxial cable or a network cable (Ethernet cable). Check your camera's user manual or the manufacturer's website for specific instructions.
Verify Software Compatibility:
Ensure that your computer's operating system is compatible with the software required to link the camera to your PC or laptop. Download and install the necessary software before proceeding.
Consider Additional Hardware:
If your camera and computer aren't directly compatible, there may be additional hardware solutions to facilitate the connection. For instance, if your camera uses HDMI, but your computer only has a VGA port, you can use an HDMI-to-VGA converter or adapter. Research the specific converters or adapters needed for your setup.
Power Requirements:
Check the power requirements for your surveillance camera. Most wireless security cameras require a power source for operation, so ensure you have the appropriate power adapter.
By following these steps, you can ensure that your surveillance camera and computer are compatible and have the necessary hardware and software for a successful connection.
How Masking in Adobe Camera Raw Transforms Photos
You may want to see also
![]()
Connect camera to power source
Connecting a surveillance camera to a power source is a crucial step in ensuring its proper functioning. Here are detailed instructions on how to connect your camera to a power source:
Step 1: Determine the Power Requirements
Before connecting your surveillance camera to a power source, it is important to check the power requirements of your camera. Most cameras will have a label or a specification sheet that indicates the voltage and current requirements. This information is crucial for selecting the appropriate power supply.
Step 2: Choose the Right Power Supply
The power supply you choose should match the voltage and provide sufficient current for your camera. It is recommended to use a power supply that operates at around 80% of its maximum capacity to avoid any overload issues. For example, if you have a camera that requires 12V and 0.35A, you would need a power supply capable of providing at least that amount of power.
Step 3: Connect the Power Cable
Once you have selected the appropriate power supply, you can connect the power cable to your camera. Most cameras will have a dedicated power input port, which is usually labelled. Make sure to connect the power cable securely to ensure a stable power supply.
Step 4: Plug into a Power Outlet
After connecting the power cable to your camera, you need to plug the power supply into a power outlet. If your camera uses a power adapter, make sure to use the one provided by the manufacturer. This ensures that the camera receives the correct voltage and current. If you are using a power receptacle, consider placing it in a secure location that is not easily accessible to potential vandals.
Step 5: Test the Connection
Once you have made all the connections, turn on your camera to test the power connection. Ensure that the camera powers up properly and functions as expected. If your camera has a power indicator light, check that it is illuminated. If your camera has a display, you may also be able to see the power status on the screen.
Step 6: Consider a Backup Power Source
For added reliability, consider using a backup power source for your surveillance camera, especially if it is located outdoors or in an area with an unstable power supply. This can be a simple power bank or a more sophisticated uninterruptible power supply (UPS). A backup power source will ensure that your camera continues to operate even during power outages or fluctuations.
By following these steps, you can ensure that your surveillance camera is properly connected to a power source and is receiving the power it needs to function effectively. Remember to always refer to your camera's user manual for specific instructions and safety precautions.
The First Motion Camera: A Historical Perspective
You may want to see also
![]()
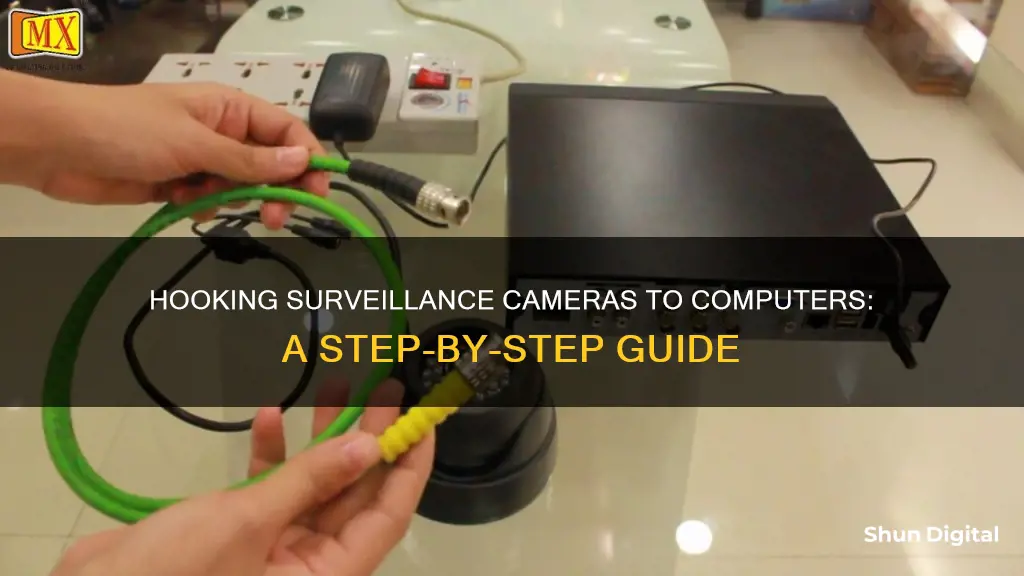
Connect camera and computer using cable
There are several ways to connect a surveillance camera to a computer using a cable. The specific steps will depend on the type of camera and computer you have, as well as the desired level of connectivity. Here are some general instructions for connecting a surveillance camera to a computer using a cable:
- Determine the compatibility between your camera and computer. Check the camera specifications and the computer's input ports to ensure they are compatible. Common connections include HDMI and VGA.
- Locate the camera and computer in the desired positions, ensuring the camera has a clear view of the area you want to monitor.
- Connect the camera to a power source if required. Most wireless security cameras will need an external power source, such as a power outlet or battery.
- Use the appropriate cable to connect the camera to the computer. For example, if both devices have HDMI ports, use an HDMI cable for optimal video quality.
- Power on the camera and computer, and wait for them to establish a connection.
- Install any necessary software or drivers. This may be provided by the camera manufacturer or included with the purchase of the camera.
- Configure the camera settings according to your preferences. This may include adjusting video quality, enabling motion detection, and setting recording schedules.
- Test the camera feed on the computer to ensure it is functioning properly.
It is important to refer to the manufacturer's instructions or user manual for specific details on connecting your particular camera model to a computer. Additionally, some cameras may require additional hardware or adapters to establish a direct connection to a computer.
Surveillance Cameras: Do They Really Need a Requiem?
You may want to see also
![]()
Install camera software
The software that comes with your camera is essential for setting up your wireless security camera and connecting it to your computer. The software enables you to view and manage your camera feed, adjust settings, and access various features. Here's a step-by-step guide to installing the camera software:
- Check the manufacturer's website: Visit the website of your camera's manufacturer and look for the specific model you own. They should provide a dedicated software package designed for their wireless security cameras.
- Download the software: Find the download link on the manufacturer's website and download the software to your computer. The software is typically provided as a setup file (.exe or .dmg) for Windows or macOS, respectively.
- Run the installer: Once the download is complete, locate the setup file and double-click it to start the installation process. Follow the on-screen instructions to install the software. You may need to accept terms and conditions and choose installation options.
- Launch the software: After the installation is finished, locate the software icon and launch it. You may need to create an account or log in, especially if the software offers remote viewing capabilities.
- Configure the software: Explore the software interface and adjust the settings according to your preferences. This may include setting up motion detection, adjusting video quality, and configuring notifications.
- Test the camera feed: Once the software is set up, test the camera feed to ensure it's working correctly. View the feed on your computer monitor and make sure the video is clear and stable.
- Explore additional features: Take some time to discover any additional features offered by the software, such as cloud storage, two-way audio, or remote pan/tilt/zoom controls. These features can enhance your surveillance system's overall functionality and performance.
By installing and configuring the camera software, you'll be able to effectively manage your wireless security camera and take advantage of its full range of capabilities. Remember to keep the software updated to ensure you have the latest features and improvements.
Fight Back: Beat Camera Tickets with These Tips
You may want to see also
![]()
Configure camera settings
Configuring your camera settings is an important step in setting up your surveillance system. Here are some detailed instructions on how to do this:
- Finding the Camera Settings: To access the camera settings on Windows 11, type "manage cameras" in the search bar on the Start menu and select "Manage cameras" from the results. Here, you can view and manage the cameras connected to your device. For Windows 10, type "camera" in the search box next to the Start Menu icon and select the Camera app. Then, select the Settings gear icon in the top-left corner.
- Adjusting Basic Settings: In the Settings menu, you can modify various options such as enabling/disabling a framing grid, choosing the type of grid, adjusting photo and video resolution, enabling/disabling the time-lapse timer, and reducing flicker. These settings can be tailored to your specific needs and preferences.
- Advanced Settings: To access more advanced settings, enable "Pro Mode" in the Settings menu. This will allow you to adjust the brightness of the camera feed. Additionally, you can configure privacy settings by opening the Settings app, selecting "Privacy," and then choosing "Camera" from the left-side menu under "App Permissions." Here, you can manage which apps have access to your camera and select specific apps that can use it.
- Camera Rotation: If you're using an external camera, you may need to adjust its rotation to match the mounting. This can be done through the Camera settings, ensuring that the camera view is oriented correctly.
- Video HDR: To enhance the image quality, consider enabling Video HDR. This feature uses advanced capture techniques to ensure that both bright and dark areas of the image appear natural and detailed.
- Windows Studio Effects: Windows 11 offers a range of studio effects, including background blur, eye contact correction, automatic framing, and voice focus. These effects can improve your video quality and are enabled using machine learning algorithms. However, enabling these effects may impact performance and battery life.
- Disabling/Enabling Cameras: If you have administrator access, you can disable or enable specific cameras for all users. This can be done through the "Manage cameras" section in the Camera settings.
- IP Camera Addressing: When connecting an IP camera directly to your computer, you may need to set a static IP address for your camera and computer to communicate. This typically involves assigning an IP address within the same network prefix, such as 192.168.177.X, where X is a number between 2 and 254.
By following these steps, you can fine-tune your camera settings to ensure optimal performance and functionality for your surveillance system.
Pentax Raw Files: What's the Extension?
You may want to see also
Frequently asked questions
Yes, you can. You need to ensure that the camera and monitor are compatible and have the required ports and connections.
You will need the camera, a power source, a wireless receiver or transmitter, and the necessary cables to connect the receiver or transmitter to the computer monitor.
First, connect the camera to a power source. Then, connect the wireless receiver or transmitter to the camera. After that, connect the receiver or transmitter to the computer monitor using the appropriate cables. Finally, adjust the monitor settings to display the camera feed.
Yes, you can. Ensure that the monitor has enough inputs for all the cameras, and you may need a switcher or multiplexer to toggle between the camera feeds.