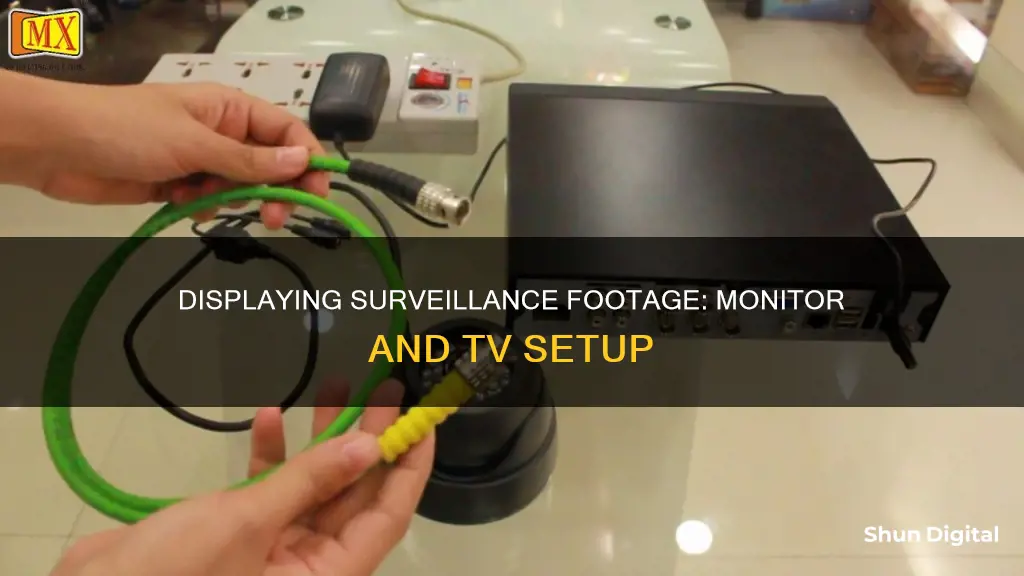
There are several ways to connect a surveillance camera to a monitor or TV, depending on the type of camera and the desired setup. Here are some common methods:
- Using a DVR or NVR: Connect the security camera to a DVR or NVR base station, and then connect the DVR/NVR to the monitor or TV using HDMI or VGA cables. This method supports multiple cameras and allows for viewing and controlling the camera feeds.
- Direct Connection: If both the camera and the monitor/TV have HDMI ports, they can be connected directly using an HDMI cable. This provides a simple way to view live feeds from the security camera.
- Ethernet Cables: If the TV has an Ethernet port, an Ethernet cable can be used to connect the camera to the TV directly. Alternatively, an Ethernet-to-HDMI adapter can be used if the TV has an HDMI port.
- Wireless Connection: Wireless cameras can be connected to a TV using a dedicated mobile app or, if the TV is a smart TV, by downloading and using an app directly on the TV. This allows for convenient streaming of the camera's video feed.
| Characteristics | Values |
|---|---|
| Security Camera Types | CCTV Cameras (Analog), HD-over-Coax Security Cameras, IP Security Cameras, Wireless Cameras |
| Connection Methods | DVR, NVR, HDMI Cable, Ethernet Cable, Wireless |
| Required Equipment | Security camera, DVR/NVR, monitor, cables (HDMI, VGA, RCA, BNC, Ethernet), adapters |
| Steps for DVR/NVR Connection | 1. Connect camera to DVR/NVR with Eternal/BNC cables. 2. Connect DVR/NVR to monitor with HDMI/VGA cable. 3. Power on devices and configure input source. 4. View camera feeds through DVR/NVR interface. |
| Steps for HDMI Cable Connection | 1. Find HDMI port on camera and monitor. 2. Connect devices with HDMI cable. 3. Turn on monitor and switch to HDMI input. |
| Steps for Ethernet Cable Connection | 1. Connect camera to Ethernet cable and then to Ethernet-to-HDMI adapter. 2. Connect adapter's HDMI output to monitor's HDMI input. 3. Turn on monitor and switch to HDMI input. |
| Steps for Wireless Connection | 1. Use a dedicated mobile app to transmit footage wirelessly. 2. Download camera brand's app on smart TV and follow on-screen instructions. |
What You'll Learn

How to connect a security camera to a TV with a DVR
Connecting a security camera to a TV with a DVR is a great way to monitor your home and deter potential intruders. Here's a step-by-step guide on how to do it:
Step 1: Understand Your Security Camera and TV
Before beginning the setup process, it's important to know what type of security camera you have and whether your TV is compatible with it. This knowledge will help you determine the best connection method.
Types of Security Cameras:
- CCTV Cameras (Analog): Traditional cameras that use video cable connections like coaxial or RCA. They typically have lower image resolutions such as 960H, D1, and CIF.
- HD-over-Coax Security Cameras: A type of analog camera designed for high-definition video transmission using coaxial cables and BNC connectors.
- IP Security Cameras: Digital cameras that transmit video data through IP networks and connect to the internet via Ethernet cables.
- Wireless Cameras: These cameras use Wi-Fi or Bluetooth to wirelessly send video feeds to connected devices, allowing for a cable-free setup.
TV Compatibility:
- Supported TV Input: Ensure your TV has the necessary input options, such as HDMI, AV, or BNC, to connect to your security camera.
- Video Resolution: Check if your TV can display the video quality of your security camera, especially if it's an older model that may not support high-definition feeds.
- Smart TV Integration: If you have a smart TV with built-in apps for camera feeds, consider connecting wirelessly.
Step 2: Connect the Security Camera to the DVR
To connect your security camera to the DVR, use the appropriate cables depending on your camera type. For digital cameras, use Eternal cables, and for analog cameras, use BNC cables.
Step 3: Connect the DVR to the TV
Use an HDMI or VGA cable to establish a connection between the DVR and your TV. Most modern DVRs support HDMI for improved image quality.
Step 4: Power On and Configure
Turn on both the DVR and the TV. Then, set the correct input source on your TV to match the connection type (HDMI or VGA) used in the previous step.
Step 5: View Camera Feeds
Once the setup is complete, you can now access and monitor the security camera feeds through the DVR's interface on your TV.
Additionally, if you want to connect multiple security cameras to your TV, a DVR is a suitable option as it can handle both analog and digital camera feeds.
A Simple Guide to Watching Videos on DBPOWER Cameras
You may want to see also

How to connect a security camera to a TV without a DVR
There are several ways to connect a security camera to a TV without a DVR, and the specific method will depend on the type of camera you have and the inputs available on your TV. Here is a step-by-step guide on how to connect a security camera to a TV without a DVR:
Step 1: Identify Your Camera Type and TV Inputs
Before establishing a connection, it's essential to understand the type of security camera you have, as different cameras have unique connection requirements. The most common types include:
- CCTV Cameras (Analog Cameras): Traditional surveillance devices that use coaxial or RCA cables to connect to television screens. They usually have lower image resolutions like 960H, D1, and CIF.
- HD-over-Coax Security Cameras: A type of analog camera designed for high-definition video transmission. They use coaxial cables and specialized BNC connectors to achieve better image quality.
- IP Security Cameras: Digital cameras that transmit video data through IP networks and connect to the internet via Ethernet cables.
- Wireless Cameras: These cameras use Wi-Fi or Bluetooth to wirelessly send video feeds to connected devices, allowing for a cable-free setup.
Additionally, you need to ensure that your TV is compatible with your camera. Check for supported TV inputs like HDMI, AV, or BNC, and confirm whether your TV can display the camera's video resolution. If your TV lacks the necessary input, consider using a converter.
Step 2: Choose the Appropriate Connection Method
Using HDMI Cables:
If both your security camera and TV have HDMI ports, this is a straightforward process. Simply connect the devices using an HDMI cable, turn on your TV, and switch to the HDMI input.
Using Ethernet Cables:
If your TV has an Ethernet port, you can connect your security camera directly using an Ethernet cable. If this doesn't work, try using an adapter, such as an Ethernet-to-HDMI adapter. Connect the adapter's HDMI output to the HDMI input on your TV, and you're ready to go!
Using AV (Composite) Cables:
This method involves using an RCA converter with a BNC cable from your camera into the AV input on your TV. While widely available, this approach is limited by the composite cable's inability to transmit HD-quality signals.
Using VGA Cables:
This method requires a CCTV camera that supports AV-out or VGA-out functions, which most cameras do. You'll need a VGA cable (VGA to VGA) and an RCA cable for audio (2 RCA male-to-male). Connect the RCA to your TV and the VGA cable to your computer monitor or LCD for both video and audio.
Using Component Cables:
First, plug the power adapter into a power outlet and connect it to your camera. Then, connect the component video output on your camera to the component video input on your TV. Turn on the TV and switch to the component video input using the remote control. If you want to add more cameras, you'll need additional component video cables and, possibly, a component video switch box.
Using a USB Cable:
This method is one of the easiest ways to connect your camera to a TV, LCD, or monitor. Most security cameras now have a USB port that is compatible with personal computers. The USB connection will allow you to view the camera's video feed on a computer monitor.
Step 3: Establish the Connection and Test
Once you've chosen the appropriate connection method and made the necessary connections, it's time to test the setup. Power on your devices, ensure the correct input is selected on your TV, and check if the camera's live feed is displayed correctly.
Additionally, if you're using a wireless camera, you can connect it to your TV by using a dedicated mobile app or, if you have a smart TV, by downloading the camera brand's app directly onto your TV and following the on-screen instructions.
Meijer's Camera Surveillance: What Shoppers Should Know
You may want to see also

How to connect a security camera to a TV wirelessly
There are several ways to connect a security camera to a TV wirelessly. Here is a step-by-step guide:
Step 1: Understand the Different Types of Security Cameras
Before setting up your security camera, it is essential to know what type of camera you have. Different security cameras require different connection methods due to their unique technical features. Here are some common types:
- CCTV Cameras (Analog Cameras): Traditional surveillance devices that use video cable connections (coaxial or RCA) to connect to television screens. They usually have lower image resolutions such as 960H, D1, and CIF.
- HD-over-Coax Security Cameras: A type of analog camera optimised for high-definition video transmission using coaxial cables and BNC connectors.
- IP Security Cameras: Digital cameras that transmit video data through IP networks and connect to the internet via Ethernet cables.
- Wireless Cameras: Security cameras that rely on Wi-Fi or Bluetooth to send video feeds to connected devices. They are distinctively cable-free and can be connected to a TV using a mobile app.
Step 2: Ensure Your TV is Compatible with the Camera
When connecting your security camera to a TV, it is crucial to ensure compatibility. Check the following:
- Supported TV Input: Confirm that your TV has the necessary input, such as HDMI, AV, or BNC, to connect to the security camera. If your TV lacks the required input, consider using a converter.
- Video Resolution: Verify that your TV can display the security camera's video quality. Older TV models may not support high-definition video feeds from certain cameras.
- Smart TV Integration: If you have a smart TV with built-in apps for receiving and displaying camera feeds, consider connecting wirelessly through your TV's interface.
Step 3: Choose a Connection Method
There are several ways to connect your security camera to your TV wirelessly, depending on your camera and TV setup:
- Using Wi-Fi and Mobile Apps: If your wireless security camera has its own application, you can use it to stream the camera's video feed onto your television. Download the app, connect your camera to Wi-Fi, and use a streaming app like Google Home to stream the video from your phone to your TV.
- Smart TV Apps: If you have smart devices or a smart TV, you can download and use the camera brand's app directly on your TV to access and stream the live video feed. Ensure that your security camera is compatible with your Smart TV.
Step 4: Set Up Your Security Camera and TV
The specific setup process will depend on the type of security camera and TV you have. However, here are some general steps to follow:
- Connect your security camera to a power source and ensure it is turned on.
- Ensure your TV is powered on and connected to the internet if necessary.
- Follow the instructions provided by your security camera manufacturer or app for wireless connection. This may involve configuring your camera's settings, Wi-Fi connection, or using a specific streaming app.
- Test the connection by accessing the camera's live feed on your TV.
By following these steps, you should be able to successfully connect your security camera to your TV wirelessly and monitor your property conveniently.
Sanyo TV Camera: Fact or Fiction?
You may want to see also

How to connect a security camera to a computer monitor
Connecting a security camera to a computer monitor can be a great way to view your security footage. This can be done using a closed-circuit television (CCTV) security camera system, which has become more affordable in recent years.
Step 1: Gather the Required Equipment
You will need the following:
- Security DVR or NVR (base station that cameras connect to for recording footage)
- Security cameras (wired or wireless)
- Computer monitor with an HDMI or VGA input
- Video cables (HDMI or VGA)
- Coaxial or CAT5e cables for wired cameras
- RCA or BNC adapters for connecting to a TV
Step 2: Connect Cameras to DVR/NVR
Connect the security cameras to the DVR/NVR base station. Use a video cable such as coaxial or CAT5e for wired cameras, and pair wireless cameras according to the provided instructions. Ensure all connected cameras display a live feed on the DVR/NVR.
Step 3: Connect DVR/NVR to Computer Monitor
Use an HDMI cable for the best video and audio connection. If HDMI is not available, use a VGA cable to transmit the video signal only.
Step 4: Install Viewing Software
Install the manufacturer-provided software on the computer connected to the monitor. This will allow you to view and control the DVR/NVR system, including live feeds, playback recordings, and advanced settings.
Step 5: Configure Display View
Once the setup is complete, you can adjust the display view on the monitor according to your preference. Typical options include cycling through full-screen views, quad view, grid view, or displaying a single camera continuously.
Troubleshooting Tips:
- Ensure all video cables are securely connected.
- Try different video cables if issues persist.
- Verify the monitor input source is set correctly (HDMI, VGA, etc.).
- Check video output settings on the DVR/NVR if the image looks distorted.
- Reinstall the viewing software and confirm the IP address is correct.
- Power cycle the DVR/NVR and monitors if feeds are frozen.
- Adjust camera channel assignments if feeds are on the wrong channel.
- Update DVR/NVR and camera firmware for consistent connectivity.
By following these steps and tips, you should be able to successfully connect a security camera to a computer monitor for continuous real-time surveillance.
OLED LG Smart TV: Built-in Camera?
You may want to see also

How to connect a security camera to a monitor with a BNC to HDMI converter
To connect a security camera to a monitor using a BNC to HDMI converter, you'll need the following:
- A security camera that uses coax cable and a BNC connector.
- A BNC to HDMI converter box.
- An HDMI cable.
- A power adapter for the camera that supplies the appropriate voltage and amperage.
- A TV or monitor that supports 1080p.
Here's a step-by-step guide on how to set it up:
- Connect your camera to a Siamese cable. Siamese cables have one connector for video and another for power. Connect the BNC-tipped wire to the video output on the camera, and the male DC connector to the power pigtail of the camera.
- Run the Siamese cable to the location of the monitor.
- Connect the DC male power connector to the female power connector on the Siamese cable. This will power your camera.
- Connect the video BNC connector to the BNC input on the BNC to HDMI converter. Make sure the BNC connector you use on the converter is labelled "INPUT".
- Connect the BNC to HDMI converter to your TV or monitor using an HDMI cable. Plug the power supply for the converter into a power outlet.
- Switch your TV or monitor's input source to HDMI. You should now be able to view the live feed from your security camera.
This setup will allow you to view the live security camera feed directly on your TV or monitor without the need for a separate DVR or NVR recording device.
Connecting Akaso Camera to PC: A Step-by-Step Guide
You may want to see also
Frequently asked questions
You can connect a surveillance camera to a monitor or TV by using a BNC to HDMI converter. This will allow you to use your own monitor or TV by converting the camera's BNC output to HDMI.
You can use a video multiplexer, which allows you to display multiple camera feeds on a single screen. CCTV video multiplexers are available in 4, 9, and 16-channel models and are compatible with most TVs thanks to their HDMI output.
Yes, if your wireless security camera has its own mobile app, you can use it to stream the camera's video feed to your smart TV. Alternatively, if your smart TV has an app store, you can download the camera brand's app directly onto the TV and use it to view the live camera feed.
The type of cable you need depends on your camera and TV. For CCTV cameras (analog cameras), you will need a coaxial or RCA cable. For HD-over-Coax security cameras, you will need a BNC cable. For IP security cameras, you will need an Ethernet cable.


