Hardwiring a dashcam to your car's fuse box is a popular installation method, offering a clean and safe setup. This guide will walk you through the process, from locating the fuse box to connecting the wires and testing your setup. While it may sound complicated, hardwiring a dashcam is a straightforward task if done carefully. So, get your tools ready, and let's begin!
| Characteristics | Values |
|---|---|
| Installation | Requires locating the fuse box, determining the correct fuse slot, connecting the wires, grounding the kit, and testing the dash cam. |
| Tools Required | Hardwiring kit, circuit tester, needle-nose pliers or crimping tool, zip ties, electric tape, user manual, and essential installation package. |
| Benefits | Provides constant power to the dash cam, prevents battery discharge, enables parking mode, and ensures a clean installation without clutter. |
| Alternatives | Using a battery, connecting to a USB port, or using the lighter socket. |
| Precautions | Caution is advised when working with electrical systems. Avoid wires controlling safety features. Ensure correct wire orientation and grounding. |
What You'll Learn
![]()
Locating the fuse box
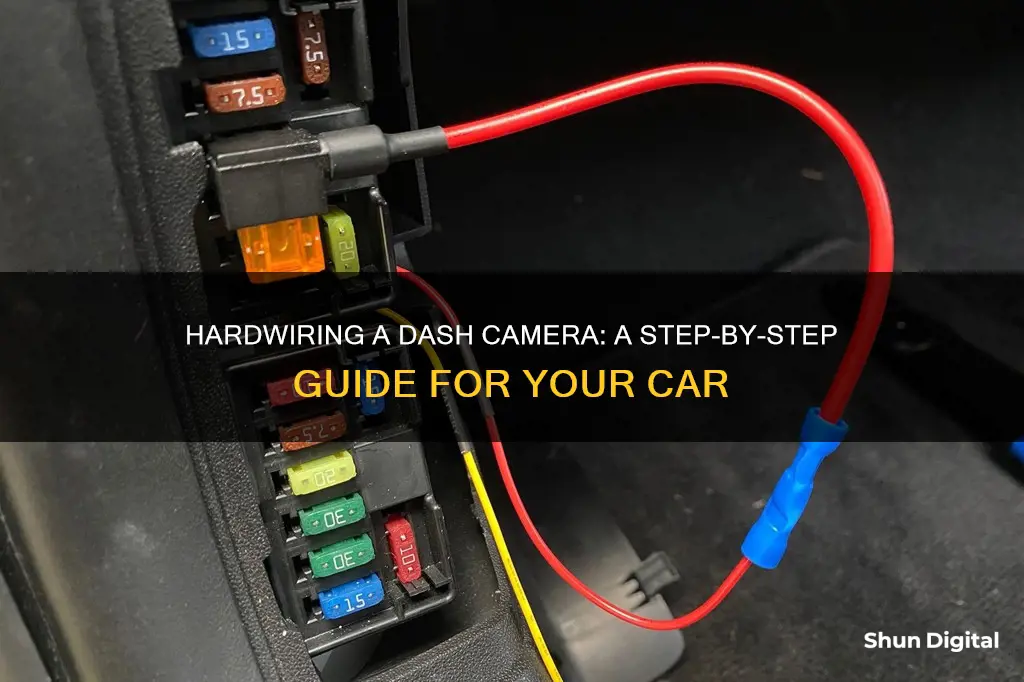
The fuse box is where you will connect your hardwire kit, so it is important to familiarise yourself with it before beginning the installation process. The fuse box contains fuses that protect the different electrical systems in your vehicle. By hardwiring your dashcam to the fuse box, you can ensure that it receives power when the car is turned on.
To connect the dashcam to the fuse box, you will need to use a fuse tap. This device allows you to tap into the vehicle's fuse box without damaging the original wiring. The fuse tap is inserted into an empty slot in the fuse box, and the camera's power cable is then connected to the fuse tap.
When locating the fuse box, it is also important to consider the routing of the cables from the dashcam to the fuse box. The cables should be neatly routed and secured to ensure a tidy installation. It is recommended to plan the cable route in advance and to use zip ties or electrical tape to secure the cables.
Overall, locating the fuse box is a crucial step in hardwiring a dashcam. By taking the time to find the fuse box and plan the cable routing, you can ensure a successful and neat installation.
Charging Your 4K Dual Action Camera: A Quick Guide
You may want to see also
![]()
Determining which fuse slots to use
- Understanding Fuse Types: Before you begin, it's important to understand the two main types of fuses in modern vehicles: constant fuses and switched fuses. Constant fuses provide power to circuits that are always live, even when the engine is turned off. On the other hand, switched fuses are connected to circuits that are only live when the engine is running.
- Locating the Fuse Box: Most vehicles have multiple fuse boxes. For dash camera installation, select the fuse box closest to where you'll be installing the camera. You can refer to your vehicle's user manual or look online for specific information on locating your car's fuse box.
- Using a Circuit Tester: To identify constant and switched fuses, you'll need a circuit tester (also known as a test light) or a multimeter. With the engine off and the key removed from the ignition, connect the grounding clip of the circuit tester to a bare metal point on the vehicle, such as the negative terminal on the car battery.
- Identifying Constant Fuses: Probe the fuses by touching the tip of the circuit tester to the exposed metal prongs on both sides of a fuse. If a fuse lights up the circuit tester with the engine off, it's a constant fuse. Constant fuses typically power components like interior lights, power locks, or the cigarette lighter.
- Identifying Switched Fuses: Locate a fuse that doesn't light up the circuit tester with the engine off. Turn the ignition to the "on" position without starting the engine. Probe the fuse again, and if it now lights up the tester, you've found a switched fuse. Typically, fuses connected to accessories like the radio, steering wheel controls, or seat controls are switched fuses.
- Selecting the Right Fuse Slots: When choosing a fuse slot for your dash camera, always refer to the vehicle's owner's manual to avoid slots associated with safety features. Select a constant fuse slot that provides uninterrupted power to your dash camera when the vehicle is parked. Additionally, choose a switched fuse slot (also known as an ignition-switched ACC fuse) that provides power to the camera when the ignition is turned on.
- Fuse Amperage Recommendations: For wiring a dash camera, it's recommended to select fuse slots rated between 10A and 30A to ensure sufficient power. If you're also wiring a battery pack, fuse slots rated between 20A and 30A are more suitable.
- Using Add-a-Fuses: To connect the hardwire kit to the selected fuse slots, use add-a-fuses or fuse taps. These devices allow for a neater and more secure installation compared to wrapping wires around fuse legs. Insert the original fuse from the fuse box into the "Old Fuse" position of the add-a-fuse, and ensure the correct orientation of the add-a-fuse to establish a proper connection.
Camera Batteries: Do They Have an Expiry Date?
You may want to see also
![]()
Connecting the wires
First, you need to identify the wires. Most hardwire kits come with either two or three wires. If you have two wires, one will be for a fuse and the other for a ground bolt. If you have three wires, the third wire is likely for a constant fuse, which provides power even when the car is off. The wires are typically colour-coded, with red for the constant fuse, yellow for the ignition-switched fuse, and a C-shaped wire as the ground wire. However, some kits may have different colour-coding, so be sure to read the labels attached to each cable.
Next, you need to connect the wires to the appropriate fuse slots in the fuse box. Before you begin, make sure the engine is off and the key is out of the ignition. Use a circuit tester to identify the correct fuse slots. The constant fuse will light up the circuit tester even when the engine is off, while the ignition-switched fuse will only light up the circuit tester when the ignition is turned on. It is important to select fuse slots that are rated between 10A-30A to provide enough power to the dashcam. Avoid using fuse slots that control critical functions such as airbags, stability control programs, or the horn. Instead, look for slots that control non-essential functions like the radio, cigarette lighter, or sunroof.
Once you have identified the correct fuse slots, it's time to connect the wires. You can use an add-a-fuse kit for a cleaner installation, or you can wrap the wires around the legs of the fuse. If using an add-a-fuse kit, insert the fuse tap into the add-a-fuse kit, ensuring that the new fuse is in the "New Fuse" position and the old fuse from the fuse box is in the "Old Fuse" position. Crimp the add-a-fuse kit to connect the hardwiring kit cables together, exposing some bare wire if necessary. Tug on the connection to ensure it is tight and secure. Finally, put the add-a-fuse kit into the fuse slot. For the ground wire, simply slip it under a metal bolt or screw, ensuring it is not attached to any plastic parts. Tighten the connection with a socket wrench.
After all the wires are connected, it's important to test the dashcam to ensure it is working properly. Plug the kit into the dashcam and start your vehicle. If the dashcam powers on, you have successfully connected the wires. If not, double-check your connections and ensure you have followed the correct procedure.
Airline-Approved: Small Cameras with Lithium Batteries
You may want to see also
![]()
Grounding the kit
First, it is important to identify a suitable ground point. A ground point is typically a metal surface that is part of your vehicle's chassis and is connected to the negative terminal of the battery. This could be a bolt, screw, or bracket that is directly attached to the chassis. It is important to ensure that the ground point is free of rust or paint, as this can interfere with the electrical connection. Sanding or wire brushing the surface can help create a clean connection.
Next, you will want to connect the ground wire from your dashcam kit to the ground point. Make sure the connection is secure and that the wire is attached to the metal surface. A bolt or screw can be used to fasten the wire in place. It is important to avoid using plastic or rubber surfaces for grounding, as they will not provide a proper path for electricity to flow.
Additionally, when grounding your dashcam kit, it is important to consider the location of the ground point in relation to the dashcam itself. The ground wire should be routed along the dashcam's cable, ensuring that it is securely attached and does not interfere with other components.
Finally, it is important to test the connection once the grounding is complete. This can be done by starting your vehicle and checking that the dashcam powers on and functions correctly.
By following these steps and considerations, you can ensure that your dashcam kit is properly grounded, providing a stable and reliable electrical connection for your device.
Playing 264 Surveillance Footage: A Step-by-Step Guide
You may want to see also
![]()
Testing the dash cam
If your dash cam has a screen, you can check the angle directly on it. Alternatively, use the dedicated smartphone app to check the viewing angle of your camera, which will frequently have positioning lines to assist as well. Make sure to get the best angle, even before you tidy up the wires, as it will help the adhesive if it doesn’t need to be moved later, and help with a reference on how far the wire needs to reach.
If the dash cam powers on, it means you did everything right. If it works, you can go ahead and tidy up the cables—you don’t want any cables to be dangling from the dash cam or around the fuse box.
The best way is to tuck the loose cables inside the fuse box's loose area and along the A-pillar of your car. Zip ties and electric tape are your friends, as they help keep things tight and out of the way. We recommend you not wait until after you've tucked away all your wiring to plug in and test your camera, as it will typically be easier to troubleshoot when the wires are readily accessible.
Common Hardwiring Mistakes
If it's your first time hardwiring a dash cam, there are a number of common mistakes that you may come across. If you are experiencing issues that aren't listed below, then seek help from an expert.
- Reversed orientation of the accessory and ignition-switched wires: The dash cam will behave abnormally if the wires are switched and, in some cases, can even result in battery drain. Please double-check the wire orientation with your specific hardwire kit.
- Bad ground: When an incorrect ground is used, the camera won't get power. A loose or weak ground may result in restarting when the vehicle hits a bump.
- Add-A-Fuse Incorrectly Set Up: If you don't put a fuse into the top fuse slot of the add-a-fuse, it will not feed power to the hardwire kit.
- Blown Fuse: If the fuse on the add-a-fuse is blown, the kit will not receive power. There might also be inline glass fuses on the cigarette cable or hardwire kit that can also be blown. If this happens, please contact the manufacturer for a replacement.
- Loose Wire in Add-A-Fuse: On some hardwire kits, the wire is much thinner than the socket on the add-a-fuse. Because of this, they may wiggle loose in the add-a-fuse, leading to an inconsistent current. Make sure that the crimp is tight and the wire is held in tightly.
Why You Should Try Manual RAW Photography
You may want to see also
Frequently asked questions
Hardwiring a car dash camera to your fuse box is the most popular and effective method. This can be done by purchasing a hardwiring kit, which connects your camera to the fuse box and prevents battery discharge.
Hardwiring provides a constant power supply to your dash camera, even when the car is turned off, enabling parking mode recording. It also eliminates the need for batteries or manual operation, reducing the risk of forgetting to charge or turn on the device.
The fuse box is typically located under the dashboard on the driver's side, under the steering column, or in the glove compartment on the passenger's side. You can refer to your vehicle's user manual or search for the information online, specifying the make and model of your car.
It is important to exercise caution when working with electrical systems. Avoid fuse slots that control critical functions like airbags, stability control, or the horn. Opt for slots that control non-essential features like the radio or sunroof. Always refer to your vehicle's owner's manual for guidance.