The ASUS VG278Q monitor can be attached to a monitor arm using a VESA wall mount. The first step is to disconnect the power and signal cables and lower the monitor to its lowest height. Then, place the monitor face down on a flat and clean surface. Use a screwdriver to remove the screws on the arm, and then detach the arm from the monitor. Finally, attach the VESA wall mount to the monitor using the screw holes on the back of the monitor. It is important to note that the VESA wall mount kit (100 x 100 mm) is purchased separately and only UL Listed Wall Mount Brackets should be used.
| Characteristics | Values |
|---|---|
| VESA Size | 100 x 100 mm |
| Monitor Weight | 8 lb |
| Monitor Width | 24.3701 in |
| Monitor Height | 14.2913 in |
| Monitor Depth | 1.9685 in |
| Monitor Weight (with stand) | 12.35 lbs |
| Monitor Width (with stand) | 24.3701 in |
| Monitor Height (with stand) | 14.8031 in |
| Monitor Depth (with stand) | 8.3071 in |
| Monitor Ports | 1 x HDMI 1.4, 1 x DisplayPort 1.2, 1 x DVI-D Dual Link, 1 x 3.5 mm Audio In, 1 x 3.5 mm Audio Out |
What You'll Learn

Detach the monitor arm for VESA wall mount
To detach the monitor arm for a VESA wall mount, follow these steps:
First, place the monitor face down on a table. Cover the table surface with a soft cloth to prevent damage to the monitor.
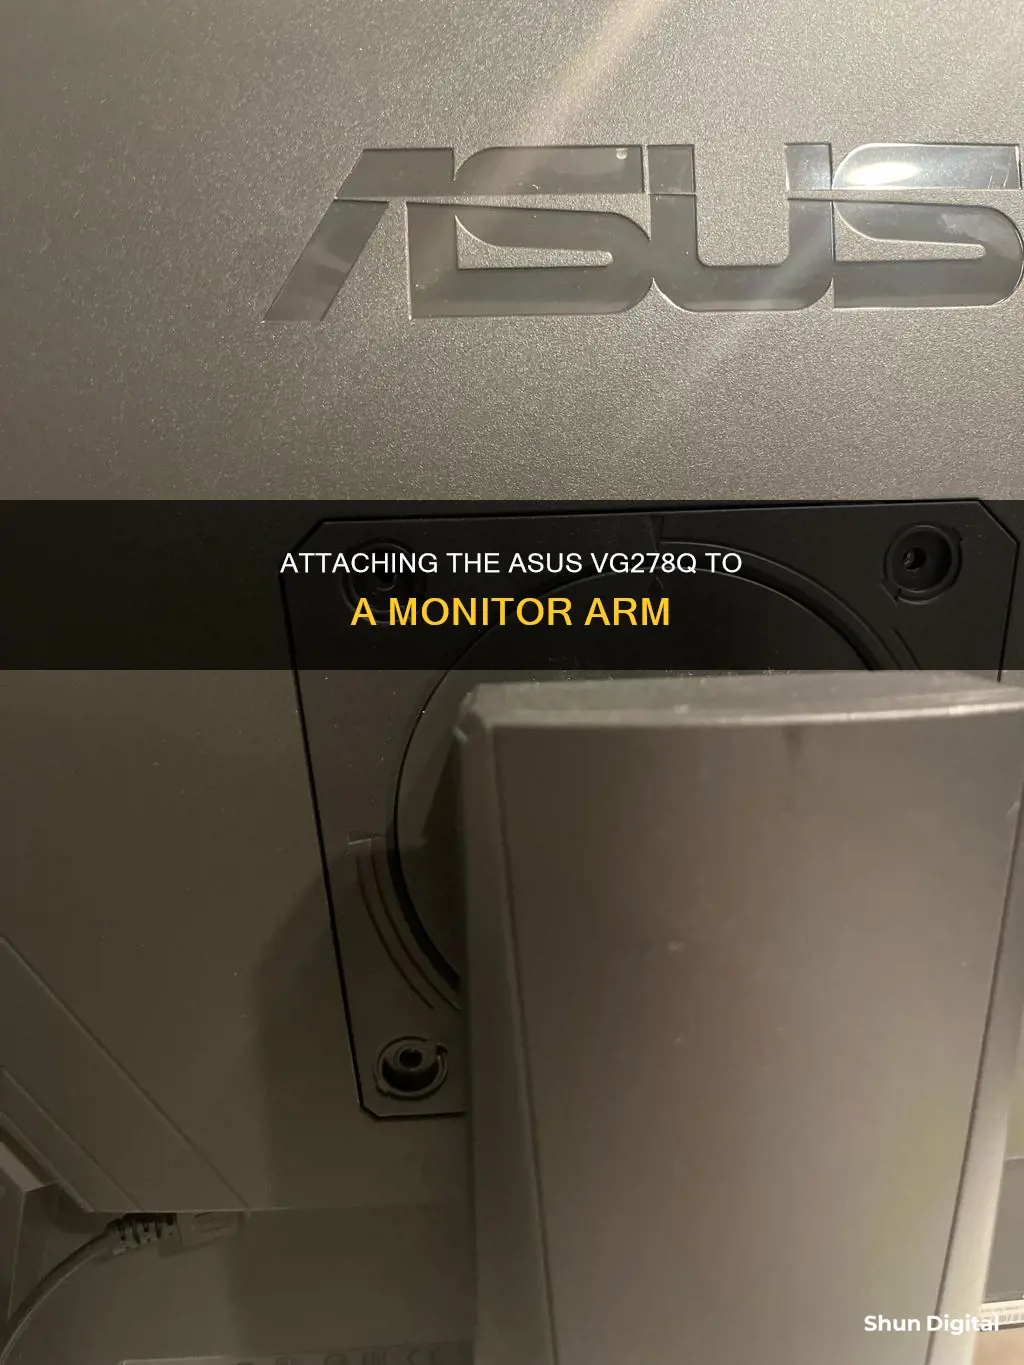
Next, remove the rubber coverings from the four screw holes. Then, remove the base of the monitor. After that, pry open the rear hinge cover to access the hinge mechanism.
Now, use a screwdriver to remove the four screws that secure the hinge. With the screws removed, carefully lift the monitor to separate it from the arm/base.
Finally, you can attach your monitor to a VESA wall mount using the appropriate kit (sold separately). Ensure that you only use a UL Listed Wall Mount Bracket with a minimum weight/load capacity of 22.7kg and screw size of M4 x 10 mm.
Deltek's Internet Monitoring: What You Need to Know
You may want to see also

Use a screwdriver to remove the screws on the hinge
To attach your ASUS VG278Q monitor to a monitor arm, you will first need to detach the existing hinge. This process involves using a screwdriver to remove the screws on the hinge. Here is a detailed guide on how to do this:
- Cover the Table Surface: Before you begin, it is important to protect your work surface. Place a soft cloth on your table or desk to prevent any damage to the monitor or the surface during the removal process.
- Identify the Hinge Screw: Locate the hinge that connects the monitor to the base or stand. Identify the screw or screws holding the hinge in place. In the case of the ASUS VG278Q monitor, there is typically a single screw on the hinge that needs to be removed.
- Select the Appropriate Screwdriver: Ensure that you have the correct type and size of screwdriver for the screw head. The most common types of screwdrivers are Phillips-head and flat-head screwdrivers. Select the one that matches your screw.
- Position the Screwdriver: Place the tip of the screwdriver firmly into the groove of the screw head. Ensure that it is centred and fits snugly to allow for optimal torque and control.
- Unscrew the Hinge: Hold the hinge firmly with one hand to stabilize it. With your other hand, slowly turn the screwdriver counterclockwise to unscrew the hinge. Apply firm but controlled force to avoid slipping or stripping the screw head.
- Remove the Hinge: Once the screw is completely unscrewed, carefully remove the hinge from the monitor. Set the screw and hinge aside in a safe place so that you can reattach them if needed.
- Inspect the Hinge and Screw: After removing the hinge, take a moment to inspect it. Ensure that the screw was completely removed and that the hinge is now separated from the monitor. Also, check the condition of the screw threads and the hinge to ensure there is no damage.
- Repeat for Multiple Hinges: If your monitor has multiple hinges, repeat the above steps for each hinge. Some monitors may have two or more screws per hinge, so be sure to remove all the necessary screws before attempting to remove the hinge.
By following these steps, you will be able to successfully remove the screws on the hinge of your ASUS VG278Q monitor. Remember to work carefully and deliberately to avoid any damage to the monitor or the screws. Once the hinge is removed, you can proceed with attaching your monitor to the desired monitor arm.
Monitoring Water Usage: Strategies for Schools
You may want to see also

Lower the monitor to its lowest height
To lower your ASUS VG278Q monitor to its lowest height, follow these steps:
- Ensure that the monitor is powered off and not in use.
- Locate the height adjustment mechanism on the monitor stand. This is typically a button, lever, or knob situated near the base of the stand.
- Engage the height adjustment mechanism. Depending on the model, you may need to press, lift, or turn the mechanism to activate it.
- Gently move the monitor downward to lower it to the desired height. You can do this by placing your hands on the sides or top of the monitor and applying gentle pressure to lower it smoothly.
- Once you have reached the lowest height, release the height adjustment mechanism.
- If available, tighten any adjustment knobs or screws to secure the monitor at the lowest height and prevent unintentional movement.
It is important to handle the monitor with care and follow the correct lifting techniques during this process. Always ensure that the monitor is stable and secure at the desired height before releasing your hands or stepping away. Additionally, make sure your work surface is clear and free of obstacles to prevent the monitor from knocking into anything during the adjustment process.
Perfectly Aligning Your ASUS Monitor: A Step-by-Step Guide
You may want to see also

Place the monitor face down on a flat surface
To attach your ASUS VG278Q monitor to a monitor arm, you'll first need to detach the monitor's existing arm and base. This will involve using a screwdriver to remove the screw on the hinge. Be sure to cover your work surface with a soft cloth to prevent damage to the monitor. Now, place the monitor face down on a flat surface. This is an important step to ensure the monitor is stable and secure as you work.
When placing the monitor face down, take care to handle it with caution. It's advisable to disconnect all cables and the power cord before repositioning the monitor. This will reduce the risk of accidental damage. Additionally, always hold the monitor by its edges, rather than the stand or cord, to avoid putting strain on these components.
While it's generally safe to place an LCD monitor face down, some people prefer to lay it on a soft cloth or towel to provide extra protection for the screen. This can help prevent scratches and reduce the risk of debris becoming embedded in the display. However, be aware that applying pressure or stacking items on top of the monitor can potentially cause damage.
Once the monitor is securely positioned face down, you can proceed with attaching the new monitor arm. Carefully follow the instructions provided with the arm to ensure a proper and secure installation.
Monitoring GPU Usage: MSI Afterburner Guide
You may want to see also

Purchase a VESA wall mount kit separately
To attach your ASUS VG278Q monitor to a monitor arm, you will need to purchase a VESA wall mount kit separately. The ASUS VG278Q monitor is VESA mount compatible, which means you can easily attach it to a monitor arm or wall mount using the standard VESA screw pattern. Here is a step-by-step guide on how to purchase and install a VESA wall mount kit for your ASUS VG278Q monitor:
Step 1: Purchase a VESA Wall Mount Kit
When purchasing a VESA wall mount kit for your ASUS VG278Q monitor, make sure to choose one that is compatible with the VESA standard. The VESA standard refers to the size and arrangement of the screw holes on the back of your monitor. For the ASUS VG278Q, you will need a VESA mount with a 100x100 pattern, which is the most common size for wall mounts. You can find VESA wall mount kits online or at electronics stores.
Step 2: Detach the Monitor Stand
Before installing the VESA wall mount kit, you will need to detach the monitor stand from your ASUS VG278Q. Place the monitor on a soft cloth on a table to prevent any damage to the screen. Use a screwdriver to remove the screw on the hinge that attaches the stand to the monitor. Once the screw is removed, carefully lift the stand away from the monitor.
Step 3: Attach the VESA Wall Mount
Now, you can attach the VESA wall mount to the back of your ASUS VG278Q monitor. Line up the screw holes on the VESA mount with the screw holes on the back of the monitor. Secure the VESA mount in place by screwing in the provided screws. Make sure the screws are tight to ensure a secure connection.
Step 4: Hang the Monitor on the Monitor Arm
With the VESA wall mount attached to your ASUS VG278Q monitor, you can now hang it on your monitor arm. Simply line up the mounting plate on the monitor arm with the VESA mount on the back of your monitor. Secure the monitor to the arm by following the instructions provided with your specific monitor arm.
Step 5: Adjust the Monitor
Once your ASUS VG278Q monitor is attached to the monitor arm, you can adjust the height, tilt, and swivel to your preferred viewing position. Make sure the monitor is securely tightened in place to prevent accidental movement. Now, you can enjoy the flexibility and ergonomic benefits of having your monitor attached to a monitor arm.
Monitoring Bandwidth Usage: A Guide for Linksys Routers
You may want to see also
Frequently asked questions
First, disconnect the power and signal cables, then lower the monitor to its lowest height. Carefully place the front of the monitor face down on a flat surface. Use a screwdriver to remove the screws on the arm, then detach it from the monitor.
The VESA size is 100 x 100 mm.
The monitor weighs 8 lb.
You can use a desk mount or a wall mount. C-clamp mounts are budget-friendly but may not be as stable, while grommet mounts offer more stability but require drilling a hole in your desk. Wall mounts provide exceptional stability and a clutter-free desk, but the installation is more involved.
Attach the base into the arm, ensuring the tab on the arm fits into the groove on the base. Fix the base to the arm by fastening the bundled screw.


