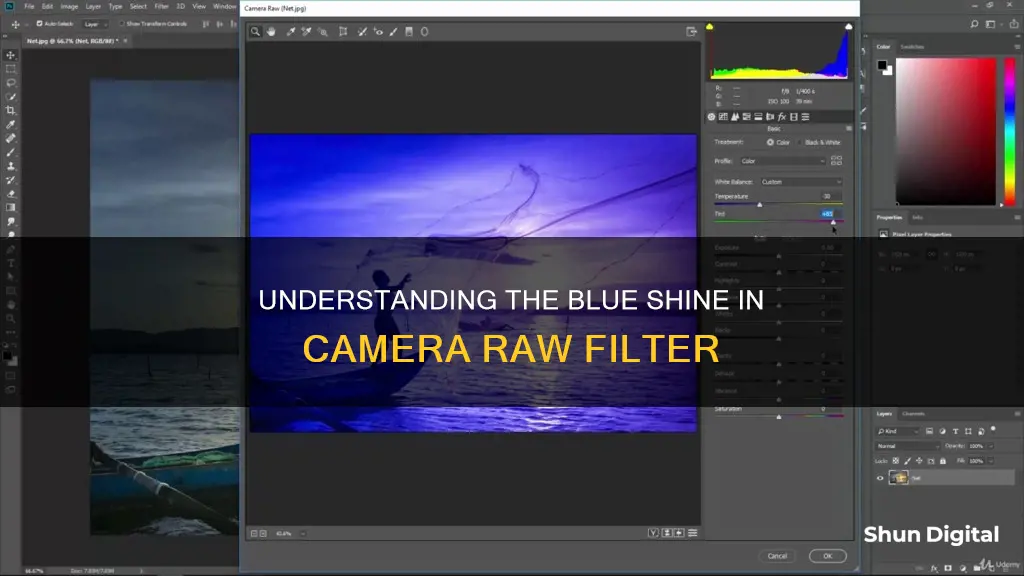
The blue colour appearing in the Camera Raw Filter is due to the black clipping detector, which indicates shadow or highlight areas that are lacking detail and have gone completely black or completely white. This can be turned off by clicking on the top left arrow of the histogram.
| Characteristics | Values |
|---|---|
| Reason for blue colour | Black clipping detector |
| How to turn off | Click on the top left arrow of the histogram |
| Other colours | Red, when pixels are clipped on the other end |
What You'll Learn
- Blue and red highlights in Adobe Camera Raw are called Shadow/Highlight clipping warnings
- Clipping occurs when the colour values of a pixel are higher or lower than what can be represented in the image
- You can turn off the blue colour by clicking on the upper-left triangle on the histogram display in Photoshop
- The blue colour indicates underexposed areas of the image
- You can also press 'U' to toggle the shadow warning
![]()
Blue and red highlights in Adobe Camera Raw are called Shadow/Highlight clipping warnings
The blue and red highlights in Adobe Camera Raw are called Shadow/Highlight clipping warnings. They indicate shadow or highlight areas that are lacking detail, meaning they have gone completely black or completely white.
These clipping warnings can be toggled on and off using the triangles in the upper corners of the histogram. The blue shadow warning can be toggled using the left triangle, and the red highlight warning can be toggled using the right triangle.
The appearance of these warnings depends on whether the areas of the image should be completely black or completely white. Typically, you don't want too much of either. Some things, like lights or the sun, may always clip.
It is important to check these warnings after making adjustments to exposure, shadows, highlights, whites, blacks, etc., as each of these adjustments will impact the clipping levels.
Charging the Elinksmart Camera: Always-on or Timed Sessions?
You may want to see also
![]()
Clipping occurs when the colour values of a pixel are higher or lower than what can be represented in the image
When using the Camera Raw filter, you may encounter blue pixels or blue and red highlights on your image. These are known as the Shadow/Highlight clipping warnings, which indicate shadow or highlight areas that are lacking detail, meaning they have gone completely black or completely white. Clipping occurs when the colour values of a pixel are higher or lower than what can be represented in the image.
Clipping can occur at various stages of image capture and processing. It may happen when initially capturing the image with a digital camera or scanner, due to internal image processing, colour space conversion, or later image editing.
In a colour image, clipping can occur separately in any of the image's colour channels, negatively affecting colour reproduction. Each colour channel can have a range of intensity values, and when the intensity in a certain area falls outside the minimum and maximum intensity that can be represented, clipping occurs. This results in a loss of image detail, as the clipped area appears as a uniform area of minimum or maximum brightness.
The blue clipping warnings in Camera Raw can be turned off by clicking on the top left arrow of the histogram. Similarly, the red highlight clipping warnings can be turned off by clicking on the top right triangle of the histogram.
It is important to note that clipping may not always be undesirable. Small amounts of clipping may be acceptable, especially when it occurs in the background or in specular highlights, such as reflections of light or the sun on shiny objects.
Smart Alarm Clock: All-in-One Solution for Your Bedroom?
You may want to see also
![]()
You can turn off the blue colour by clicking on the upper-left triangle on the histogram display in Photoshop
If you're using the Camera Raw filter and your images are showing a strange blue colour, this is likely due to some kind of chroma noise. Chroma noise is usually filtered out by the phone's JPEG conversion software, but if you're shooting in RAW, it won't be.
If you're using Photoshop, you can turn off the blue colour cast by clicking on the upper-left triangle on the histogram display. This is called the Shadow/Highlight Clipping Warning and it indicates shadow or highlight areas that are lacking detail and have gone completely black or completely white. Clicking on the upper-left triangle will turn off the warning.
You can also try using the Match Color adjustment in Photoshop. Go to Image -> Adjustments -> Match Color, and check the box for Neutralize. This should remove the blue colour cast.
Another option is to use the Levels Adjustment Layer in Photoshop. Open a Levels Adjustment Layer, change the channel to Red, and adjust the knobs that control the darks and highlights until they meet the left and right edges of the histogram. Repeat this process for the Green and Blue channels.
If you're using Adobe Lightroom, you can try adjusting the colour format in the Camera Raw import settings. This may get rid of the blue spots, but it could also make the rest of the photograph look weird.
Finally, if none of these solutions work, you may need to try a different photo editing software or adjust the white balance on your camera before shooting.
Charging Camera Batteries: Alone Show Secrets Revealed
You may want to see also
![]()
The blue colour indicates underexposed areas of the image
When using the Camera Raw filter, you may notice that underexposed areas of your image are highlighted in blue. This is a feature called the Shadow/Highlight Clipping Warning, which indicates that these areas are lacking detail and have gone completely black.
The blue highlights can guide you in adjusting the exposure of your image. You can minimise the blue areas by "pulling them in" with the exposure controls in the Camera Raw dialog box. Here, you can modify attributes such as exposure, brightness, clarity, and saturation. You can also adjust the shadows and highlights, whites, and blacks to improve the detail in your image.
If you do not wish to see the blue highlights, you can turn them off by clicking on the triangles in the upper corners of the histogram or by pressing the "u" key.
Downsizing Raw Camera Files: Techniques for Efficient Storage
You may want to see also
![]()
You can also press 'U' to toggle the shadow warning
When using the Camera Raw Filter, you may notice that everything has a blue shine. This is due to the Shadow Clipping Warning feature, which indicates that there are shadow areas in your image that are lacking detail and have gone completely black. These areas may be underexposed, and you can use the Shadow Clipping Warning to identify them so that you can adjust your image accordingly.
You can toggle the Shadow Clipping Warning on and off by pressing the letter "U" on your keyboard. This is a useful shortcut to know, as it allows you to easily view the areas of your image that may require adjustments. By toggling the warning on and off, you can see the impact of the shadow areas on your image and make more informed editing decisions.
In addition to the "U" key, you can also use the triangles in the upper corners of the histogram to turn the Shadow Clipping Warning on and off. The histogram is a graphical representation of the tonal distribution in your image, and the triangles in the upper left and right corners are used to control the shadow and highlight clipping warnings, respectively.
By utilizing the Shadow Clipping Warning feature and pressing "U" to toggle it on and off, you can make more precise adjustments to your images and improve the overall quality of your work.
T3 Batteries: Compatible with T5 Cameras?
You may want to see also
Frequently asked questions
This is likely due to the black clipping detector, which shows the shadow areas of your image that are lacking detail and have gone completely black. You can turn it off by clicking on the top left arrow of the histogram.
In Camera Raw, you can click on the little arrow on the top left of the histogram to turn off the shadow indicator (blues). Alternatively, you can use the keyboard shortcut "U" to toggle the shadow warning.
The blue highlights are called the Shadow/Highlight clipping warnings, which indicate shadow or highlight areas that are lacking detail and have gone completely black or white. They can be turned on and off using the triangles in the upper corners of the histogram.
The Camera Raw Filter only works with image layers that have been opened with Camera Raw. If you have not opened an image using Camera Raw, or if you have not selected a layer within that image, then the filter will be greyed out.