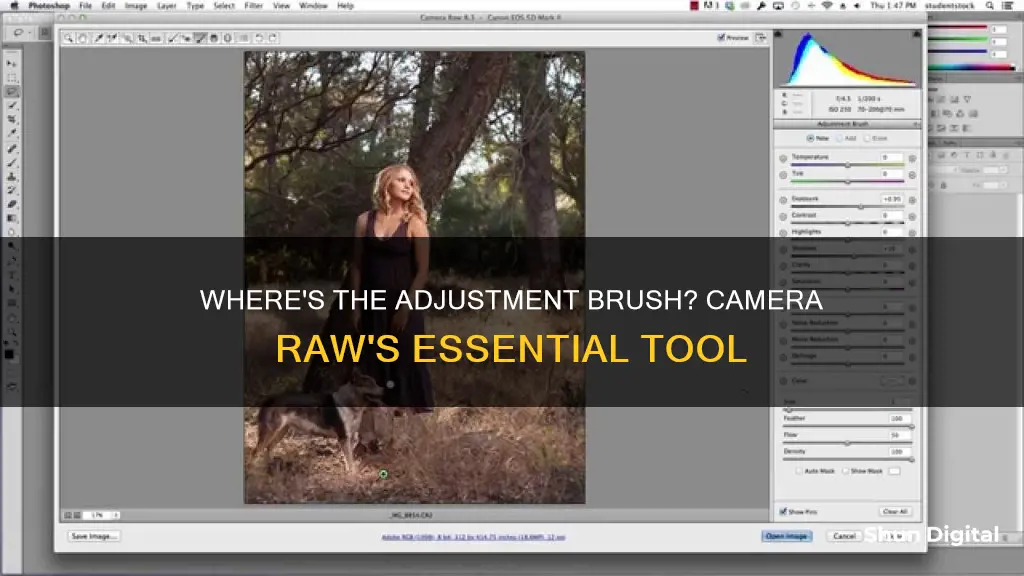
The Adjustment Brush is a tool in Adobe Camera Raw (ACR) that allows users to make local adjustments to specific areas of a photo. It is located at the top left of the dialog box and is possibly equivalent to the Dodge and Burn tools in Photoshop. The Adjustment Brush isolates a specific area by masking it, similar to using layer masks in Photoshop. When the Adjustment Brush icon is clicked, the right panel changes to the Adjustment Brush tab, where users can modify the size of the brush and adjust the feather and density (flow). The Adjustment Brush can be cumbersome to use, but it can speed up the editing workflow with practice.
| Characteristics | Values |
|---|---|
| Location | Top left of the dialog box |
| Use | Making local adjustments to specific areas of your photo |
| Similar Tools | Dodge and Burn tools in Photoshop |
| Function | Lightens or darkens a specific area |
| Application | Click on the Adjustment Brush icon, modify the brush size and determine how much feather and density (flow) to apply |
| Icon | A pin appears to show where the adjustment has been made |
| Other Features | Auto Mask, Graduated Filter, Radial Filter |
What You'll Learn
![]()
The Adjustment Brush tool is used to make local edits
The Adjustment Brush tool is a powerful feature in image editing software such as Adobe Camera Raw, Lightroom, and Photoshop, used to make localised edits to specific areas of an image. It allows users to "paint" adjustments directly onto their images, targeting specific sections while leaving others untouched.
When using the Adjustment Brush tool, you can modify the size, feather, flow, and density of the brush to suit your needs. The size determines the pixel diameter of the brush, while feather controls the hardness or softness of its edges. Flow refers to the rate at which the adjustment is applied, and density or opacity affects the transparency of the stroke.
To use the Adjustment Brush tool, you first need to select it from the toolbar. In Lightroom, you can access it by clicking the icon in the Develop module or using the keyboard shortcut 'K'. In Photoshop, it's found by clicking and holding the standard Brush Tool and then choosing the Adjustment Brush Tool. Once selected, you can choose the type of adjustment you want to make, such as brightness, contrast, or colour changes.
The Adjustment Brush tool is particularly useful when you need to make adjustments to specific parts of your image without affecting the entire picture. For example, you can use it to brighten a subject's face, darken the sky, or enhance specific colours. The tool isolates a specific area by masking it, allowing you to make precise adjustments without affecting the surrounding areas.
The Adjustment Brush tool simplifies the editing process by combining the traditional workflow of selecting, masking, and applying adjustments into a single step. It is an excellent option for beginners and advanced users alike, offering a straightforward and intuitive approach to local image adjustments.
Charging Camera Batteries: Strategies for Dead Rising Players
You may want to see also
![]()
How to reset the sliders
To reset the sliders in Camera Raw, you can follow these steps:
- Double-click a slider: This will reset a specific slider to its default value without affecting the others. This is helpful if you want to undo changes made to a particular slider.
- Shift-double-click a slider: Performing this action will restore the Auto setting to just that slider.
- Click "Default" in the Basic or HSL/Grayscale tab: By clicking "Default," you can reset all the sliders in the current tab to their default values, removing any custom settings you may have applied.
- Choose "Camera Raw Defaults" from the Camera Raw Settings menu: This option resets all the sliders in all the tabs to the default settings for the camera model used to capture the photo. It's like reverting to the original camera settings.
- Hold down Alt/Option and click "Reset": Holding down Alt/Option and clicking "Reset" (which changes from "Cancel") allows you to restore the dialog settings that were in place when the dialog was first opened.
Additionally, when you open a photo into Camera Raw, it is automatically adjusted according to the built-in profile for your camera model. If you want to restore these initial settings, you can choose "Image Settings" from the Camera Raw Settings menu. This will revert the settings to those attached to the file from either the initial photo shoot or a previous Camera Raw session.
Fujifilm S1: The Right Camera Battery Choice
You may want to see also
![]()
The Adjustment Brush is similar to the Dodge and Burn tools in Photoshop
The Adjustment Brush is a local editing tool in Adobe Camera Raw (ACR) that is similar to the Dodge and Burn tools in Photoshop. Dodging and burning are techniques that originated in the darkroom, where photographers would control the exposure of selected areas of an image by allowing more or less light to reach a particular area.
The Adjustment Brush in ACR allows you to make similar local adjustments to your photo by isolating a specific area through masking. This is similar to using layer masks in Photoshop. The Dodge and Burn tools in Photoshop also allow you to make local adjustments by lightening or darkening specific areas of an image.
When using the Adjustment Brush in ACR, you can modify the size of the brush and adjust the feather and density (flow) to control how the adjustment is applied. Similarly, in Photoshop, you can configure the Dodge and Burn tools by adjusting the brush size, hardness, and other advanced settings.
Both the Adjustment Brush in ACR and the Dodge and Burn tools in Photoshop give you control over specific areas of your image, allowing you to enhance your photos and make them more visually appealing.
Calibrating Your Lith Battery: A Step-by-Step Guide
You may want to see also
![]()
The Graduated Filter tool can be used in conjunction with the Adjustment Brush
The Adjustment Brush is an editing tool in Adobe Camera Raw (ACR) that allows you to make local adjustments to specific areas of your photo. This is particularly useful when you need to make adjustments beyond the initial global adjustments of a RAW file in ACR.
The Adjustment Brush isolates a specific area by masking it, and when you click on the Adjustment Brush icon, the right panel changes to the Adjustment Brush tab. The bottom sliders modify the size of the brush, and you can also adjust the feather and density (flow) to control how hard or soft the brush is and how much adjustment is applied.
The Graduated Filter tool is another feature in ACR that allows you to apply adjustments across a particular region of your photo, which can be as wide or narrow as needed. The Graduated Filter can be used in conjunction with the Adjustment Brush for more precise editing.
For example, you can use the Graduated Filter on skies and then use the Adjustment Brush to mask areas that you don't want the Graduated Filter to affect. This combination can speed up your editing workflow and reduce the need for further adjustments in other software like Photoshop or Lightroom.
By using the Graduated Filter and Adjustment Brush together, you can make broad local adjustments to your images, lightening or darkening specific areas. This can be especially useful for refining details that require more control, which can be done in Photoshop using layer masks.
In summary, the Graduated Filter tool and the Adjustment Brush in ACR are powerful tools that can be used together to make precise local adjustments to your images, enhancing your editing capabilities and streamlining your post-processing workflow.
Choosing Solar Panels for Trail Cameras
You may want to see also
![]()
How to remove Adjustment Brush edits
To remove Adjustment Brush edits in Camera Raw, follow these steps:
- Choose the Adjustment Brush tool. You can do this by selecting it from the toolbar or by pressing "K" on your keyboard.
- Check "Mask" and "Overlay" by pressing "Y" and "V", respectively, or by locating these options in the settings area.
- To remove adjustments in a specific area, click on the pin for that area, then click the "Erase" button or hold down "Alt" or "Option" and apply strokes where you want to erase the mask.
- To remove a pin and its adjustments entirely, click on the pin, then press "Backspace" or "Delete". Alternatively, you can right-click on the selected pin and choose "Delete" from the context menu, or hold down "Alt" or "Option" and click on the selected pin.
- If you want to remove all Adjustment Brush edits from the photo and reset the tool mode to "New", click the "Clear All" button.
Keep Your Camera Ready: Battery Storage While Traveling
You may want to see also
Frequently asked questions
The Adjustment Brush is located at the top left of the dialog box in Adobe Camera Raw.
After making adjustments in the Basic and Tone Curve tabs, click the Adjustment Brush tool (K). The sliders for the tool display (some are like the sliders in the Basic tab). Click the + or – button for any slider to “zero out” all the sliders except the one you click.
For the brush settings, try a Feather value of 50–95 (to allow the edits to fade into surrounding areas), a Flow value of 60 (for the amount of adjustment produced by each stroke), and a Density value of 60 (for the level of transparency in the stroke).
The Adjustment Brush is used to make local adjustments to your image, targeting specific areas that need attention while leaving other areas untouched.