Haze can be defined as selective low-contrast areas within the midtones of the histogram of an image. Adobe's Camera Raw filter includes a Haze control, which allows photographers to adjust the amount of haze in a photograph. This feature can be used to reduce or add haze to an image. The Dehaze slider can be found in the Basic section of the Raw controls, right beneath Texture and Clarity. Dragging the slider to the right removes haze, while dragging it to the left increases the haze.
| Characteristics | Values |
|---|---|
| What is Haze? | Selective low-contrast areas within the midtones of the histogram |
| What is the Dehaze Tool? | A feature in Adobe Photoshop's Camera Raw filter that reduces atmospheric fog and haze from images |
| How to Use the Dehaze Tool? | Drag the Dehaze slider to the right to remove haze and to the left to add haze |
| Where is the Dehaze Tool Located? | In the Basic section of the Raw controls, right beneath Texture and Clarity |
| Additional Steps to Enhance Images | Boost the Clarity and Brighten the Exposure to balance out the image |
What You'll Learn
![]()
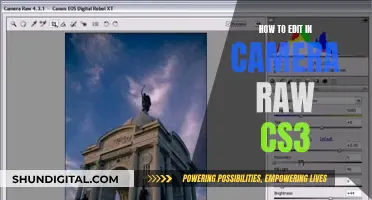
The Dehaze tool can be used to add haze to an image
Haze in images is often the result of atmospheric conditions like fog, UV rays, and environmental factors like pollution. While photographers usually prefer their pictures to be clear and free of haze, there are times when adding haze to an image can create a dramatic effect. This is where the Dehaze tool comes in.
The Dehaze tool is a feature of Adobe Photoshop's Camera Raw and Lightroom applications. It is designed to reduce atmospheric fog and haze from images, resulting in clearer pictures. However, what makes this tool truly versatile is its ability to work both ways. Not only can it remove haze, but it can also be used to add haze to an image. This feature provides photographers with more creative control over their images, allowing them to enhance their photographs in unique ways.
To use the Dehaze tool to add haze to your image, first, convert your image into a smart object by selecting "Filter" and then "Convert for Smart Filters". This step ensures that you work non-destructively, giving you the flexibility to make changes without permanently altering your original image. Once your image is converted, open Adobe Camera Raw by selecting "Filter" and then "Camera Raw Filter".
With the Basic Panel open in front of you, you will find the Dehaze slider. Dragging this slider to the left will introduce haze into your image. Play around with the slider to achieve the desired amount of haze. It is important to note that going too far to the left will increase the haze significantly, potentially giving your image an unnatural look. Therefore, use this tool with moderation to achieve the best results.
The Dehaze tool is not just limited to outdoor photography or images with existing haze. It can also be creatively applied to clear images to add a dreamy or artistic touch. By reducing the contrast and increasing the haze, you can achieve a misty and ethereal effect. This tool is especially useful for landscape photographers who want to add a touch of atmosphere to their images.
In conclusion, the Dehaze tool is not just for removing haze from photographs. Its ability to add haze opens up creative possibilities for photographers, allowing them to enhance their images and create unique artistic effects. By understanding how to use this tool effectively, photographers can take their post-processing skills to the next level and produce captivating images that stand out.
Cleaning Camera Battery Contacts: A Step-by-Step Guide
You may want to see also
![]()
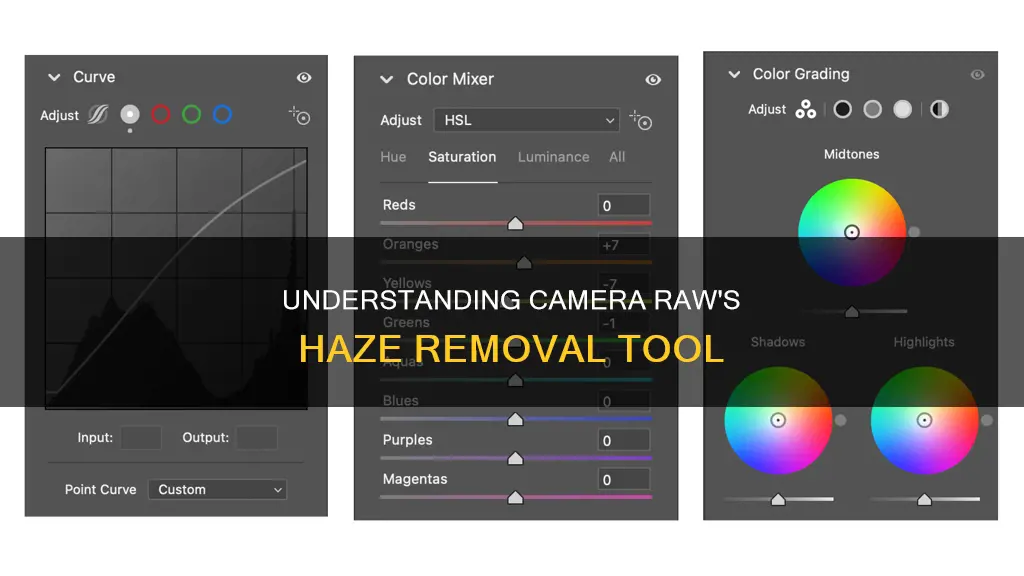
Haze is caused by atmospheric conditions like fog and UV rays
Haze is an atmospheric phenomenon that occurs when dust, smoke, and dry particles in the air reduce the clarity of the sky. It is primarily caused by a combination of atmospheric conditions and human activities. Atmospheric conditions, such as fog, play a significant role in the formation of haze. Fog, a type of obscurity in the lower layers of the atmosphere, is caused by the suspension of water droplets, usually when the air is nearly saturated with moisture. In contrast, haze often occurs during periods of unusual dryness in the lower atmosphere.
When fog forms, it reduces visibility to less than 1,000 meters, while haze is characterized by the suspension of extremely small, dry particles that are invisible to the naked eye but give the air an opalescent appearance. These particles can include dust, smoke, volcanic ash, or industrial pollutants. They scatter and absorb sunlight, reducing the clarity and color of what we see. This is particularly noticeable during sunrise and sunset, when the sky may appear subdued or washed out.
Human activities also contribute significantly to the formation of haze. Vehicle traffic, industrial fuel burning, and manufacturing operations emit pollutants into the atmosphere, creating a cloud of haze that can hang in the air for days. Wildfires, farming practices, and the burning of fossil fuels further exacerbate the problem. The industrial revolution, in particular, led to a rapid increase in the concentration of sulfate aerosols, which have a significant impact on the planet's climate.
Haze has become a global issue, affecting not only local environments but also international relations. It can migrate across borders, carried by wind, and pollute neighboring countries. Additionally, haze poses health risks, with exposure to haze particles linked to increased respiratory illnesses, decreased lung function, and even premature death.
Understanding the causes and impacts of haze is crucial for developing effective strategies to mitigate its effects and improve air quality on a global scale.
Unleashing Camera Raw: Mastering the Art of Masking
You may want to see also
![]()
Haze can be removed from images using Adobe's Dehaze tool
The Dehaze tool is built on the theory of light transmission, estimating the loss of light due to absorption and scattering in the atmosphere. This allows the tool to analyse the scene and make adjustments to enhance the image. It is particularly useful for landscape, nature, wildlife, and wedding photography, where haze caused by fog, UV rays, or pollution can obscure the finer details of a shot.
To use the Dehaze tool in Photoshop, first convert your image into a smart object by selecting "Filter > Convert for Smart Filters". Then, open Adobe Camera Raw by selecting "Filter > Camera Raw Filter". In the Basic Panel, you will find the Dehaze slider. Drag the slider to the right to remove haze and to the left to add haze. It is important to note that too much haze removal can make the image look unnatural, so adjustments to brightness, clarity, and exposure may be needed to achieve the desired result.
In Lightroom, the Dehaze slider can be found in the Develop Tab. As with Photoshop, dragging the slider to the right will remove haze, and to the left will add it. The Lightroom Dehaze tool is quite powerful and can make images appear darker and more saturated, so it is recommended to use local adjustments rather than applying it to the entire image.
The Dehaze tool is a valuable addition to a photographer's post-processing toolkit, allowing them to quickly and easily enhance their images by reducing or adding haze to achieve their desired aesthetic.
Charging Your Spy Pen Camera: How Long Does It Take?
You may want to see also
![]()
The Dehaze tool can be found in the Effects panel
The Effects panel in Camera Raw contains various tools to adjust the look of an image, and the Dehaze slider is a welcome addition to this suite of features. By dragging the slider to the right, haze is removed, and dragging it to the left adds haze. This simple adjustment can have a dramatic effect on the overall contrast and clarity of a photograph.
The placement of the Dehaze slider in the Effects panel makes logical sense, as photographers often want to apply this adjustment during the initial stages of correction. With the Dehaze tool easily accessible from the start, users can quickly enhance their images before moving on to more advanced edits.
In addition to its use in Camera Raw, the Dehaze tool is also available in Adobe Lightroom. Located in the Develop module under the Effects panel, it serves the same function of reducing or adding haze to images. This tool is particularly handy for landscape photographers, as it can bring out the details of distant objects obscured by haze.
The Dehaze tool in both Camera Raw and Lightroom is a valuable asset for photographers, offering a quick and effective way to enhance their images and ensure the finest details are captured and presented.
Polaroid Camera Battery Guide: Which Batteries to Use?
You may want to see also
![]()
The Dehaze tool can be used to adjust tone curves, shapes and vignetting effects
Haze in images is often the result of atmospheric conditions like fog, UV rays, and environmental factors like pollution. This can be a problem for photographers, especially those who want to capture images in their truest and purest forms. This is where the Adobe Camera Raw Dehaze tool comes in.
The Dehaze tool is a Creative Cloud update that helps reduce atmospheric fog and haze from images, resulting in clearer pictures. It can also be used to add haze to an image for effect. The tool is built on the theory of light transmission and estimates the loss of light due to absorption and scattering into the atmosphere. This allows the tool to adjust tone curves, shapes, and vignetting effects.
In Adobe Camera Raw, the Dehaze tool can be found in the Effects panel under a slider named 'Dehaze'. By dragging the slider to the right, you can remove haze, and dragging it to the left will add haze. This adjustment can also be made during the initial stages of correction in the Basic panel.
The Dehaze tool is particularly useful for restoring landscape images where the background details fade away due to haze. It can enhance the details of mountains, making them stand out, and improve the saturation in flat-contrast images. Additionally, it can be used to bring out details in lighter and slightly overexposed areas, such as skies and distant horizon lines.
Overall, the Dehaze tool is a valuable feature in Adobe Camera Raw that allows photographers to adjust tone curves, shapes, and vignetting effects, resulting in clearer and more detailed images.
Recycling Camera Batteries: Safe Disposal and Environmentally Friendly Options
You may want to see also
Frequently asked questions
The Haze tool is in the Basic section of the Raw controls in the Adjustment panel on the right.
First, convert your image into a smart object (Filter > Convert for Smart Filters). Then, open Adobe Camera Raw (Filter > Camera Raw Filter) and drag the Haze slider to the left to add haze.
First, convert your image into a smart object (Filter > Convert for Smart Filters). Then, open Adobe Camera Raw (Filter > Camera Raw Filter) and drag the Haze slider to the right to remove haze.
The Haze tool is used to adjust the tone curves, shapes, and vignetting effects. It can also be used to add haze to an image for dramatic effect.