There are several different camera modes, which are the different selections available on the top dial of your camera. These modes are predetermined settings that help you take a photograph. The mode dial is the most important dial on your camera, as it determines how the camera will act when you point it at a scene.
One of these modes is Guide Mode, also known as Program Mode or P Mode. In this mode, the camera automatically selects the shutter speed and aperture, while you set the ISO. This mode is almost like Auto Mode, but you can change the aperture and shutter speed to suit the scene. If you point your camera at a darker scene, the f-number will drop and the shutter speed will slow down. If you point it at a brighter scene, the f-number will rise and the shutter speed will get faster.
| Characteristics | Values |
|---|---|
| What is Guide Mode? | A semi-automatic mode that allows you to control the ISO while the camera controls the aperture and shutter speed. |
| When to use it? | When you want to control the ISO but don't mind the camera automatically adjusting the shutter speed and aperture to suit the lighting conditions. |
| How does it work? | You set the ISO, and the camera adjusts the aperture and shutter speed accordingly to achieve the desired exposure. |
| Benefits | Useful when you want to focus on composition rather than technical settings. It's a good transitional mode for beginners who want more control than Auto mode but aren't ready for full Manual mode. |
| Drawbacks | Limits your control over depth of field and motion blur as you can't directly set the aperture and shutter speed. |
What You'll Learn
![]()
Guide mode vs. manual mode: When to use each
Guide mode is a setting on some cameras that helps users take photos in challenging conditions. It is an automatic mode that adjusts the camera's settings to suit the scene being photographed. The camera's ISO, aperture, and shutter speed are all automatically adjusted in Guide mode, just as they are in Auto mode.
Manual mode, on the other hand, gives the photographer complete control over the camera's settings. They can adjust the ISO, aperture, and shutter speed independently to achieve their desired effect. This can be intimidating for beginners, but it offers a level of flexibility that other modes cannot match.
When to Use Guide Mode
Use Guide mode when you want to take photos quickly and don't have time to adjust your camera's settings manually. This could be the case if you're photographing a fast-moving subject or if the lighting conditions are changing rapidly. Guide mode can also be useful when you're first learning how to use a camera and want to focus on composition rather than camera settings.
When to Use Manual Mode
Use Manual mode when you want full control over your camera's settings and are working in slow-paced shooting scenarios or unchanging lighting conditions. This could include landscape photography, studio photography, or any situation where you have time to carefully adjust your settings. Manual mode is also useful when you want to achieve specific creative effects, such as a shallow depth of field or motion blur.
Flying with Fully Charged Camera Batteries: Safe or Not?
You may want to see also
![]()
How to use guide mode for great results
Guide mode, or Program mode (P Mode), is a semi-automatic mode that gives you control over some aspects of your camera settings while the camera handles the rest. It's a great mode to use when you want to focus on composition and framing without worrying about adjusting all your camera settings manually. Here are some tips on how to use guide mode to get excellent results:
Understand the Exposure Triangle
Before using guide mode, it's essential to understand the three key elements of the exposure triangle: ISO, aperture, and shutter speed. These settings work together to determine the overall brightness and quality of your photos.
- ISO: Controls the camera's sensitivity to light. A higher ISO value increases sensitivity and exposure but can introduce noise and graininess.
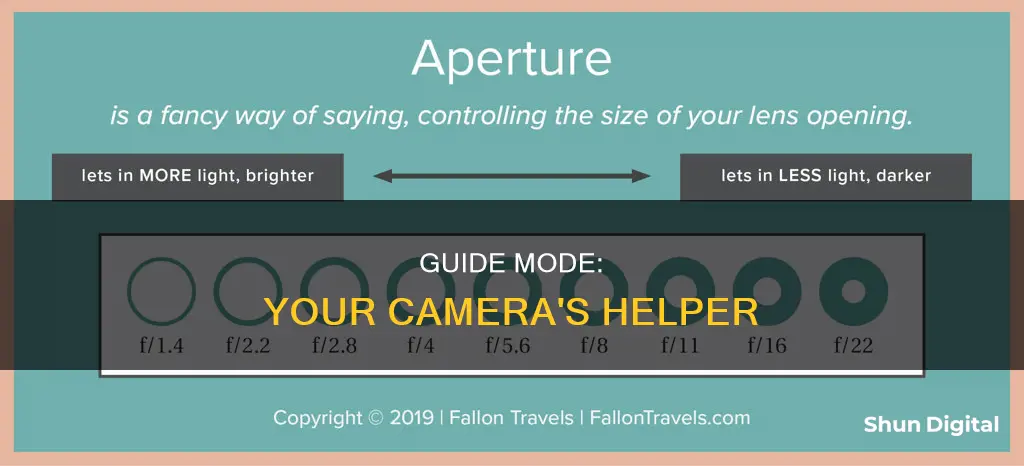
- Aperture: Refers to the opening in the lens that controls the amount of light entering the camera. It's measured in f-stops, where a smaller f-number indicates a larger aperture and more light. Aperture also affects depth of field, or how much of your image is in focus.
- Shutter Speed: Determines the duration the shutter remains open, controlling how long light hits the camera sensor. Faster shutter speeds freeze motion, while slower speeds can create motion blur.
When to Use Guide Mode
Guide mode is ideal when you want to control the ISO but don't need to adjust the shutter speed and aperture manually. It's a convenient mode when shooting outdoors or under powerful artificial lights, as you can set a low ISO to minimize noise and let the camera handle the rest.
Using Guide Mode as a Learning Tool
If you're new to photography and want to transition from Auto mode to more advanced modes, guide mode is an excellent stepping stone. It allows you to experiment with different ISO settings while the camera automatically adjusts the aperture and shutter speed. This helps you understand the relationship between these settings and their impact on your images.
Adjusting Settings in Guide Mode
When using guide mode, you can adjust the ISO to suit your lighting conditions. For well-lit outdoor scenes, an ISO of 100-200 is a good starting point. In lower light conditions, you might use ISO 400 or 800. Remember that a higher ISO can introduce noise, so it's best to use the lowest ISO setting that suits your lighting conditions.
While the camera will automatically select the aperture and shutter speed in guide mode, you can influence these settings by adjusting the exposure compensation. This feature allows you to make your images brighter or darker without directly changing the aperture or shutter speed.
Additionally, guide mode gives you control over other camera features such as white balance, metering mode, point of focus, and flash usage. These settings can enhance your images by removing color casts, adjusting for lighting conditions, and ensuring proper focus.
When Not to Use Guide Mode
While guide mode is versatile, there are times when other modes may be more suitable. If you need precise control over aperture for depth of field or shutter speed for capturing motion, consider using Aperture Priority or Shutter Priority modes. If you're an experienced photographer who wants full control over all settings, Manual mode is the best choice.
Remember, guide mode is a valuable tool when you want to simplify your camera settings without sacrificing creative control entirely. It's an excellent mode for beginners and experienced photographers alike, offering a balance between full automation and manual control.
Where to Buy Camera Batteries: CVS Options
You may want to see also
![]()
Guide mode vs. aperture priority mode
Guide mode is a setting on some cameras that allows users to learn how to adjust settings to capture different types of photos. It is an educational tool that helps users understand how aperture, shutter speed, and ISO settings affect their photographs.
Aperture Priority mode, on the other hand, is a semi-automatic camera mode that gives the photographer control over the aperture while the camera selects a corresponding shutter speed. This mode is often represented as "A" or "Av" on camera dials.
In Aperture Priority mode, the photographer can adjust the aperture and ISO, while the camera automatically selects the shutter speed to maintain a good exposure. A wider aperture creates a shallow depth of field, blurring the background, while a narrower aperture creates a deeper depth of field, keeping the entire scene in focus. Aperture Priority mode is particularly useful for portrait photography, wildlife photography, and any situation where the photographer wants to control the appearance of sharpness and blurriness in the image.
Guide mode is designed to teach users about the different settings and their effects, whereas Aperture Priority mode is a tool for photographers who want more control over their images without having to manually adjust every setting.
Aperture Priority mode is a good choice for beginners who want to understand the impact of aperture and ISO on their photographs, as well as professionals who want to focus on specific settings without worrying about the shutter speed.
While Guide mode assists users in understanding the various camera settings, Aperture Priority mode offers more creative freedom and flexibility by allowing control over the aperture and ISO.
Where is My Image Processor? Camera Raw's Missing Feature
You may want to see also
![]()
Guide mode vs. shutter priority mode
Guide mode is not a standard mode on cameras, but it is likely a custom mode set by the user or a mode specific to a certain camera model. However, the standard modes on cameras include Aperture Priority, Shutter Priority, Program, and Manual.
Shutter Priority Mode:
Shutter Priority Mode, also known as Shutter Speed Priority, is a mode on your camera that allows you to manually select a shutter speed for a given exposure. The camera then automatically chooses the appropriate aperture and ISO settings to complement the selected shutter speed. Shutter Priority Mode is perfect for capturing fast-moving subjects with minimal motion blur. It is also useful for creating artistic blur effects in your photos by using slower shutter speeds. This mode is usually labelled as "S" or "Tv" for "Time Value" on most digital camera mode dials.
Aperture Priority Mode:
Aperture Priority Mode gives you control over the aperture and ISO settings, while the camera automatically selects the corresponding shutter speed to produce a well-exposed image. This mode is ideal for situations where you need to control the depth of field in your images. It is also useful for beginners who want to learn about camera settings without worrying about manually adjusting the shutter speed.
The main difference between Guide Mode and Shutter Priority Mode is that Shutter Priority Mode is a standard mode available on most cameras, while Guide Mode may be a custom mode set by the user or specific to a certain camera model. In Shutter Priority Mode, you have control over the shutter speed, and the camera adjusts the aperture and ISO accordingly. Guide Mode, on the other hand, may offer a different set of customizable settings depending on the user's preferences or the camera model.
In conclusion, while Shutter Priority Mode is a standard mode that gives you control over shutter speed, Guide Mode may offer a customizable set of settings that can include shutter speed, aperture, ISO, or other parameters. The specific features of Guide Mode will depend on how it has been configured by the user or the camera manufacturer.
Mastering Replay Mode: Rotating Camera in Asseto Corsa
You may want to see also
![]()
Guide mode: a transitional tool
Guide mode is an excellent tool for photographers looking to transition from automatic to manual camera settings. It is a semi-automatic mode that allows users to have more control over their camera settings than Auto mode, but not as much responsibility as Manual mode.
In Guide mode, the camera automatically adjusts the shutter speed and aperture based on the available light to achieve an exposure value of zero. This takes the pressure off the photographer to determine the correct settings for a well-exposed image. However, the photographer can still make adjustments to the ISO to control the camera's light sensitivity and, consequently, the image's brightness. This is an excellent way for beginners to learn how ISO affects an image without worrying about aperture and shutter speed.
Guide mode is also a useful tool when photographers are faced with tricky lighting situations and need a helping hand to determine the best basic settings. It is available on all entry-level and advanced cameras and is usually indicated by a "P" on the mode dial.
While Guide mode is a helpful learning tool, it has its limitations. Photographers have no control over the depth of field or motion in this mode, which can be restrictive when trying to achieve specific effects. Additionally, Guide mode may not be suitable for fast-paced conditions with rapidly changing light, as it does not allow for quick adjustments to all exposure settings.
For photographers who want more control over their camera settings but aren't ready for the full responsibility of Manual mode, Guide mode is an excellent transitional tool. It allows users to experiment with different ISO settings and gain a better understanding of exposure before moving on to more advanced modes like Aperture Priority, Shutter Priority, and full Manual.
Olympus Camera Battery Encoding: What's the Deal?
You may want to see also
Frequently asked questions
Guide mode, or program mode, is a semi-automatic mode that allows you to change the camera's aperture and shutter speed settings. The camera will then adjust the ISO to get a balanced exposure.
ISO refers to the sensitivity of the camera's sensor. A lower ISO means the camera is less sensitive to light, and a higher ISO means it is more sensitive.
Aperture is the opening in the lens that lets light into the camera. A wider aperture lets in more light, resulting in a brighter image, while a narrower aperture lets in less light, making the image darker.
Aperture priority is useful when you want to control the depth of field in your image, while shutter priority is better for capturing motion.
Guide mode is a good option when you want to adjust the aperture and shutter speed but don't want to worry about setting the ISO. It's also a useful transitional mode when you're learning how to use manual settings.