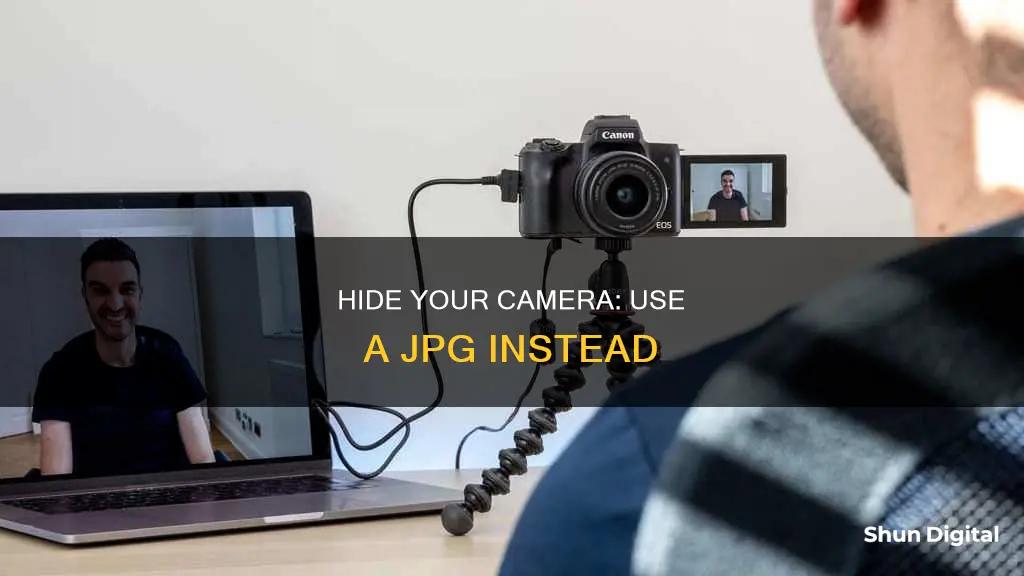
There are many reasons why you may want to use a JPG image instead of your computer camera. For example, you may want to use a virtual background without a green screen or blur your background. To do this, you will need to download an app that allows you to use a virtual background. There are many free apps available, such as Zoom, Skype, and Microsoft Teams. Once you have downloaded the app, open the settings and look for the option to Choose Virtual Background or Blur My Background. Then, simply select the JPG image you want to use, and it will appear instead of your computer camera feed.
What You'll Learn
![]()
Using an online converter
There are many online converters available that can help you convert your image files to a JPG format. These include:
- Img2Go: This online converter allows you to convert all kinds of files into images. You can convert video to image to create screenshots or convert photos into other formats such as GIF, PNG, SVG, JPEG, and more. It's free to use and mobile-friendly.
- Online-Convert: This website contains a list of all the file types it can convert to and from. It can handle various image types, including .RAW files, which can be harder to convert online due to their size.
- CloudConvert: This online tool supports various file formats, including PNG, JPG, GIF, WEBP, and HEIC. You can use the options to control image resolution, quality, and file size. CloudConvert is ISO 27001 certified and has been in operation since 2012.
- FreeConvert: This online converter allows you to convert images directly on your mobile device using their Android or iOS app. It supports over 500 image formats and can convert camera RAW image files. It guarantees file security and privacy, with files protected by 256-bit SSL encryption and automatically deleted after a few hours.
To use an online converter, follow these general steps:
- Choose a web converter that suits your needs and supports your desired input and output formats.
- Upload your image file by selecting it from your device or entering a URL if the image is already online.
- Specify the output format as JPG or JPEG.
- Apply any optional enhancements or adjustments to the image, such as changing the size, quality, or DPI.
- Start the conversion process by clicking the "Convert" or "Start" button.
- Download the converted image file to your device or save it to cloud storage.
Evolution of Retina Cameras: A Historical Perspective
You may want to see also
![]()
Using Paint on Windows
To substitute a JPG for your computer camera, you can use Microsoft Paint. Here's a step-by-step guide on how to do it:
Step 1: Open Microsoft Paint
Click on the Windows logo in the bottom-left corner of your screen, then type "paint" in the search bar. Click on Paint in the Start menu to open the Paint window. Make sure to select classic Paint and not Paint 3D.
Step 2: Open an Image (Optional)
If you want to edit an existing image, click on "File" in the top-left corner of the Paint window, then select "Open" from the drop-down menu. Browse to the location of the image you want to open and select it.
Step 3: Select the Eyedropper Tool
Click on the eyedropper-shaped icon in the "Tools" section at the top of the Paint window. This will allow you to select colours from your image.
Step 4: Choose the Colours
Click on the colour you want to replace with your JPG. This will be assigned as "Color 1" at the top of the Paint window. Then, click on the eyedropper tool again and select the colour you want to replace it with. This will be assigned as "Color 2".
Step 5: Select the Eraser Tool
Click on the eraser-shaped icon in the "Tools" section. This tool will be used to replace the selected colours.
Step 6: Replace the Colour
Right-click and drag across the colour you want to replace. Make sure to use the right mouse button for this step, as using the left button will erase everything the eraser touches. Dragging with the right button will cause the "Color 2" to replace "Color 1" without altering the other colours in your image.
Additional Tips:
- You can zoom in to get a better view of the colours by clicking the "+" sign in the bottom-right corner of the Paint window.
- If the colour you want to replace is not on the canvas, you can skip selecting it with the eyedropper tool and directly click on the "Color 2" box to choose the replacement colour from the palette.
- If you want to keep the original image, remember to create a copy or duplicate layer before making any changes.
GW2 Camera Modes: Which One is Best?
You may want to see also
![]()
Using Preview on a Mac
While it is not possible to directly add a JPEG image to a PDF using Preview on a Mac, there is a workaround that involves copying and pasting the image into the PDF. This method allows for the repositioning and resizing of the pasted image.
Firstly, open the folder containing the JPEG image you want to add to your PDF. Right-click on the image and select 'Open With' > 'Preview' in the menu. Once Preview is open, press Command+A on your keyboard to select the entire image, then press Command+C to copy it. Next, press Command+V to paste the image, which will result in your original image being covered by a new copy. This pasted copy is now an "object" that can be pasted into your PDF. So, press Command+C again to copy this "object image".
Now, locate the PDF you want to insert the JPEG image into. Right-click on the PDF and select 'Open With' > 'Preview' in the menu. Scroll to the page where you want to add the image and press Command+V to paste it in. You can now use the handlers to reposition and resize the image within the PDF.
In addition to this, Preview on Mac also allows you to crop, resize, rotate, and convert image file types. For example, you can convert image files to JPEG, JPEG 2000, PDF, PNG, PSD, TIFF, and other file types.
Easy Setup Guide: Uniden UDSC15 Surveillance Camera
You may want to see also
![]()
Using Gimp on a PC, Mac or Linux
GIMP is a powerful image manipulation software that can be used on a PC, Mac or Linux device. It is a great tool for quick image modifications, such as resizing, rotating or flipping an image.
To replace your computer camera image with a JPG, you will need to use the 'Export' command in GIMP, as the 'Save' command will force your image to be saved in the XCF format. Here is a step-by-step guide:
- Open your image file in GIMP.
- Go to the 'File' menu and choose 'Export As'.
- Select 'JPEG' as the file type.
- Configure your compression settings.
You can now choose where to save your file and name it.
If you are looking to use this image as your computer camera image, you may need to resize it to fit the required dimensions. This can be done easily in GIMP by going to 'Image' and then 'Scale Image'. Here, you can enter new values for the width and height of your image.
GIMP also offers a range of tools to enhance your images, such as improving composition, colours, sharpness and removing unwanted objects. You can access these tools through the Toolbox or by using keyboard shortcuts.
With its range of features and capabilities, GIMP is a great option for editing images and replacing your computer camera image with a JPG.
Fight Speeding Camera Tickets: Your Legal Rights and Strategies
You may want to see also
![]()
Changing the file extension
Finding the File
First, you need to locate the file on your device. It could be on your desktop or in a specific folder.
Making the File Extension Visible
Depending on your settings, the file extension may not be visible. On Windows, go to "Folder Options" under "Appearance and Personalization Settings" and adjust the "View" tab. On a Mac, look for "Advanced Finder Preferences" to make the extensions visible.
Renaming the File
Right-click on the image file and select "Rename". Now, delete the old extension and replace it with the new one. For example, if the file name is "image.png", you can change it to "image.jpg". Your computer will now treat the file as a JPEG image.
Using Default Image Editing Software
You can also use your operating system's default image editing software to change the file format. On Windows, use "Paint", and on Mac, use "Preview". Open the image file, go to the "File" menu, and select "Save As" or "Export". Choose the desired format from the dropdown list, rename the file if needed, and click "Save".
Using Online Conversion Tools
If you prefer, there are many free online conversion tools available. Simply search for "file extension A to file extension B" (e.g., "PNG to JPG"), upload your image file, select the desired format, and download the converted image.
Remember to always back up your files before making any changes, as incorrect file extensions can make your files unusable.
Samsung S10 Plus: Night Mode Missing?
You may want to see also
Frequently asked questions
Find a web converter that suits your device and image type. Then, upload your image, verify that the converter is set to convert your file to a JPEG, and convert the image.
Open Paint, then open your image in Paint. Click "File", then click the arrow next to "Save As". Click "JPEG", rename the file if you wish, then click "Save".
Open your image with Preview, then click "File" and select "Export". Change the format to JPEG, then rename the file and save.
Remove the SD card from your camera, then insert it into your computer's card reader. Open the File Explorer, click on your SD card, then select the pictures you want to transfer. Drag the pictures to a new location, then eject the SD card.