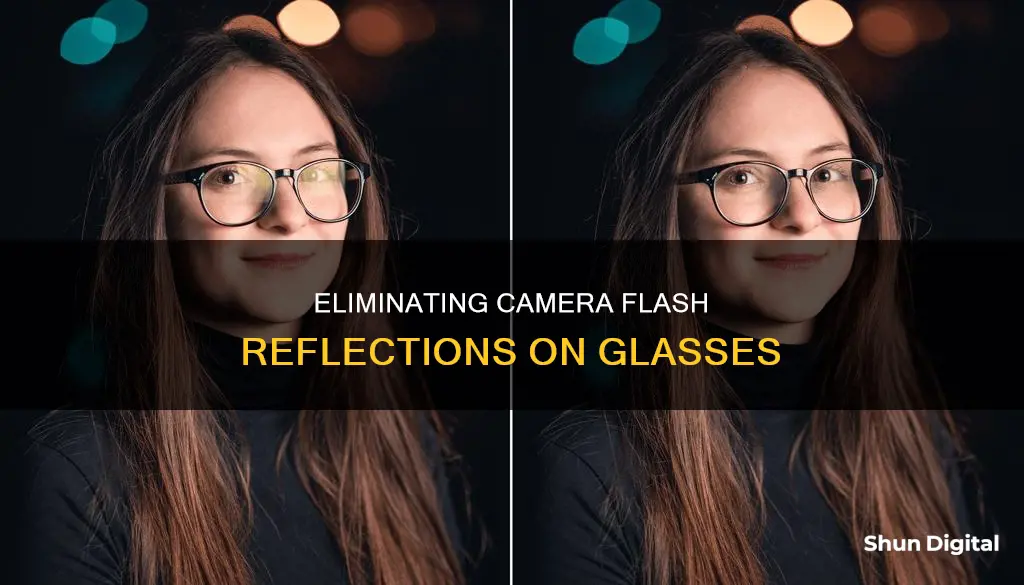
Camera flash reflecting off glasses can be a nuisance, spoiling an otherwise perfect photo. The good news is that there are several ways to tackle this issue, both during the shoot and in post-processing. During a shoot, simple adjustments like changing the angle of the subject's head or the glasses themselves can prevent glare. Alternatively, one can remove the glasses or use backlighting to reduce reflections. If glare does occur, various photo editing tools like Fotor, PhotoDirector, and Adobe Photoshop offer solutions. These include using selection tools, adjustment layers, the Clone Stamp tool, and AI-powered glare removal features to minimise or eliminate the unwanted flash reflections from glasses in your photos.
| Characteristics | Values |
|---|---|
| Type of glare | Sun glare, light glare, flash glare, glasses glare, skin glare |
| Tools | Fotor's glare remover, PhotoDirector, Gimp, Photoshop, Luminar Neo, Affinity, ON1, Capture One, OM Workspace, Digicam, Darktable, GraphicConverter 11 |
| Techniques | Avoid glare in the first place, remove glare in editing, watch your angle, tilt the glasses, change the direction of light, remove the glasses, do an "eye swap", edit out the glare, lasso the light away, use the clone stamp, use the brush tool, use adjustment layers |
What You'll Learn

Using photo editing software
Photo editing software is a great way to remove camera flash glare from glasses in your photos. There are many programs and apps available to help you achieve this, and most offer a range of tools to tackle the issue. Here is a step-by-step guide on using photo editing software to remove those unwanted reflections:
Step 1: Choose Your Software
Firstly, you need to select a suitable photo editing program. Some popular options include Adobe Photoshop, Fotor, PhotoDirector, and Gimp. Some software is free, while others require a subscription or one-off payment.
Step 2: Open Your Image
Once you have chosen your software, open your image file. Most programs allow you to do this by dragging and dropping the image file into the workspace or by clicking an "Open Image" button.
Step 3: Select the Right Tool
The next step is to choose the most appropriate tool for removing the glare. Different software will have different tools, but some common ones include the Clone Stamp tool, the Brush tool, and the Lasso tool.
Step 4: Remove the Glare
Now it's time to start editing. If you are using the Clone Stamp tool, you will need to identify a glare-free area that you can replicate over the glare. For the Brush tool, you can make precise adjustments to the affected area. With the Lasso tool, you can make a freehand selection of the glare and then create an adjustment layer to reduce brightness and contrast.
Step 5: Fine-Tune Your Image
After removing the glare, you may need to make some adjustments to ensure the edited area blends seamlessly with the rest of the image. You can use tools like the Mask tool to blur the edges of your selection and help them blend with the surrounding pixels.
Step 6: Save Your Work
Finally, don't forget to save your edited image. Most software will allow you to save in common formats such as JPG or PNG.
By following these steps, you can effectively remove camera flash glare from glasses in your photos, resulting in a more natural and attractive image.
Exploring Night Owl Cameras: A Comprehensive Guide
You may want to see also

Adjusting the angle of the glasses
Firstly, consider the angle at which your model is facing, or the angle from which you are photographing them. A slight adjustment of their head position can eliminate reflections altogether. If the model cannot move out of the reflection, they can try angling their glasses down. This should be done subtly, so as not to distort their facial features or make them feel uncomfortable.
Additionally, you can adjust your own positioning as the photographer. Moving slightly to the left or right, or adjusting your height in relation to the model, can help to reduce the appearance of glare.
These simple techniques can help minimise the impact of camera flash on glasses, resulting in clearer and more natural photographs.
Facing the Camera: Uncomfortable Reflections on Screen
You may want to see also

Adjusting the direction of the light source
Firstly, it's important to understand the role of light in creating glasses glare. Light reflects off shiny surfaces, and glasses are no exception. Therefore, by manipulating the angle of your subject in relation to the light source, you can minimise the glare. Instead of positioning your subject to face the light directly, try moving their head slightly away from the light source. This subtle adjustment can significantly reduce the amount of light reflecting off the glasses.
Another effective technique is to tilt the glasses themselves, rather than the subject's head. By changing the angle of the glasses in relation to the light, you can minimise the glare while maintaining the desired pose or composition. It's worth noting that completely removing glare might not always be necessary. Simply ensuring that the glare does not cover the eyeball can make a significant difference and simplify the editing process.
Additionally, consider experimenting with backlighting. Instead of using front or side lighting, position your subject so that the light source is behind them. This will reduce the amount of light hitting the glasses directly. However, be cautious when using reflectors with backlighting, as they can bounce light onto the glasses and reintroduce glare.
If adjusting the angle or using backlighting doesn't work, you can try changing the direction of the light source entirely. This may involve moving to a different location or adjusting the lighting setup to eliminate the glare-causing reflections. Remember, the key is to observe how light interacts with the glasses and make the necessary adjustments to minimise the reflections.
By implementing these strategies, you can effectively reduce or eliminate glasses glare by adjusting the direction of the light source. This will help you capture more flattering and natural-looking photographs, minimising the need for extensive editing or post-processing.
Woman Man Camera TV: Sarah Cooper's Guide to Chaos
You may want to see also

Removing the glasses
If you are taking photos of someone wearing glasses, there are a few things you can do to avoid glare in the first place. The main thing to keep in mind is the angle of your subject to the light source. Move your subject's head a little away from the light or change the direction they are facing. You can also try tilting the glasses so that they are not on the same level as the light source. If you are photographing a child or someone who won't follow your directions, you can try using backlight to reduce the amount of light hitting the glasses.
If you can't avoid the glare in the photo, you can try removing it with photo editing software. There are many options available, including free tools like Fotor and paid tools like Adobe Photoshop. These programs offer various features to remove glare, such as the Lasso tool, Clone Stamp tool, Brush tool, and AI-powered glare removal.
- Select the glare: Use a selection tool like the Lasso tool to select the glare on the glasses.
- Create an adjustment layer: Go to the Layers panel and create an Adjustment Layer.
- Adjust brightness and darkness: Right-click on the new layer and select Levels. Adjust the sliders to make the glare less noticeable.
- Duplicate the lens: Once you've corrected the glare in one lens, select and duplicate the pixels.
- Transform and place the lens: Press Ctrl+T (Command+T on Mac) to horizontally transform the copied selection. Then, move the glare-free lens over the existing lens in the image. You may need to adjust the opacity to ensure a perfect overlay.
Alternatively, you can use the Clone Stamp tool to take pixels from one part of the image and paint over the glare. This is useful for particularly bright patches of glare that require fine-tuning.
The FBI and Your Camera: Privacy Concerns
You may want to see also

Merging two images
There are several photo editing applications available that can help you merge two images and remove camera flash from glasses. Here is a step-by-step guide on how to achieve this using a combination of techniques:
Step 1: Choose Your Images
Select two images that you want to merge. Ideally, one image should be well-lit and free of flash glare, while the other image should be a portrait with glasses exhibiting flash glare. This way, you can retain the lighting and composition of the first image while removing the glare from the glasses in the second image.
Step 2: Import Images into a Photo Editing App
Download and install a photo editing application that offers layer-based editing and glare removal tools. Some popular options include PhotoDirector, Fotor, and Picsart. Import both images into the app, opening them in separate projects or layers.
Step 3: Remove Glare from Glasses
Use the glare removal tool within the app to eliminate the flash glare from the glasses in the second image. This process may involve selecting the removal tool, adjusting the brush size, and then painting over the glare on the glasses. Fine-tune the brush size and intensity to ensure precise removal.
Step 4: Combine the Images
Once the glare is removed from the second image, you can merge the two images together. Select the well-lit image as your base layer and add the glare-free portrait as a new layer on top. Adjust the opacity and positioning of the top layer to align the two images seamlessly.
Step 5: Fine-Tune and Save
Make any additional adjustments to the merged image, such as enhancing lighting, colours, or contrast to ensure a natural blend. Finally, save your work in your preferred file format, such as PNG or JPG.
By following these steps, you can effectively merge two images while removing camera flash from glasses. This technique allows you to retain the desired lighting and composition of one image while correcting the glare issue in the other, resulting in a polished and professional-looking final product.
Roomba's Vision: Understanding the World Through a Robot's Eyes
You may want to see also
Frequently asked questions
The best way to prevent camera flash from reflecting on glasses is to avoid having the person face the light directly. Move their head slightly away from the light source or tilt their chin down a little.
PhotoDirector is a popular photo editing app available for both Android and iOS devices. It offers AI-powered glare removal and is highly effective in removing glare from glasses.
First, download PhotoDirector from the Google Play Store or the App Store. Then, import the photo you want to edit. Tap "Tools" and select the "Removal" tool. Manually adjust the removal area to ensure precise glare removal. Finally, save and share the edited photo.
In Photoshop, you can use the Lasso tool to make a freehand selection of the glare and then create an adjustment layer to reduce its brightness and contrast. Alternatively, you can use the Clone Stamp tool to cover up the glare by painting over it with pixels from a glare-free area of the image.
Yes, MyEdit is an online tool that allows you to remove glare from photos. Simply log in to the MyEdit website, drag and drop your photo, adjust the brush size, and brush over the light glare on the glasses.


