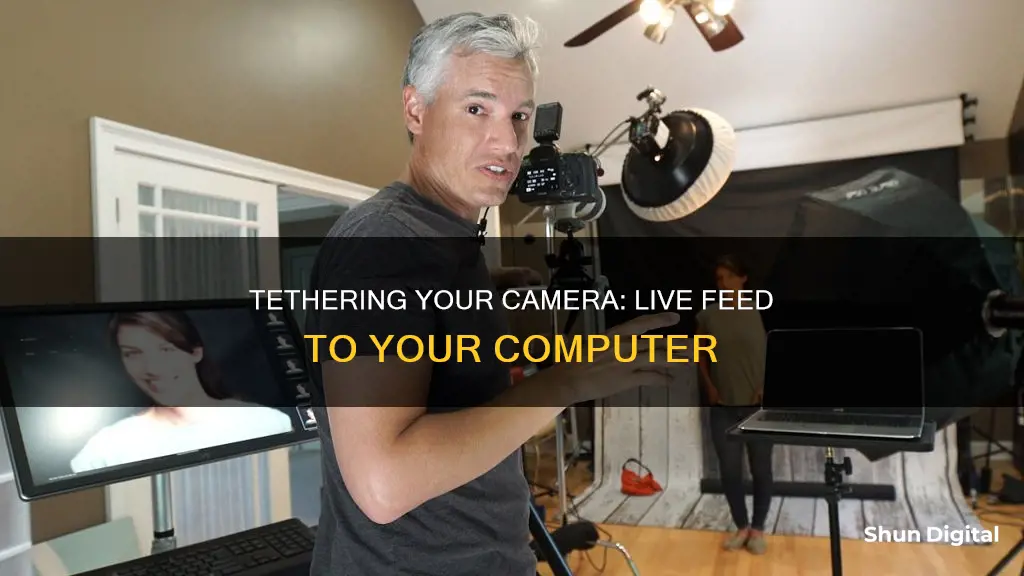
Tethered photography is a process that involves connecting your camera to a computer, tablet, or smartphone using a cable or wireless app. This allows you to instantly view your images on a larger screen as you capture them, making it easier to spot issues with focus, lighting, or composition. To get started with tethered photography, you will need a camera capable of instant image transfer, a compatible cable or wireless connection, tethering software, and a computer or tablet with a large monitor.
| Characteristics | Values |
|---|---|
| Connection Type | Wired or Wireless |
| Connection Cable | USB, FireWire, HDMI |
| Connection App | Wireless App |
| Image Transfer | Instant |
| Image Storage | Computer or Tablet |
| Image Format | RAW or JPEG |
| Image Resolution | Full |
| Camera Control | Remote |
| Camera Settings | Adjustable |
| Camera Shutter | Remotely Triggered |
What You'll Learn
- Wireless tethering: Connect your camera to your computer or tablet via Wi-Fi
- Wired tethering: Use a USB cable to connect your camera to your computer
- Tethering software: Use Lightroom or Capture One to adjust camera settings and take photos
- Camera requirements: Ensure your camera supports instant image transfer and has the necessary output port
- Computer requirements: Your computer must have a compatible port and at least 2GB of RAM
![]()
Wireless tethering: Connect your camera to your computer or tablet via Wi-Fi
Wireless tethering is a great way to connect your camera to your computer or tablet without the hassle of cables. Here's a step-by-step guide to help you get started:
Step 1: Check Your Camera's Wi-Fi Capabilities
Firstly, you need to check if your camera supports Wi-Fi connectivity. Most newer cameras have built-in Wi-Fi, which allows for wireless tethering. This feature enables you to connect your camera directly to your phone, tablet, or computer without any physical cables.
Step 2: Download a Tethering App
To wirelessly tether your camera to your device, you'll need a tethering app. There are several options available, such as CamRanger, which is a popular choice for photographers. These apps typically provide an easy way to connect your camera to your device and offer various features to enhance your photography experience.
Step 3: Connect Your Devices
Once you have your tethering app installed, it's time to connect your camera to your computer or tablet. Follow the instructions provided by your chosen app. Usually, you'll need to connect your camera to the app, which then creates a wireless network for your other devices to join. Make sure your computer or tablet is connected to the same wireless network.
Step 4: Adjust Camera Settings
After establishing the connection, you can now adjust your camera settings remotely from your computer or tablet. This includes changing exposure settings, turning on Live View, and adjusting focus and white balance. You can also fire the camera shutter remotely, capturing images that are instantly transferred to your device.
Step 5: Preview and Edit Your Images
One of the biggest advantages of wireless tethering is the ability to preview your images on a larger screen. This allows you to zoom in on details and make adjustments as needed. You can also edit your images directly on your computer or tablet, applying changes and presets to enhance your photographs.
Remember, wireless tethering offers convenience and freedom of movement without the constraints of cables. However, it may have slower transfer speeds compared to wired tethering, so consider your specific needs when choosing a tethering method.
ZS50: In-Camera Charging Supported?
You may want to see also
![]()
Wired tethering: Use a USB cable to connect your camera to your computer
Wired tethering is a reliable way to connect your camera to your computer. It involves using a USB cable to establish a physical connection between the two devices. Here's a step-by-step guide on how to set up wired tethering:
Step 1: Get the Right USB Cable
First, you need to get a USB cable that is compatible with your camera and computer. Different cameras have different USB ports, so check your camera's USB port type. Common types include Mini-A, Mini-B, Type C, and Micro B. The cable that comes with your camera might be too short for tethering, so consider purchasing a longer cable, ideally 15 feet or longer.
Step 2: Connect the Camera and Computer
Turn off your camera. Use the USB cable to connect the camera to your computer. Then, turn on the camera. If your camera has a menu option for "Remote Shoot (PC Remote)" or similar, select that option. Otherwise, you may need to select specific settings manually, such as "MENU -> (Setup) -> [USB] -> [USB Connection Mode] -> [Remote Shooting]."
Step 3: Launch Remote Shooting Software
On your computer, launch the remote shooting software provided by your camera manufacturer. This could be called "Remote" or something similar. If you don't have this software, you may need to download it from the manufacturer's website. Once launched, the software should detect your camera.
Step 4: Select Your Camera in the Software
In the software, look for a device selection window and select your camera from the list. If your camera doesn't appear, try clicking the "Refresh" button. If you're using a wired LAN connection, you may need to enter access authentication information, such as a username and password.
Step 5: Adjust Camera Settings
Depending on your camera and software, you may be able to adjust various settings directly from your computer, such as shutter speed, aperture, ISO, and white balance. Play around with these settings to get the perfect shot.
Step 6: Start Shooting
Once you're happy with the settings, you can start shooting! You can trigger the shutter button directly from your computer or use the physical shutter button on your camera. The photos will be saved directly to your computer, and you can view them in real-time on your computer's larger screen.
Wired tethering is a straightforward way to connect your camera to your computer for remote shooting. It offers a reliable and secure connection, allowing you to capture high-resolution images and view them on a bigger screen.
Charging Your Gear 360: A Quick Guide to Powering Up
You may want to see also
![]()
Tethering software: Use Lightroom or Capture One to adjust camera settings and take photos
Tethering software allows you to adjust your camera settings and take photos from your computer, tablet, or smartphone. Adobe Lightroom and Capture One are two popular tethering software options.
Lightroom Tethering
Lightroom is a popular choice for tethering as it is accessible to more photographers than Capture One. To tether your camera to Lightroom, first turn off your camera and connect it to your computer with a USB cable. Then, open Lightroom and select "File > Tethered Capture > Start Tethered Capture". In the Tethered Capture Settings dialog box, enter a session name, select a file naming template, pick a file destination, and apply metadata and keywords. Once you click "OK", a narrow control panel and a library where your photos will appear should be visible.
Lightroom also offers the ability to turn on Live View, which is compatible with select Canon and Nikon cameras. This feature lets you see what your camera is seeing in real time. You can also adjust your camera settings manually, such as the shutter, aperture, and ISO settings, directly from the computer.
Capture One Tethering
Capture One has long been the industry standard for fast and reliable capture directly from your camera to your computer. It offers extensive camera control, including autofocus control and manual focus override, as well as remote camera control. It also provides Live View support and wireless (Wi-Fi) tethering for Canon, Sony, Nikon, and Fujifilm cameras.
To begin tethering with Capture One, simply plug your compatible camera into the software and start capturing. Before starting your tethered shooting session, ensure that your camera brand is the only option selected in the Capture tab in the Capture One Pro Preferences. This ensures that the different SDKs do not interfere with each other.
Understanding Tapo Camera's Home and Away Modes
You may want to see also
![]()
Camera requirements: Ensure your camera supports instant image transfer and has the necessary output port
To live tether your camera to a computer, you need to ensure your camera supports instant image transfer and has the necessary output port.
Most DSLR cameras have an output port (USB, FireWire, HDMI, etc.) that enables image transfer, but not all support tethering. Be sure to check your camera manual to confirm that it's capable of tethering and identify which types of images it's designed to transfer—JPEG, RAW, or both.
Look for phrases like "Direct Image Transfer" and "Instant Image Transfer" in your camera manual, as well as any references to tethering. Some camera models support Parallel File Writing, allowing images to be written simultaneously to both the memory card and the tethered computer or tablet. As of 2016, Canon was the only manufacturer offering this solution.
If you're using a Sony, Nikon, or another brand that doesn't offer parallel file writing, you may need to use a workaround. Some cameras require their manufacturers' proprietary software to tether, while others can use familiar tethering software solutions.
Regarding output ports, the type of USB port can vary from camera to camera. Older devices may feature a Mini-A or B port, while newer models may have a Type C or Micro B port. Be sure to check your camera's USB port to identify the compatible cable type.
Additionally, some modern cameras have built-in Wi-Fi for wireless tethering, offering an alternative to physical connections.
Understanding Camera Focus and the Beauty of Blur
You may want to see also
![]()
Computer requirements: Your computer must have a compatible port and at least 2GB of RAM
To live tether your camera to your computer, you will need to ensure your computer meets the following requirements:
Ports
Your computer must have a port that is compatible with your camera. The type of port will depend on the model of your camera. Older devices may feature a Mini-A or B port, while newer versions may have a Type C or Micro B port. Check your camera's manual or the side of your camera to see which port type is compatible with your device.
USB Cable
Nearly all cameras come with a USB cable that can be used for tethering. The cable that comes with your camera may be too short, so you may need to purchase a longer one, with most professionals opting for cables at least 15 feet (4.6 m) long.
RAM
Your computer must have at least 2GB of RAM to live tether your camera.
Tethering Software
While your camera likely comes with basic tethering software, you may want to consider a more professional option if you plan to tether your camera often. Popular options include Capture One and Adobe Lightroom, which both offer a range of features for shooting tethered.
Surveillance Cameras in Movie Theaters: Are We Being Watched?
You may want to see also
Frequently asked questions
Tethered photography is the process of connecting your camera to a computer, tablet, or smartphone via a cable or wireless connection. Once connected, any new images captured by the camera are passed directly to the connected device and can be saved in a designated folder.
Tethered photography allows you to instantly view your images on a larger screen, making it easier to spot issues with focus, lighting, posing, or composition. It also enables you to adjust camera settings and trigger the shutter remotely. Additionally, you can collaborate more effectively with clients, assistants, and other team members by sharing and reviewing images in real-time.
You will need a camera capable of instant image transfer, a compatible cable (such as a USB or FireWire cable) to connect your camera to your computer or device, and tethering software to support tethered capture. Some cameras come with built-in tethering software, or you can purchase specialised software.
First, ensure your camera is turned off. Connect one end of the cable to your camera and the other end to your computer or device. Then, turn on your camera. Open your chosen tethering software and follow any specific instructions provided. You may need to adjust settings such as file naming, image destination, and metadata.
There are several software options available for tethered photography, ranging from free to paid options. Some popular choices include Adobe Lightroom, Capture One, and Canon EOS Utility. These software programs offer various features, such as remote camera control, image editing, and organisational tools.