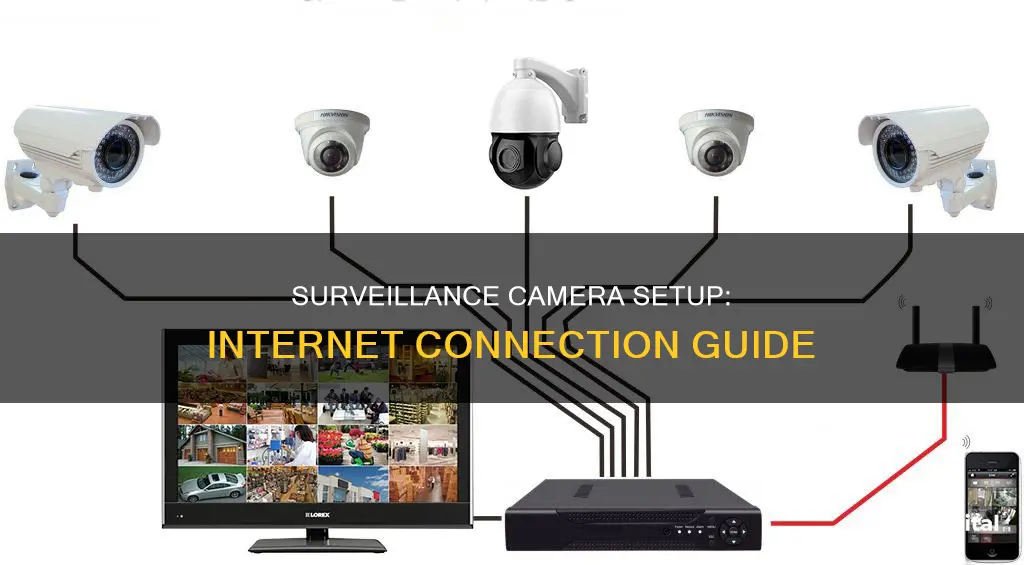
Connecting a surveillance camera to the internet is a straightforward process that can be done in a few simple steps. Here is a basic guide on how to get your surveillance camera online:
First, you need to understand the basics of computer networking and how it applies to your camera system. You should also know the difference between a modem and a router, as both play a crucial role in the internet connection process. A modem provides your IP address or Wide Area Network (WAN), while a router connects your devices to the modem's internet connection. It's important to note that modems don't have a built-in firewall, so if you're connecting your camera directly to the modem, be sure to change the password to secure your connection.
Next, determine the IP address of your camera. Each device on your network has a unique IP address, and you'll need to know this address to configure your camera's network settings. You can usually find the IP address in the camera's networking or configuration settings.
Once you have the IP address, connect your camera to your Local Area Network (LAN). Plug an Ethernet cable into the camera's Ethernet socket, and then plug the other end into your router. If your camera doesn't have Wi-Fi, this may be the only step needed for the network configuration.
Now, configure your camera's Wi-Fi settings. Use a web browser to access the camera's web interface by entering its IP address and port number into the address bar (e.g. http://192.168.0.20:81). Here, you can set up your Wi-Fi network name and password, as well as any other necessary configurations.
Finally, test your camera to ensure it's working properly. Try accessing the camera feed from a different device or network to make sure it's visible and functioning as expected.
By following these steps, you should be able to successfully connect your surveillance camera to the internet and begin monitoring your property remotely.
| Characteristics | Values |
|---|---|
| Camera Type | IP cameras or PoE cameras |
| Power Source | Power over Ethernet (PoE) or 12V DC power adapter |
| Connection | Wired or wireless |
| Software | Surveillance software e.g. Reolink Client |
| Configuration | IP address, subnet mask, router's IP address |
| Display | Computer monitor or mobile device |
What You'll Learn
![]()
Powering the camera
There are several ways to power a surveillance camera. The most suitable method for your camera will depend on the type of camera you have and your intended setup.
Power over Ethernet (PoE)
If your camera supports Power over Ethernet, you can power it by connecting it to a PoE-enabled router or switch using an Ethernet cable. This method allows for both power and data transmission over a single cable.
Power Adapter
If your camera came with a power adapter, you can plug it into a power outlet to receive electricity. This option is suitable if there is an outlet near your camera.
Battery Power
Some wireless security cameras are battery-powered, eliminating the need for power cables. These cameras may have rechargeable or replaceable batteries. This option offers flexibility in terms of installation, as you don't need to worry about proximity to a power source. However, you will need to replace or recharge the batteries periodically.
Solar Power
Wireless security cameras can also be solar-powered. This method involves using a solar panel to collect solar energy, which is then stored in the camera's rechargeable batteries. Solar-powered cameras are ideal for remote locations with weak or no WiFi connectivity.
Direct Current (DC) Power Cable
If you have a DC-powered camera, you will need to connect it to a power source using the appropriate DC power cable. This may involve running the cable from the camera to a nearby power outlet or a video recorder that transmits power back to the camera.
When powering your surveillance camera, it is important to consider the distance between the camera and the power source, as well as any specific power requirements, such as voltage and current ratings.
Yi Home Surveillance Camera: Battery-Powered?
You may want to see also
![]()
Connecting to a router
Connecting a surveillance camera to a router is a straightforward process, but it does require some basic networking knowledge. Here's a detailed guide on how to connect your surveillance camera to a router:
Step 1: Understand the Requirements
Before you begin, it's important to know that all professional wireless or Wi-Fi surveillance cameras need a wired power connection, typically through a power adapter plugged into a 110V–220V socket. Additionally, wireless cameras are different from wire-free cameras. For a stable connection, it is recommended to use a powerful router or Access Point (AP) to ensure strong Wi-Fi connectivity.
Step 2: Prepare the Equipment
Make sure you have the necessary equipment. This includes a power adapter for the camera, a network cable (Ethernet cable), and a router. If your camera uses Power over Ethernet (PoE) technology, you will also need a PoE injector or a PoE switch.
Step 3: Connect the Camera to the Router
Use the network cable to connect the camera to the router. Plug one end of the cable into the Ethernet port on the camera and the other end into the router. If you are using a PoE injector or switch, follow the specific instructions provided with those devices.
Step 4: Configure the Camera's Wi-Fi Settings
Once the camera is connected to the router, you need to configure the camera's Wi-Fi settings. This typically involves selecting the correct Wi-Fi network and entering the password. Refer to your camera's user manual for detailed instructions on how to access the camera's settings.
Step 5: Disconnect the Network Cable
After the camera is configured and connected to your Wi-Fi network, you can disconnect the network cable. At this point, your camera should be connected to the router wirelessly.
Step 6: Install Surveillance Software (Optional)
If you plan to view the camera feed on your computer, you may need to install surveillance software. Some popular options include Reolink Client and ConfigTool. Launch the software and set up configurations for camera functions.
Step 7: Access the Camera Remotely
To access the camera feed from another computer that is not on the same network, you will need to input the camera's unique identifier (UID or IP address) into the software to remotely access the camera. This will allow you to view the camera feed from anywhere in the world.
Focusing Medium Format Cameras: A Quick Guide to Sharp Images
You may want to see also
![]()
Finding the camera's IP address
To find your surveillance camera's IP address, you can use one of several methods, depending on your camera's manufacturer, your own technical expertise, and your preferred way of working.
Using the Manufacturer's Tool
Each camera manufacturer provides its own tools that are supposed to work with their brands only. For example, Hikvision uses the SADP tool to detect its cameras and recorders. You can download the relevant software for your camera, install it, and then run it to scan your local network and list any devices found.
Use a Third-Party IP Scanner
You can use a third-party IP scanner to scan your network and list all the devices found, including your camera. There are many free IP scanners available, including Advanced IP Scanner and Angry IP Scanner, which are both available for Windows and Mac.
Find the IP Address via the Router's Settings
You can also find your camera's IP address by checking the devices connected to your router. Log in to your router's configuration page using a web browser and look for the section that displays DHCP clients or attached devices. You can then match the MAC address of your camera with its corresponding IP address listed.
Using the Camera's UPnP Features
If your camera has the UPnP protocol enabled, you can use software or an app on your smartphone to run on your network and look for devices that use UPnP.
Using an IP Address Finder Tool
An IP camera, like any other network device, can be located on the network using a generic IP address finder tool. Once you run the tool, it will scan your local network and list all the devices connected to the internet and their IP addresses.
Using the ARP Command for Local Network Devices
You can use the ARP command in Command Prompt to find the IP address of your camera. Enter "arp -a" in Command Prompt to display a table of IP addresses and their corresponding MAC addresses. You can then scan the table to locate the MAC address associated with your camera and identify its assigned IP address.
Scanning for IP Cameras with Dedicated Mobile Apps
You can also use dedicated mobile apps designed for scanning and detecting wireless IP cameras. These apps allow you to conveniently identify and access your WiFi IP security camera without the need for complex configurations.
Checking for Physical Labels on the Camera
You can also check your camera for any physical labels or stickers that display important information such as the model number, serial number, or even an assigned static IP address.
Reviewing DHCP Server Leases on Your Network
To ensure seamless network connectivity for your IP security camera, you can review the DHCP server leases on your network. Access your router's configuration page or settings menu to view active DHCP leases, which represent dynamic IP addresses assigned to connected devices, including your camera.
Using Command Prompt for IP Scanning
Using Command Prompt for IP scanning is another option for identifying the IP address of your camera. By using commands like "ipconfig" or "arp -a", you can streamline the process of scanning local network devices and retrieving essential information.
Employing Network Scanning Tools
Network scanning tools such as Nmap can be used to discover devices on your network, including IP security cameras. By using Nmap, you can gain insights into all devices connected to your network and their configurations.
Accessing Your Router's Device List
Accessing your router's device list is another crucial step in identifying the IP address of your camera. Log in to your router's configuration page and look for the section that displays DHCP clients or attached devices. Match the MAC address of your camera with its corresponding IP address listed to pinpoint the specific IP address assigned to your camera.
Raw Files: Easy Edits, Better Photos
You may want to see also
![]()
Configuring Wi-Fi
Step 1: Connect Your Camera to the Network
Use an Ethernet cable to connect your camera to your router. This initial step establishes a wired connection between your camera and your local network. Ensure that your camera is powered on and booted up before proceeding.
Step 2: Find Your Camera's IP Address
To configure your camera's Wi-Fi settings, you need to know its IP address. You can find this information in several ways:
- Use a utility program from your camera's vendor to locate the camera. Ensure that Dynamic Host Configuration Protocol (DHCP) is enabled so that your camera obtains an appropriate IP address from the router.
- Refer to your router's configuration page to find the assigned IP address of your camera. You can unplug and then plug in the Ethernet cable to identify which device on the list corresponds to your camera.
Step 3: Access the Camera's Web Interface
Using a web browser, visit your camera's web UI by entering its IP address and port (e.g., http://192.168.0.20:81). Omit the port if your camera uses the default HTTP port 80. Some cameras use a different port, such as port 81, so refer to your camera's specifications if needed.
Step 4: Configure Wi-Fi Settings
On your camera's web interface, navigate to the Wi-Fi configuration page. Here, you will set up your camera to connect to your Wi-Fi network. Provide the network name (SSID) and password for your Wi-Fi network. Ensure that your camera is set to the same frequency as your router (2.4GHz or 5GHz).
Step 5: Finalize the Configuration
Once you have entered the Wi-Fi details, save the settings and disconnect the Ethernet cable from your camera. Your camera should now be connected to your Wi-Fi network.
Optional: Fix the IP Address
If your camera has a dynamically assigned IP address, it may change after a power cycle or router reboot. To ensure a stable connection and avoid IP conflicts, you can set a static IP address for your camera. Consult your camera's manual or a networking professional to guide you through this process.
Cleaning Exploded Camera Batteries: Step-by-Step Guide
You may want to see also
![]()
Setting a static IP address
Step 1: Find the Router's LAN IP Address:
The Router's LAN IP address, also known as the Gateway IP address, is typically found on a label underneath or on the back of your router. This address serves as the gateway to your network. In most cases, you can set up your camera with an IP address that falls within the same range as the router's LAN IP address. For example, if your router's LAN IP address is 192.168.1.1, you can set your camera's IP address to 192.168.1.100, where the last numbers can be modified within the range of 2 to 253.
Step 2: Set Up a Static IP Address on the Camera:
There are two common methods to achieve this:
Method 1: Use the Camera's Firmware or Software:
- Access the camera's firmware or software settings by logging in to its web interface using a web browser. You may need to use specific browsers, such as Internet Explorer, for video display.
- Navigate to the "Config" or "Setup" menu, then select "TCP/IP" or "Network".
- Change the radio button selection from "Obtain an IP address automatically" to "Use the following IP address".
- Enter the desired static IP address for your camera, ensuring it falls within the range of your network scheme but does not conflict with other devices.
- Save the changes, and your camera will now be configured to always request this IP address from the router.
Method 2: Use a Vendor's Utility Program or Third-Party Software:
- Download and install a utility program or third-party software from the camera vendor's website or CD. Ensure that it is compatible with your camera model.
- Run the program to scan your network and locate your camera.
- Depending on the software, you may need to disable virtual network drivers to ensure proper operation.
- Locate your camera in the list of devices and navigate to its network configuration settings.
- Uncheck the box for "Obtain IP from DHCP" or "Obtain IP from Server".
- Input the desired static IP address and any other required information, such as the camera's username and password.
Step 3: Configure Additional Network Settings:
After setting the static IP address, you will need to configure other network settings to ensure your camera functions smoothly. These settings include:
- Subnet Mask: This is typically set to 255.255.255.0 and determines the range of IP addresses available on your network.
- Default Gateway: This is usually the IP address of your router and is set as the default gateway for your camera.
- DNS Servers: These are the Domain Name System servers provided by your Internet Service Provider (ISP) or found on your router's web interface.
By following these steps, you will successfully set a static IP address for your surveillance camera, enhancing the security and stability of your network connection.
The Evolution of Camera Bodies: Materials and Design
You may want to see also
Frequently asked questions
A modem gives you your IP address or Wide Area Network (WAN) and transmits this information to your router, which is used to connect your devices to the modem's internet connection.
First, check the compatibility between your camera and monitor by looking at their specifications and ports. Then, connect your camera to its power source and use an HDMI or VGA cable to connect it to the monitor. Power on both devices and, if necessary, adjust your monitor settings to display the camera feed.
First, power your camera and connect it to your network or computer. Then, configure your camera by assigning it a unique IP address that matches your router's IP address scheme.