Focusing a camera is an essential aspect of photography, and getting it right can make or break a shot. Focusing can be easy or difficult depending on the subject, and it is important to understand the different techniques and settings to achieve the desired result. While autofocus is a convenient option, there are times when manual focus is required or preferred. By adjusting the focus ring, the aperture, and the distance between the camera and the subject, photographers can ensure their subject is in sharp focus, with a blurred background if desired.
What You'll Learn
![]()
Understand the plane of focus
The plane of focus (PoF) is an imaginary two-dimensional plane in front of the camera at the point of focus. It is the region in space with the potential to be as sharp as possible in a photo.
Some people find it useful to think of the PoF as a window intersecting with the scene being photographed. Any object in the photo that touches this window is said to be "in focus". When you move the plane forward and backward to achieve your intended image, usually with your subject at maximum sharpness, that's called focusing.
The PoF represents the theoretical plane of sharpest focus and lies in the depth of field. It lies parallel to the sensor and perpendicular to the optical axis. The PoF should not be confused with the focal plane, which is inside the camera.
The definition of focal plane is the distance from the camera at which the sharpest focus is attained. A useful visualisation is to imagine a piece of tape stretched straight across an open field from left to right, with the subjects standing directly on the tape. They will all be in focus, even at a low f-stop like f1.4. If one of them steps in front of or behind the tape, they will be out of focus because they have stepped out of the focal plane.
As you increase the f-stop number, the tape becomes wider. You must also be aware of your position relative to your subjects when shooting at low f-stops. You need to face your subjects directly, as moving off to the side will skew the straight line of the focal plane.
DNG and ARW: Adobe's Camera Raw Compatibility Mystery
You may want to see also
![]()
Use manual focus
Manual focus is a useful skill to have as a photographer, as it gives you more control over your images. It is particularly helpful when your camera struggles to focus automatically, such as in low-light or low-contrast situations, or when there are obstructions between you and the subject.
To use manual focus, you need to locate the focusing mode switch on your camera or lens, which is usually labelled "AF/MF", and switch it to "MF". Then, find the focus ring, which is often near the middle of the lens barrel. Look through your camera's viewfinder and twist the focus ring to one side. You should see the focus shift as different areas of the scene go in and out of focus. Keep twisting the ring until your subject comes into focus.
Manual focus can be tricky to master, as it requires practice and dexterity. It is also not suitable for moving subjects or fast-paced scenarios. However, it is a valuable skill that will allow you to capture sharp and focused images, even in challenging situations.
- Use your camera's Live View function to preview the shot and adjust focus while zoomed in.
- Narrow the aperture to give yourself a larger margin of error.
- Check the results of your manually focused images on the LCD screen to ensure they are sharp.
- Use manual focus in low-light situations, as autofocus tends to struggle in these conditions.
- Use manual focus for macro and close-up photography, as autofocus often locks onto the wrong parts of the scene.
- Consider using manual focus for street photography. This technique, called zone focusing, involves dialling in a narrow aperture and manually focusing in advance, allowing you to capture moments quickly and effortlessly.
- Use manual focus when creating creative effects, such as intentional camera movement or deliberate misfocusing. This gives you more control over the point of focus and ensures your camera cooperates with your artistic vision.
Cleaning Camera Battery Terminals: A Step-by-Step Guide
You may want to see also
![]()
Adjust the depth of field
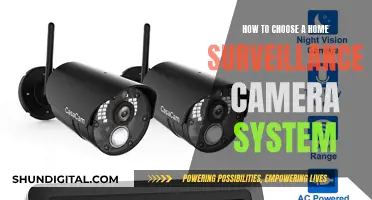
Adjusting the depth of field is a foundational concept in photography. The depth of field is the zone within a photo that appears sharp and in focus. There are three main factors that determine the depth of field in an image: aperture, the distance between the subject and the camera, and lens focal length.
Aperture Settings
Aperture is a hole in your lens that lets light pass through to the image sensor. A larger aperture lets in more light and a smaller aperture lets in less light. Aperture also plays a crucial role in depth of field. Adjusting the aperture is the easiest way to control the depth of field in your images.
If you want a shallower depth of field, select a smaller aperture number. For a deeper depth of field, choose a larger aperture number. On your camera, aperture settings are represented by "f-stops". An f-stop will look like f/2.8 or f/11. Selecting an f-stop of f/2.8 will produce a shallow depth of field, while an f-stop of f/11 will produce a deep depth of field.
It's important to note that adjusting the aperture to achieve your desired depth of field may affect the lighting of your image. To compensate for this, you may need to adjust your shutter speed accordingly. If you increase the aperture, decrease the shutter speed, and vice versa.
Distance Between Camera and Subject
Another way to affect the depth of field is to change the distance between the subject of your shot and your camera. For a shallow or narrow depth of field, move closer to your subject. To increase the depth of field, move farther away from the subject.
This technique often works best with a lens that has a wide aperture and does not zoom, also known as a fast prime lens. With these lenses, you can achieve beautifully blurred backgrounds and create bokeh, or out-of-focus elements in your background that look like illuminated dots of light.
Understand the Focal Length of Your Lens
Focal length is another important concept to understand when adjusting the depth of field. The focal length of a lens describes its ability to magnify a distant subject. It is the length between the sensor in your camera and the area of your lens where light rays converge to create a sharp image.
Different lenses have different focal lengths, usually measured in millimetres. For example, an ultra wide-angle lens may be 14-24mm, while a telephoto lens might offer a focal length of 70mm to 300mm.
When you set your focal length longer, or zoom in on a subject, you can achieve a shallower depth of field. For a deeper depth of field, choose a shorter focal length lens.
The Magic Behind Camera Glass Manufacturing
You may want to see also
![]()
Focus on the eyes
Focusing on the eyes is a traditional rule in portrait photography. The eyes are often the focal point of a portrait, and by focusing on them, you ensure that they are sharp and stand out in the image. However, this rule can be broken in certain situations, especially when moving further away from your subject.
- Focus between the eyes: Rather than focusing on a single eye, focus on the space between the eyes to ensure that both eyes are in focus. This is especially important when shooting with a wide aperture, such as f/2.0, as the depth of field is shallower.
- Ensure eyelashes are visible: A good indicator of sharp focus on the eyes is the ability to see and count individual eyelashes. If you can count the eyelashes, your focus is sharp.
- Consider the distance and framing: As you move further away from your subject and include more of their body in the frame, the eyes become less prominent. In these cases, you can focus on the face rather than the eyes, as a slight softness in the eyes may not be noticeable, especially when viewing the image at a smaller size or on social media.
- Use autofocus or manual focus: Most modern cameras have autofocus capabilities, which can be useful for quickly acquiring focus on the eyes. However, in certain situations, such as low-light conditions, manual focus can give you more control and allow you to fine-tune the focus.
- Practice and experiment: Focus is a creative decision, and there are no hard and fast rules. Experiment with different focus points and techniques to find what works best for the specific portrait you are capturing.
Keep Your Camera Charged: Tips to Conserve Battery Power
You may want to see also
![]()
Use live view mode
Live View mode is a feature that allows you to preview the image on your camera's LCD screen or electronic viewfinder before taking a shot. This mode is especially useful when you need to focus the camera without a subject or in low-light situations, as it provides a magnified view of the image, revealing more details than an optical viewfinder.
To activate Live View mode, locate and press the button on your camera that typically features a symbol of a camera and a rectangle. The location and name of this button may vary depending on your camera model, so refer to your camera's manual if you are unsure. Once Live View mode is activated, you can adjust various settings, such as brightness, histogram, and grid lines, to suit your preferences and shooting conditions.
When using Live View mode for focusing, start by selecting the focus mode (manual or autofocus) and the focus area (single or continuous focus). You can also adjust the size and position of the focus point or zone on the screen or viewfinder. If you are using autofocus, point your camera at the subject and press the shutter button halfway to activate it. For manual focus or to fine-tune the focus, press the magnify button (often marked with a plus sign) to increase the magnification level. Adjust the focus ring on your lens until the subject appears sharp and clear. You can also utilise the focus peaking feature, which highlights in-focus areas with colours like red, green, or blue, to aid in achieving precise focus. Once you are satisfied with the focus, fully press the shutter button to capture the image.
Using Live View mode for focusing offers several benefits. It provides greater detail and contrast than an optical viewfinder, allowing you to magnify the image and fine-tune the focus, especially for small or distant subjects with low contrast. Live View also grants you more control and flexibility over the focus mode, area, and adjustments. Additionally, it displays the exact exposure, white balance, and depth of field, enabling you to make any necessary adjustments.
However, it's important to consider some drawbacks of Live View mode. It consumes more battery power than an optical viewfinder, and cameras with slower processors or low-resolution screens may experience lag or delay in image display. Additionally, the performance of the autofocus system may vary depending on your camera model and settings. In some cases, cameras may employ a slower or less accurate autofocus method in Live View mode or may not support certain autofocus features like eye or face detection. Furthermore, Live View may not perform optimally in extremely bright or dark conditions, as it can lead to overexposure or underexposure of the image or introduce noise or artifacts.
Focusing Camera with C-Mount Trinocular Microscope: Easy Guide
You may want to see also
Frequently asked questions
First, switch your lens to manual mode. You'll then need to twist the focus ring until your subject is sharp. You can use the LCD screen to fine-tune the focus.
The autofocus function is best for moving objects. However, if you want to focus manually, you can try moving in sync with your subject. Set the distance you'd like to maintain, focus, and then get your subject to move towards or away from you, maintaining the same distance by moving backward or forwards with them.
Make sure you keep the camera at the same distance from your subject once you've set the focus. If your subject moves outside the range noted on the focus ring, they will become unfocused.
Use the largest aperture setting to blur the background. A smaller f-stop number, like f2, corresponds with a larger aperture. You can also try putting more distance between your subject and the background.